Navigation: Loans > Loan Screens > Check Printing Screen Group >
Important: Starting in CIM GOLD version 7.9.2 the LIP and Reserve Checks screen will no longer be available. Instead, only this Checks screen will be displayed under Loans > Check Printing in CIM GOLD. This screen takes the place of the LIP and Reserve Checks screen. It's a one-stop place to print all your loan checks (excluding GOLDTrak PC checks).
Additionally, this new screen has the added functionality to print funding checks from API's and GOLD Loan Gateway boarded into CIM GOLD. Funding checks are not available for GOLDTrak PC-originated loans; only for loans boarded from APIs/GOLD Loan Gateway.
If you are using CIM GOLD versions older than 7.2, see the LIP Checks and Reserve Checks help instead. (Funding checks are not available through those screens.) |
|---|
|
Note: Nothing can be done on this screen until a valid teller number is indicated in the Check Actions field group. |
|---|
Introduction
The Checks screen allows those with security to print reserve or funding checks to a printer. See the Security topic for more information on how to set up security for users for this screen.
To display check records, enter criteria in the Check Retrieve Parameters field group, then click <Retrieve>. All check records matching those specifications will be displayed in the list view table below the search parameter fields, as shown below:
|
Note: Some institutions can fund checks via ACH through the FPAE record, rather than using this system to fund checks through Accounts Payable. See ACH Funding for more information about this process. |
|---|
For check records to be retrieved on this screen, one of three possible scenarios must occur:
Reserve Check Disbursement records are included on this screen if the check disbursement is scheduled to be processed automatically. The system will automatically create the check disbursement record in the afterhours on the reserve's Pay Date, if the Auto Disbursement box is checked on the Loans > Account Information > Reserves > Account Reserve Detail screen > Reserve Disbursement tab.
•If a checkmark is entered in that field, the system will create a reserve disbursement record on the first working day on or after the reserve's Pay Date. Then when users access the Checks screen, they can view the new reserve disbursement record and print a check to the associated reserve payee. See the Auto Disbursement field description for more information.
•If that field is unchecked, you will need to create the disbursement record manually.
Manual Reserve Checks:
Reserve checks that are manually printed from GOLDTeller (using tran code 440 or 640) cannot be viewed on this screen. If you need to reprint a check for a Reserve Disbursement that was manually created in CIM GOLDTeller (maybe because of a paper jam that ripped the check), you will need to correct the first Reserve Disbursement transaction and then run the transaction again with a new check in CIM GOLDTeller. See Reversing Transactions in CIM GOLDTeller for more information. See Tran Code 440, Reserve Disbursement, in the Transactions manual on DocsOnWeb for more information about those manual transactions.
See also: Reserve system help
|
Reserve excess checks, also known as surplus checks, occur after account analysis is processed on reserve accounts and the account has excess funds. Those excess funds are returned to the borrower via a check. Use the The Surplus Limit field on the Loans > Account Information > Reserves > Reserve Analysis screen > Options, Limits & Loan Fields tab to determine how much of a surplus is required before a check record is created. Any excess of $50 or more must be returned to the borrower, according to RESPA regulations.
Your institution may maintain a small cushion in the reserve account each year after the analysis is run (usually no more than 2 months of reserve payments). Section 10 of the Real Estate Settlement Procedures Act (RESPA) limits the amount of money a lender may require the borrower to hold in a reserve account for payment of taxes, insurance, etc. RESPA also requires the lender to provide initial and annual escrow account statements. Your institution may have specific guidelines of how to process excess checks.
Example: A borrower has an add-on insurance policy as part of their loan. As part of the payment, $50 accumulates in the reserve account for the insurance policy, which is due once a year totaling $600.00. The Reserve Analysis is run before the renewal date, and the reserve account has more than $600. Based on options you set up as part of the reserve analysis on the Reserve Analysis Options screen, the system analyzes whether a check should be created, and if it does, a check record is sent to the Checks screen. An employee then prints the excess check using the Checks screen, and sends it to the borrower.
See the Reserve Analysis and Reserve Analysis Options screens for descriptions on how the system handles surplus or shortage reserve amounts.
Loan History will show that the reserve disbursement payment record was sent using tran code 440 or 640 and teller number 8910 (System Afterhours Transactions).
|
If you use a third-party to originate loans, or you maintain your own website for customers to apply for and submit loan applications, you can use our APIs to board the loans through GOLD Loan Gateway into CIM GOLD for servicing. When loans are approved, they are boarded into CIM GOLD, where a funding check can be created on this screen to be printed and sent or given to the new account owner.
Setting up your website or third-party integration will require help from GOLDPoint Systems developers. We have detailed API documentation to help the third-party or your website developers. Contact GOLDPoint Systems if your institution would like to use this feature.
If for some reason you do not see the funding check in the system, you can manually add a funding check. Use caution when doing this. Make sure that you understand that the loan has not been boarded yet, but it will be in the system eventually. See the Add a Funding Check Record topic for more information. |
Screen Details
Using the Checks screen, you can perform any of the following functions (click the link for more details):
•Print checks already in the system.
oReprint checks due to a paper jam or other reason.
•Add funding check records and then print checks for the new account owner.
•Void checks that have already been printed.
•Print a register listing all checks that were printed.
•Print a Remittance Report for payees.
•Fund a customer's debit card directly (if your institution provides that service).
If your institution uses our Check Reconciliation system, after checks are voided they are sent to the Check Reconciliation system. The Check Reconciliation system tracks the status of checks, such as whether the check is still outstanding; if it's been cleared through the Federal Reserve Bank; if you have issued a stop payment; or if the check has been voided.
•When reserve checks are printed from this screen, they are assigned Source "RSD - Reserve Disbursement Checks" or "XCS - Excess Checks from Reserve Analysis."
•When funding checks are printed from this screen, they are assigned Source "FUN - Funding Checks from Gateway."
See the Check Reconciliation help for more information. |
Before you can print checks using this screen, check formats must be set up with specifications for the checks your institution uses. For most users, this will have been done in advance to using this screen. You will still need to select the proper format from the Format field in the Check Retrieve Parameters field group.
Certain formats can only be used for certain Check Types:
•Check Format 15 is only used for Funding checks. •Check Formats 2 and 4 are only used with Reserve checks. oFormat 2 is for automatic check disbursements. See item 1 above. oFormat 4 is for excess checks generated from Account Reserve Analysis. When the system runs reserve analysis (usually yearly), and the reserve balance after creating reserve disbursements is greater than any options set up, the excess amount in the reserve balance can be sent back to the account owner in the form of a check. See help for the Reserve Analysis and Reserve Analysis Options screens for more information.
If you are responsible for setting up check formats, review the help on the Loans > Check Printing > Check Format Setup screen, and make sure to set up Check Format 15 for funding checks and Check Formats 2 and 4 for reserve checks.
Example: Your institution needs two types of reserve checks depending on who the reserve check is being sent to.
•You name Check Format 2, "Disbursements." That way your users will instantly know to use that check format when printing reserve checks being sent to companies or agents (payees). They would also need to use the correct printer and check stock, so the check is printed correctly.
•You name Check Format 4, "Surplus Check." That way your users know to use that check format when printing surplus reserve checks for account owners when their end-of-year reserve balance is more than options specify. They would also need to use the correct printer and check paper, so the check is printed correctly. |
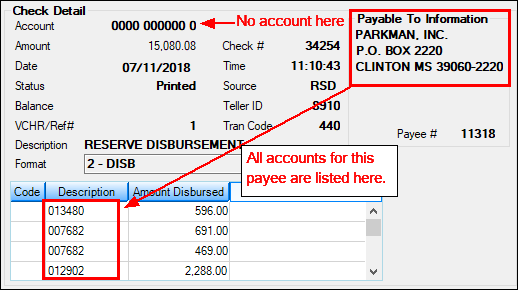
For reserve disbursements where more than one account is tied to a payee, the system will only create one check for that payee but include all the account numbers affected. Once that check is printed, the Check Detail field group will display all accounts tied to that check, as shown below:

There is no limit to the number of accounts that are included on a check stub for one payee. You would need to also ensure that the Check Format is set up appropriately on the Check Format Setup screen to be able to handle all accounts, or make it generic to not include a lot of details to avoid only printing one account's information.
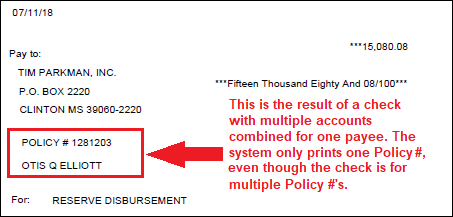
For example, if you were to include the Policy Number field on the check, as shown below, it would only print one Policy Number, even though the check is for multiple policy numbers. Your institution may rarely have instances where multiple accounts are combined on one check. In that case, you may want to include the Policy Number directly on the Check Format. It's up to your institution to best determine which fields should be included on the Check Format.
 Results of Check Format that includes the Policy Number
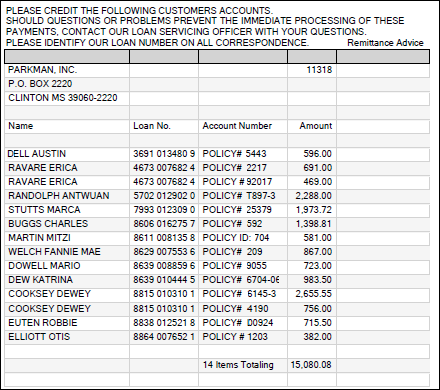
The Remittance Report will print all affected policy numbers. You should print a remittance for payees to send with the check by clicking <Print Remittance>. The system will combine all accounts included on the payment on one Remittance report, specifying who the check payment was for, their policy numbers, and amount to remit, as shown below:
 Check Remittance
|
The following reports are helpful in analyzing reserve information. These reports can be downloaded in GOLDView. Contact your GOLDPoint Systems account manager if your institution would like to set up any of these reports to run. Click the report name to read details about that report in DocsOnWeb.
•Reserve Exception List (FPSRP021): Identifies all loans that have a reserve expiration date in the past. •Reserve Disbursement Posting Journal (FPSRP033): A daily report that identifies reserve disbursements processed. •Reserve Disbursement Paid in Investor Order (FPSRP042): Identifies all reserve 1 and 2 disbursements and sorted by the investor master number. •Reserve Negative Balance Report (FPSRP073): Identifies all loans with negative balances in either reserve 1 or reserve 2. •Reserve Forecast List (FPSRP082): Identifies loans that have reserve expiration dates up to four months ahead of the report date. •Interest On Negative Reserves Report (FPSRP161): Identifies the amount of interest accrued and paid on negative reserve 1 and 2 balances. •Auto Reserve Disbursement (FPSRP306): Identifies all loans for which reserve disbursements were created via the afterhours process. •Reserve Analysis Statement (FPSRP339): Contains projections, identification of all reserve disbursements to be made in the next period, a brief explanation of any deficiency, surplus or shortage, a breakdown of the new payment, a breakdown of the current payment, and a comparison of the prior year’s projection to the current year’s history. •Reserve Analysis Report (FPSRP339): Identifies all loans for which an analysis was performed. |
Reserves
The General Ledger Autopost system is set up to handle all automatic reserve disbursements and reserve excess checks. The Autopost is maintained by your accounting department with the help of GOLDPoint Systems Financial Team. The Autopost handles where funds are pulled from and credited to in correlation with your institution's G/L accounts and certain transactions. See the Autopost overview topic for more information.
Funding Checks
For funding checks, the G/L accounts work slightly differently.
oWhen check records are boarded from Gateway due to a new account being created (tran code 680), the G/L accounts used are designated using a few screens in the Loans system. See Loan Pattern Setup Screen for more information on the steps involved in setting up funding transactions with specific G/L accounts.
oWhen a new check record is created using the <Add Check> function, the system uses the G/L accounts entered on the GOLD Services > Office Information screen > G/L Account tab. Enter the G/L accounts to be used by your institution (or each office) in the provided fields: Funding Check Debit and Funding Check Credit. See the G/L Account tab help on the Office Information screen for more information. |
For more detailed information concerning each of the fields on this screen, see the following field group links:
|
|
Record Identification: The fields on this screen are stored in the FPCK record (Check Printing Utility). You can run reports for this record through GOLDMiner or GOLDWriter. See FPCK in the Mnemonic Dictionary for a list of all available fields in this record. Also see field descriptions in this help manual for mnemonics to include in reports. |
|---|
In order to use this screen, your institution must:
•Subscribe to it on the Security > Subscribe To Mini-Applications screen.
•Set up employees and/or profiles with either Inquire (read-only) or Maintain (edit) security for it on the CIM GOLD tab of the Security > Setup screen. |