Navigation: Loans > Loan Screens > Check Printing Screen Group > Checks Screen >
You can use the Checks screen to print funding checks within CIM GOLD. The ability to print funding checks requires institutions to board loans through GOLD Loan Gateway (or through an API). This screen is not used for printing funding checks from GOLDTrak PC. All funding checks to be printed are listed in the list-view table. However, if for some reason a loan did not fund properly as to create a Funding Check record and display it in the list view table, you can create a new Funding Check record by clicking <Add Check> on the Checks screen.
CAUTION: You should not print checks for established loans where the funding checks have already been dispersed. You should only use this screen to print checks for newly boarded loans. Printing checks from this screen will not affect the Loan History or offset the Principal Balance. It is only intended for newly boarded loans. |
|---|
To add a Funding Check record:
1.In the Check Type field, select "Funding."
 |
Tip: An institution option is available that will default an entry in this field (either Funding or Reserves). Contact your GOLDPoint Systems account manager and have them set up option CPDT (Check Print Default Type).
•If "R" is in that option, the Check Type field will default to "Reserve." •If "F" is in that option, the Check Type field will default to "Funding." |
|---|
2.Make sure the Funding Check record doesn't exist in the system by using the fields in the Check Retrieve Parameters field group to retrieve new Funding Check records. If the record you want to create is not displayed in the list view, move on to step 3. If it displayed, print the check by following the steps in the Print Checks topic and ignore the rest of the steps below.
3.Click <Add Check>. The Add Funding Check dialog box is displayed, as shown below.
4.Enter the Amount of the check in the designated field.
5.Enter the Date the check record was created in the Date field. This defaults to today's date, but if the person applied for a loan and was accepted a few days ago or last week, change this date to the date the loan was approved.
6.Enter the Office number of the account for which you want to create the Funding Check record.
7.Enter the Account number in the provided field. This must be a valid account recognized by CIM GOLD. If this account is not in CIM GOLD, you will receive the following error after completing these steps:
Error in AddCheck [NNNNNNN]: (CheckProcessing: Unable to add the Check record (FPCK) because no matching loan (FPLN) was found)
8.Lines 1-4 are for the name and address of the account owner who the check should be paid to. You do not need to use all four lines. See Check Formatting below for more information on how these fields are mapped onto a check using the Loans > Check Printing > Check Format Setup.
9.The Description and Additional Description fields are optional. They can be included on the check if you also include them on the check format. See Check Formatting below for more information on how these fields are mapped onto a check.
10.Click <OK>.
The check record you just created will now display in the list view when you click <Retrieve> after selecting Check Type "Funding" and Status "New."
Printing New Check Records
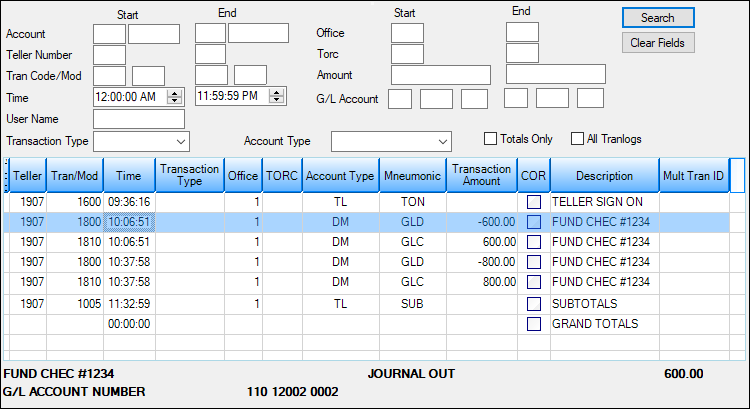
Select the new record and print a check for it, as explained in the Print Checks topic. Once checks are printed, they move to the Printed Status. Any checks that are printed are recorded in the Journal In (tran code 1810) and Journal Out (tran code 1800) fields for the Teller Totals and can also be viewed in Electronic Transaction Journal (see below).

Teller > Electronic Transaction Journal Screen
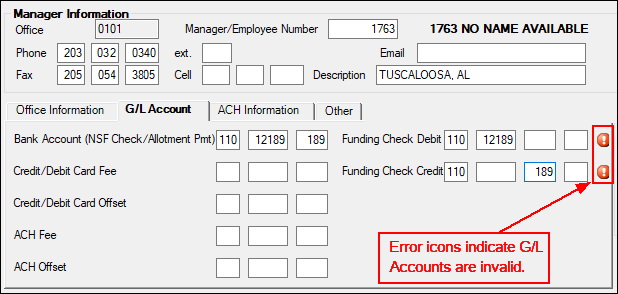
The General Ledger accounts used for the Journal In and Journal Out fields are entered on the GOLD Services > Office Information > G/L Account tab in the provided fields: Funding Check Debit and Funding Check Credit. See the G/L Account tab help on the Office Information screen for more information.
If you do not enter a valid G/L account in the provided fields on the Office Information screen, the following error message will display after attempting to print a funding check:
GL Account Not Found
Check the Office Information screen for the office where the account number resides and see if valid G/L accounts are provided in those fields. You will not be able to print the check until valid G/L accounts are entered in those fields. If an error icon is displayed next to those fields, you know that you need a valid G/L account pulled from the General Ledger system (see below):

GOLD Services > Office Information Screen > G/L Account Tab
If you want to use any of the fields in the Add Check function to pull information to print on your checks, make sure you have the fields mapped accordingly for Check Format #15 on the Loans > Check Printing > Check Format Setup screen. Checks do not need to include all this information, and you can use any of the fields available on the Check Format Setup screen. But if you do want to use any of the fields on the Add Funding Check dialog, the following example will be helpful for you to set up the Check Format with this information:
|