Check Format Setup Screen |
  

|
Navigation: Loans > Loan Screens > Check Printing Screen Group >
Check Format Setup Screen |
|
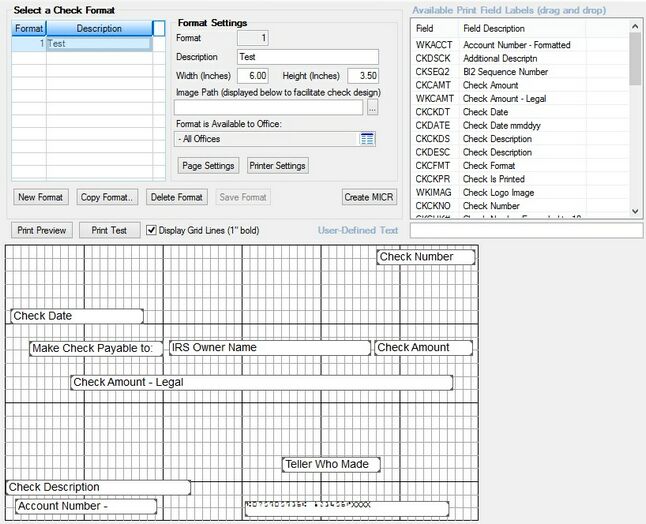
The Check Format Setup screen in the Check Printing function is used to set up check formats, which tell the system the size of the check, what data is should be pulled onto the check, and where on a check to place the data, such as the check amount, check date, payee, etc. This is an administrative screen and access to it should be limited.
The list view at the top left of this screen displays all formats that your institution has set up. Clicking on a format causes the details of the format to be displayed on the rest of the screen.
Loans > Check Printing > Check Format Setup Screen
After check information has been sent to the Check Printing function, your institution then prints the checks directly from the Check screen. See the Checks screen for information about when check information can be printed using the Check Format you create here.
Note: If you are using CIM GOLD versions prior to 7.9.2, checks are printed from the Loans > Check Printing > LIP Checks and/or Reserve Checks screen.
Check printing is controlled by the type of check being printed (formats). In some cases, your institution can further control when and where a check is printed. For example, you could print all reserve disbursement checks at one time, or each branch could print its own checks.
The check printing process allows you to do the following:
| 1. | Build your own Formats that control the specifics of the checks being printed, including the size of the check and where on a check data will be placed. |
| 2. | Copy formats to quickly create new formats. |
| 3. | View a check format before printing actual checks. |
| 4. | Print all checks in a specific format at one time or select specific checks in a format to be printed. This allows departments or branches to print their own checks. |
| 5. | Reprint checks (due to paper jams, etc.). |
| 6. | Print a check register (shows all checks that were printed—the check #, amount, and payee). |
| 7. | Delete checks. |
| 9. | After checks have been created and printed, they can be sent to the Check Reconciliation (institution option CKRC is set to "Y"). |
| 10. | Print real-time Funding checks, if your institution uses that feature. (See Add a Funding Check Record on the Checks screen.) |
| 11. | Print logos, signatures, and MICR lines, allowing you to use blank check paper instead of pre-printed checks. |
| 12. | Control who has access to set up or change formats. (See Security in this help.) |
| 13. | Control the printing of checks through employee security, which can be set to allow employees to print checks only for specific formats. (See the Security topic on the Checks screen.) |
See the following help topics to learn more about checks in CIM GOLD:
Check Printing Institution Options
The fields and buttons on this screen are as follows:
Check Format Setup screen buttons
Available Print Field Labels list view
|
Record Identification: The fields on this screen are stored in the CSFM record (Check Format Master). You can run reports for this record through GOLDMiner or GOLDWriter. See CSFM in the Mnemonic Dictionary for a list of all available fields in this record. Also see field descriptions in this help manual for mnemonics to include in reports. |
|---|
In order to use this screen, your institution must:
•Subscribe to it on the Security > Subscribe To Mini-Applications screen.
•Set up employees and/or profiles with either Inquire (read-only) or Maintain (edit) security for it on the CIM GOLD tab of the Security > Setup screen. |