EZPay IMAC Table: Setup tab |
  

|
Navigation: Loan Screens > Transactions Screen Group > EZPay Screen > EZPay Settings and Options > EZPay IMAC Table >
EZPay IMAC Table: Setup tab |
|
 |
GOLDPoint Systems Only: These options are set up for individual institutions on the GOLDPoint Systems > EZPay IMAC Table screen in CIM GOLD. Select the institution in the list at the top of the screen to edit that institution's EZPay information in the fields below (if the institution's name or production URL is not listed, they need to be set up by programmers). The Use EZPay option on this tab must be marked in order for an institution to use the EZPay screen.
IMPORTANT: Many of the options on the EZPay IMAC Table no longer control options for payments on the institution's website (GOLD Account Center). Therefore, if an institution wants to make changes to EZPay, verify whether they also want the change applied to their website (GAC). If they do, contact a member of the Web Team to set up the accompanying option for GAC. |
|---|
This help topic describes the EZPay options which can be set up for your institution on the Setup tab of the EZPay IMAC Table (shown below). Your institution cannot access this tab (it must be managed on your behalf by GOLDPoint Systems), but you can read through the descriptions of available options to see if you want any of them implemented.

GOLDPoint Systems > EZPay IMAC Table > Setup Tab
Option |
Description |
||||||||||||||
|---|---|---|---|---|---|---|---|---|---|---|---|---|---|---|---|
Use EZPay
Mnemonic: EZUEZP |
This box must be checked if the institution wants to use the EZPay system. |
||||||||||||||
Institution/Description
Mnemonic: EZINNM |
This is the institution number selected from the list view table above. The description (name) of the institution is also displayed in the provided field.
If you are setting up an institution for the first time by clicking <Create New>, you would enter the institution's number in this field, and the name of the institution in the Description field. |
||||||||||||||
Past Due Days
Mnemonic: EZPDDY |
This option is only for online web payments (GOLD Account Center), not CIM GOLD.
Enter the number of days after the current Due Date when the system will no longer allow a payment to be made on the institution's website. If the customer attempts making a payment after this number of days from the Due Date, they will receive an error message notifying them to contact the institution to make their payment.
If this option is left blank, no matter how delinquent the loan, web payments can be processed on accounts.
|
||||||||||||||
Max Pmt Adjust Amt
(EZMPAA) |
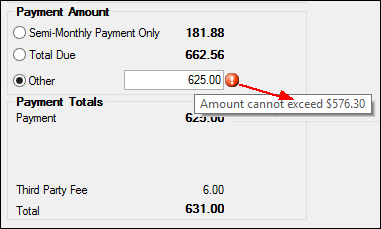
For interest-bearing loans (payment method 6), use this option to make sure a payment does not pay off the loan. Enter an amount in this field that will be deducted from the payment if the payment will pay off the loan (the Payoff or Pay to Zero field is selected).
Example: Max Pmt Adjust Amt = 10.00. The payoff amount on a loan is $400.00. Therefore, the maximum payment allowed would be $390.00.
If the user attempts to make a payment for the full amount, they will receive a message similar to the following (either through EZPay or through the online payment):
The user will be forced to change the amount to an amount under the maximum amount.
This option is to help institutions with marketing efforts and retain loan accounts. |
||||||||||||||
|
(EZMNPP) |
This option affects how the Scheduled One Time Future Payments field functions on the EZPay screen. Set this option from "1" to "8" to allow users to set up one to eight one-time payments. The Payments list view is displayed according to how this option is set up. In the example below, up to four future payments can be set up:
This option also affects the number of payments that can be indicated to be processed in the Special Monthly Payments field group.
|
||||||||||||||
|
(EZMTPD) |
Set the number of days a one-time future payment is allowed to be paid in the future. Example: Max Nbr Pmts Period = 3 and One Time Period Days = 120: this would allow for three payments that can be paid in the future but only up to 120 days from date of first entry (today's date). Note: If the institution has the Use Fee Table option (EZFTBL) set, this option is ignored.
If your institution allows for up to three scheduled payments, the maximum days must be set to allow those scheduled payments to occur in the future.
Example: Schedule three payments on 05/01 for 06/30, 07/30, and 08/30. The days maximum must be at least 123 days. Multiple scheduled payments do not have to be sequential, but this option will not allow payments if they are set out past the number of maximum days set in this option. |
||||||||||||||
Immediate ACH Fee
(EZOCFE) |
Enter the fee amount this institution wants to charge customers for making payments using immediate ACH (e-check, external checking or savings account). If the institution has the Use Convenience Fee Table option (EZFTBL) set, this field is ignored and the fee amount set up on the Loans > System Setup Screens > EZPay Convenience Fee is used instead.
If an amount is entered here, when making an immediate payment, the Fee amount will be displayed in the provided field.
See the Fees topic for more information about charging fees in EZPay.
 Click to expand.
|
||||||||||||||
|
(EZRAHF) |
Enter the fee amount this institution wants to charge customers for making payments using ACH (e-check, external checking or savings account). If the institution has the Use Convenience Fee Table option (EZFTBL) set, this field is ignored and the fee amount set up on the Loans > System Setup Screens > EZPay Convenience Fee is used instead.
If an amount is entered here, when making a recurring ACH payment, the Fee amount will be displayed in the provided field, as shown below:
See the Fees topic for more information about charging fees in EZPay.
 Click to zoom in.
|
||||||||||||||
Future One Time ACH Fee
(EZFOTF) |
Enter the fee amount that will be charged for each one-time ACH payment. If the institution has the Use Convenience Fee Table option (EZFTBL, see below) set, this field is ignored and the fee amount set up on the Loans > System Setup Screens > EZPay Convenience Fee is used instead.
See the Fees topic for more information about charging fees in EZPay.
|
||||||||||||||
Promise to Pay Min Pcnt
(EZPPMA) |
Use this field to indicate the minimum percentage of the loan balance that must be paid in the event of a customer payment promise. This would be used in collection efforts when users are accessing the EZPay screen after processing PP Comment Codes on the Collection Comments screen. See the Collection Comments screen help for more information. |
||||||||||||||
eCheck Fee
(EZOCFE) |
This is the fee an institution charges for e-Check transactions. If the institution has the Use Convenience Fee Table option (EZFTBL, see below) set, this field is ignored and the fee amount set up on the Loans > System Setup Screens > EZPay Convenience Fee is used instead.
|
||||||||||||||
CIM GOLD Minimum Payment
(EZPMIN) |
This affects all payment transactions: e-Check, one-time, and recurring. If the minimum payment amount is not met (as set up in this option), an error occurs when a user tries to process a loan payment that is less than this minimum amount. The error message, "A minimum payment of $XX.XX is required" appears and the payment is not processed. |
||||||||||||||
Web Minimum Payment
(EZWMIN) |
This option is similar to EZPMIN (above), but it affects EZPay users who use the institution's website to make a loan payment. If the payment is for less than the amount entered in this option, the error message, "A minimum payment of $XX.XX is required" appears and the payment is not processed. |
||||||||||||||
CIM GOLD Payoff Percent
(EZPPCT) |
If this option is set, the system does not allow a payoff or a payment in CIM GOLD to completely pay off a loan. This option designates up to what percentage of the loan the person can pay off using the EZPay screen. For example, the percentage could be set to "99," leaving one percent still needed to pay off the loan. To completely pay off the loan, the person would need to call your institution or personally walk into an office to authorize a complete payoff of the loan. The user would need to use the Loans > Payoff screen to lock in the loan and pay it off.
If this option is set and the user attempts to pay off the loan using EZPay, they will receive the following error message: "The maximum payment amount allowed is $NNNN." The user could then run the transaction for the amount displayed, then use the Payoff screen to finish paying off the loan. |
||||||||||||||
Web Payoff Percent
(EZWPCT) |
This option is similar to EZPPCT (above), but it affects EZPay users who use the institution's website to make a loan payment. This option designates up to what percentage of the loan the user can pay off using the institution's website. For example, the percentage could be set to "99," leaving one percent still needed to pay off the loan. To completely pay off the loan, the person would need to call your institution or personally walk into an office to authorize a complete payoff of the loan. Note: Additional programming is available to not allow a payoff to go below institution option MAUP ((POPOFF – MAUP) * 90% - MAUP).
MAUP stands for Maximum Underpayment Amount for Payoff. This option establishes the maximum underpayment amount when a loan payoff is processed. An underpayment situation exists when a payment received is less than the actual payoff or pay-to-zero amount but within the allowable threshold that would pay off or pay the loan to zero.
If the amount of the loan payoff or pay-to-zero minus the payment received is less than or equal to the maximum underpayment amount (as defined in institution option MAUP), the system will post a G/L Credit Correction (tran code 1810-Correction) by Journal In, Check In, or Cash In to debit the Payoff Underpayment G/L account on the GOLD Services > General Ledger > G/L Account By Loan Type screen with a description of "Underpayment."
See the Over/Under Payments Report (FPSRP297) for more information. |
||||||||||||||
|
(EZPFFA) |
Enter the amount this institution wants to default for processing the Pay Fees transaction. If Pay All Fees is selected in the Payment Amount field group, or if any miscellaneous fees are selected in the Fees list view in that field group, the amount in this option is placed in the Fee field in that field group. Your institution must verify that a General Ledger account is set up for these fees. See the Fees topic for more information. GOLDPoint Systems account managers can help you with this process. |
||||||||||||||
Card Cutoff Time in Mtn Time/Use Card Cutoff Time
(EZCCOT/EZUCOT) |
Select this option to stop employees from reversing payments past a certain time during the day, but allow employees to post payments after the cutoff time and be able to reverse them. The cutoff times are in 24-hour increments.
If your institution has set the Card Cutoff Time in Mtn Time (EZCCOT) option to 9:00 p.m. and has set the Use Card Cutoff Time (EZUCOT) option, card payments are able to be reversed until 9:00 p.m. For example, if a card payment is made on 1/28 at 7:00 p.m., that payment can be reversed until 9:00 p.m. on 1/28. If a card payment is made on 1/28 at 9:02 p.m., that payment can be reversed until 9:00 p.m. on 1/29. |
||||||||||||||
ACH Cutoff Time in Mtn Time/Use ACH Cutoff Time
(EZACOT/EZUACO) |
Set this option to stop employees from reversing payments past a certain time during the day, but allow employees to post payments after the cutoff time and be able to reverse them. The cutoff times are in 24-hour increments.
If your institution has set the ACH Cutoff Time in Mtn Time (EZACOT) option to 3:30 p.m. and has set the Use ACH Cutoff Time (EZUACO) option, ACH payments are able to be reversed until 3:30 p.m. For example, if an ACH payment is made on 1/28 at 1:00 p.m., that payment can be reversed until 3:30 p.m. on 1/28. If an ACH payment is made on 1/28 at 3:32 p.m., that payment can be reversed until 3:30 p.m. on 1/29. |
||||||||||||||
Default Card Processor
(EZCCPS) |
Use this field to indicate the institution's default card transaction processor (if applicable). Card processors are set up by the Web Team. If the card processor does not appear in this list, contact a member of the Web Team. |
||||||||||||||
Default ACH Processor
(EZCACP) |
Use this field to indicate the institution's default ACH transaction processor (if applicable). ACH processors are set up by the Web Team. If the ACH processor does not appear in this list, contact a member of the Web Team. |
||||||||||||||
CIM GOLD Hold Code Restriction
(EZCHCR) |
Use this field to indicate hold code numbers that, when active, will block EZPay from allowing payments. When this option is set, the following message will be displayed in the red banner at the top of the EZPay screen when the indicated codes are active on an account:
 Click to expand.
Note that certain hold codes will automatically restrict users from making payments on the account using the EZPay screen. For example, hold codes 60 (account frozen), 62 (account in dispute), and 83 (Stop ACH) will not allow payments to be made on the account.
If more than one hold code is needed in this field, separate each Hold Code with a comma and no spaces, as shown below:
For more information about hold codes, see the Loans > Account Information > Actions/Holds/Event Letters screen. screen. |
||||||||||||||
eCheck Process Type
(EZECHK) |
This option sets the e-check process type to one of the following:
•If this option is set to "3," e-Check is paid by a third party. This is real-time payment made on the host, and ACH is originated by a third-party vendor (such as NetDeposit).
•If this option is set to "O," e-Check is paid online. The loan payment is made immediately, and the ACH is scheduled for the following afterhours processing cycle.
|
||||||||||||||
CIM GOLD AVS Level
(EZCAVS) |
This field affects which fields are required before a card can be verified from the Card Profiles. Select one of the following codes from the drop-down list:
•"A – All fields open." When this option is selected, all fields are open and required on the Card Profiles link. The Billing Address field group (including ZIP field) is open to file maintenance.
•"Z – ZIP code only." When this option is selected, only the Card Information fields and the ZIP code are required for card verification. The Billing Address fields will be grayed out, except for the ZIP field.
•"N – Name only with no address fields." When this option is selected, the only thing needed is the Card Information when entering credit cards for payments. The Billing Address fields and ZIP field will be grayed out. |
||||||||||||||
Web AVS Level
(EZWAVS) |
This option is similar to the CIM GOLD AVS Level option above, except this option relates the EZPay function your customers use on your website (GOLD Account Center). What you enter in this field affects what verification fields must be entered by your customers when they are processing a credit card payment.
•Enter "A" (All Fields Open) if you want to require credit card information, name information, and billing address information from your customers before the system can verify and make payments with credit cards.
•Enter "Z" (ZIP Code only) if you only require name, credit card information, and a ZIP code before verifying credit cards.
•Enter "N" if you only require name information (no ZIP code or billing information) when verifying credit cards. |
||||||||||||||
|
(EZFUDY) |
Enter the number of days after a one-time future payment (or future payoff) is made that the account will go into the applicable Collection Queue, so a follow-up contact can be made with the borrower. This option can be used to ensure that a follow-up does not occur until one or more business days after a one-time future payment has been made.
For example, if your institution had the Follow Up Days (EZFUDY) option set to “1” and had three future payments set up, they would have the following follow-up dates:
If the loan is delinquent, the loan is not sent to a collector’s queue until the specified number of days (according to the Follow Up Days option) after a loan payment is made from EZPay. If the user tries to enter a follow-up code before the designated number of days using the Comment Code field on the Loans > Marketing and Collections Screen > Contact tab, the system returns an error message and does not allow the follow-up code to be entered.
See also: Write Collection Record option below. |
||||||||||||||
GOLDPhone AVS Level
(EZGAVS) |
Enter one of the following codes for GOLDPhone verification: "Z" - ZIP code verification; "N" - no verification. |
||||||||||||||
Days Payoff Backdating Allowed
(EZBDPO) |
Enter the number of days your institution will allow payoffs to be backdated. If nothing is entered in this option, customers can backdate payoffs to whatever date they want. See the Payoffs topic for more information. |
||||||||||||||
Days Payoff Futuredating Allowed
(EZDAFP) |
Select this option to set the number of days in the future that a payoff is allowed. For example, if this option is set to "60," a payoff will not be allowed more than 60 days in the future. If this option is set up to be greater than zero, the Future Payoff radio button is enabled on the EZPay screen. See Payoffs topic for more information. |
||||||||||||||
|
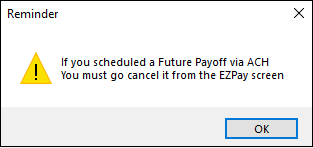
(EZWRCR) |
Set this option if a one-time future payment transaction (or future payoff) on the EZPay screen should write to the Collection Comments record. When this option is on and a one-time future payment transaction is processed, the system records that information and displays it in the Collection Comments record as a Promised Payment. If the Follow Up Days option (EZFUDY) also contains a number, this account will be displayed in the Collection Queue the designated number of days after the payment is made.
See the One-Time Future Payments topic for more information. |
||||||||||||||
|
(EZWREL) |
Set this option if the institution would like an event letter to automatically generate once a customer makes a one-time payment through EZ Pay. The event letter number for this transaction is 60. See Event 60, One-time Electronic Payment, in the GOLD EventLetters manual. Also see EZPay Event Letters for more information. |
||||||||||||||
Disallow PM5 Pay To Zero
(EZP5PO) |
Set this option to disallow the Pay To Zero option on the EZPay screen for payment method 5. If this option is selected, that radio button is not available on the EZPay screen. See the Pay to Zero topic for more information. |
||||||||||||||
Allow Next Payment Due
(EZAMPM) |
Set this option to allow the Next Payment Due radio button to appear in the Payment Amount field group. |
||||||||||||||
Stop CIM GOLD PM5 Payment
(EZSCP5) |
Select this option if your institution does not want to accept payments for payment method 5 loans using the EZPay screen. When this option is set, and a processor tries to make a payment on a payment method 5 account using the EZPay screen in the CIM GOLD® program, the following message is displayed in the red banner at the top of the EZPay screen: "Unable to make a payment on revolving/LOC loans at this time." |
||||||||||||||
|
(EZWCEL) |
Set this option if your institution wants an event letter record created in the afterhours after a customer cancels a one-time payment. The event letter is only created if the payment is canceled at least one day after it was set up. See Event 61, Cancelled Event Letter in the GOLD EventLetters manual. Also see EZPay Event Letters for more information. |
||||||||||||||
Stop Web PM5 Payment
(EZSWP5) |
This option is similar to the EZSCP5 option above except this option affects users who are using the EZPay screen via the institution's website. Select this option if your institution does not want to accept payments for payment method 5 loans using EZPay on the institution's website. If users with payment method 5 loans attempt to make a payment using EZPay, the message "Unable to make a payment on revolving/LOC loans at this time" is displayed. |
||||||||||||||
|
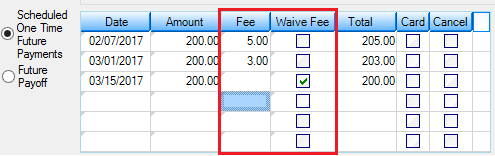
(EZWVFE) |
Set this option to enable a Waive Fee checkbox field next to the Fee field used in determining the Payment Amount in EZPay. This checkbox field can be used to waive the indicated fee on the payment.
Field level security can be used to restrict the field for some employees but allow it to be available to others. |
||||||||||||||
Show Name Mailing
(EZNMML) |
Set this option if you want EZPay to display the payee's home address and not the loan address. |
||||||||||||||
Don't Save Routing or Account
(EZDSRA) |
Set this option if you do not want the routing number and account number to be saved with the loan record when setting up recurring fees. This will cause employees to manually enter routing and account numbers on transactions, rather than the system already remembering them and automatically entering them for accounts with recurring payments.
|
||||||||||||||
Don't Default Checking/Savings
(EZDDCS) |
Set this option if your institution does not want to default the checking/savings account of the borrower in the Payment Account field.
|
||||||||||||||
|
(EZEPNS) |
Set this option if your institution wants to allow non-signers to make EZPay payments. If this option is set, the Other Payment Account field is enabled. |
||||||||||||||
|
(EZFTBL) |
Set this option if your institution wants to use the Loans > System Setup Screens > EZPay Convenience Fees Screen to define fee amounts, rather than using the options on this screen. See the linked help for that screen for more information.
If your institution uses this option, the Credit Card Fee (EZCCFE), e-Check fee (EZOCFE), Debit Card Fee (EZDCFE), and ACH Fee (EZRAHF and EZFOTF) options on this tab are all ignored. |
||||||||||||||
Don't Truncate Account
(EZDTAC) |
Set this option to not truncate the account number. This option enables the full routing and account number to be displayed on the EZPay screen. |
||||||||||||||
Disallow Immediate Payments (CCFI)
(EZDIMP) |
Set this option to disable all payment options on the EZPay screen except Scheduled One Time Future Payments. This ensures that only payments scheduled for the future are allowed. |
||||||||||||||
Require Payoff Lock
(EZLFPO) |
Set this option if the institution requires a loan to be locked for payoff before allowing the EZPay screen to run a payoff transaction on the account. If a loan is locked for payoff and this option is set, the Payoff radio button is automatically selected and only the payment information and fee fields on the EZPay screen are enabled while all of the other fields are disabled. This ensures that only a payoff can be made.
When setting this option, enable the following options:
•Set this option as well as the Days Payoff Futuredating Allowed (EZDAFP) option. Note: Verify with the client the number of days to be entered.
•Set institution option Unlock and Drop Payoff Record Nightly (OP06 DPON) to "N." Note: Setting this option could affect future late charges. Set the following options to determine how late charges are handled:
oUse institution option Assess Future Late Charges in Payoff (OP06 AFLC) to indicate whether future late charges are assessed.
oSet the Days Payoff Backdating Allowed (EZBDPO) option. Note: Verify with the client the number of days to be entered.
oBackdating Warning: There is a built-in warning message on the Payoff screen to alert the user if they are backdating a payoff more than six days. Note: The Payoff screen does not read the EZPay IMAC table and, therefore, cannot know how far out the future payoff can go.
This option also enables the Payoff link to appear on the EZPay screen. |
||||||||||||||
Show Card Log
(EZSCDL) |
Set this option to display the Card Log as a tab on the EZPay screen. |
||||||||||||||
Show EZPay Log
(EZSEPL) |
Set this option to display the EZPay Log as a tab on the EZPay screen. |
||||||||||||||
Cleanup Future Payments
(EZCUFP) |
Set this option if the institution wants all future payment records for a customer (FPRA, FPAS) removed from the system if that customer's stored ACH payment information (FPEA) is deleted.
If this option is used, a prompt will appear in CIM when a user attempts to delete an ACH profile. This prompt will inform the user that any future payments using the selected routing and account numbers will be removed from the system and that the customer will need to re-schedule the recurring payments if desired.
If this option is not used, a different prompt will appear in CIM when a user attempts to delete an ACH profile. This prompt will inform the user that all future payments will process normally and will need to be removed individually if desired. |
||||||||||||||
|
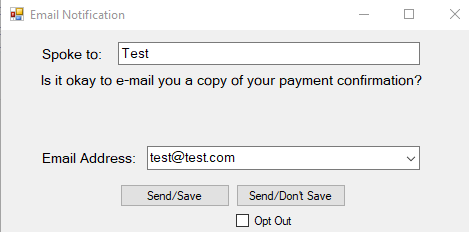
(EZEMLN) |
Set this option if the institution wants an Email Notification dialog to appear when an ACH payment is made on the EZPay screen (event letter 60, see EZPay Event Letters for more information). This dialog allows the user to indicate a customer's name and email address to be notified of the payment. In order for this function to work properly, the customer must have an email address on file and notification template 6060 must be set up.
An example of this dialog is shown below. The process for entering information in this dialog is as follows:
1.The user indicates the customer's name in the Spoke to field. The user then asks the customer if they would like an emailed copy of their payment confirmation.
2.If the customer doesn't want an emailed copy, mark the Opt Out checkbox and click the newly-appeared <Save> button to close this dialog, process the payment, and otherwise send the event letter normally.
3.If the customer wants an emailed copy, the user can choose a saved Email Address or enter a new one in the provided field. If the user enters a new Email Address, the customer can indicate whether they want the email address saved to their profile:
•If the customer wants the indicated email address saved to their profile (or if they want use a previously saved email address for the payment), click <Send/Save> to save the email address, send the email, and process the payment.
•If the customer wants the email address used for only that payment and not saved to their profile, click <Send/Don't Save> to send the email and process the payment.
 |