E-Checks |
  

|
Navigation: Loans > Loan Screens > Transactions Screen Group > EZPay Screen > Using the EZPay Screen > Step 1: Payment Methods >
E-Checks |
|
If E-Check is selected as the payment method (if the user has proper field level security to do so), use the Account Information field group on the bottom-left corner of the screen (shown below) to indicate information about the ACH account that will be used for making the payment. There are two possible ways to make E-Check payments: Using a saved payment account or entering information for an alternate payment account. Instructions for each option are provided below.
|
Note: Your institution may use the Telephone and Walk-In radio buttons to specify how each e-check payment is made (see these buttons to the right of the E-Check button in the example screenshot below). If these radio buttons are visible, use them to indicate the proper designation before proceeding.
These radio buttons will only be visible if certain Payment Portal options are set for your institution. Your institution will set a default for which radio button is automatically filled when the EZPay screen is accessed, but you can indicate your own personal default to override it in the CIM GOLD main menu bar > Options > User Preferences menu. |
|---|
Once the desired payment method and account information are selected, proceed to Step 2: Payment Types. If you encounter any error messages during the payment submission process, see Troubleshooting for information about how to resolve them.

E-Check Payment on the Loans > Transactions > EZPay Screen
Use the Name field in the Account Information field group (shown above) to indicate the name of the person making the payment. The Mailing Address attached to the selected customer will appear below the Name field (this name and address information is managed on the Marketing and Collections screen > CIF tab). Once a Name is indicated, select the Payment Account that will provide the funds for the payment. The Bank Information for the selected account will appear below the Payment Account field when an account is selected.
The accounts available in the Payment Account field are set up either through your institution's website (by the customer) or clicking the blue External Accounts link. This link opens up the External Accounts dialog which can be used to indicate an external Payment Account. See the linked help for that dialog for more information. |
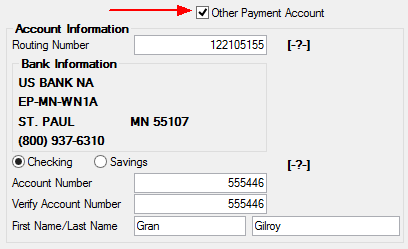
If the person making the payment is not listed, or if the customer is paying from a one-time only account, mark the Other Payment Account checkbox field (shown below; not available unless the EZPay Non-Signer option (EZEPNS) is enabled). The fields in the Account Information field group will change, as shown below:
Using the provided fields, enter the Routing and Account Numbers (as well as the account owner's First and Last Name) for the alternate account that will provide funds for the payment. If a correct Routing Number has been entered, the Bank Information associated with that routing number will appear beneath the Routing Number field. Use the available radio buttons to indicate whether the account is a Checking or Savings account.
Hovering the cursor over either help icon ([-?-]) on the right side of the field group displays a sample personal check. If necessary, use this example as a reference to locate the account number and routing number of the alternate payment account, as shown below:
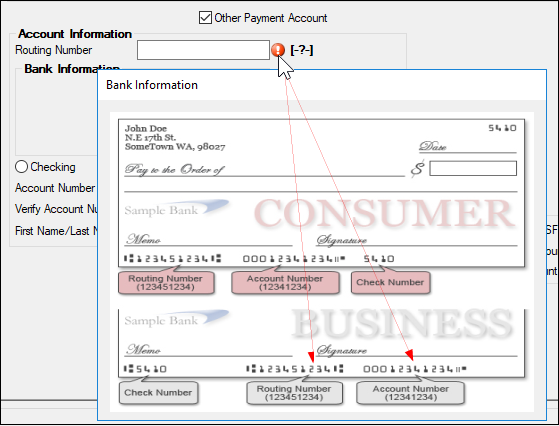 |