Navigation: Loans > Loan Screens > System Setup Screens >
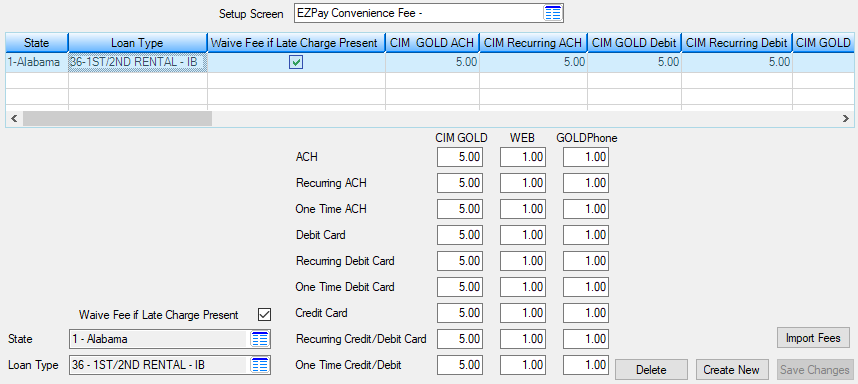
The EZPay Convenience Fees screen is used to set up convenience fees to charge when your institution's employees process ACH or card payments via website, GOLDPhone, walk-in, or phone call through the Loans > Transactions > EZPay screen.
Fees indicated on this screen are grouped and assigned to a combination of State and Loan Type. Each combination can be assigned a unique batch of fees. For example, Loan Type 10 in Utah can be assigned fees that are distinct from the fees assigned to Loan Type 10 in Colorado.
An EZPay option must be set up for your institution in order to use the fees defined here in EZPay, GOLDPhone, and the web. Your GOLDPoint Systems account manager must set up Use Convenience Fee Table (EZFTBL) in the EZPay IMAC table on behalf of your institution. Also, refer to help for Fees on the EZPay screen for a complete understanding of how convenience fees are used in EZPay.

Loans > System Setup Screens > EZPay Convenience Fees Screen
The list view at the top of this screen contains all State/Loan Type combinations that have been previously assigned convenience fees on this screen. The list displays each State/Loan Type combination, whether fees are waived when late charges are present, and all indicated fee amounts. 27 separate fee amounts can be indicated per State/Loan Type combination (see field descriptions below).
To delete the fee setup for a particular State/Loan Type combination, select the item in the list and click <Delete>.
To create a new fee setup for a particular State/Loan Type combination and add it to the list, click <Create New>, enter information in the fields below, and click <Save Changes>. Alternatively, multiple fee setups can be added to this screen at once using the <Import Fees> button. See the toggle below for more information about this feature.
Multiple fee setups can be added to this screen at once by importing a tab-delimited text (.txt) file. This file must be set up a certain way or else errors will occur during the import process. Follow the instructions below to make sure the text file is formatted properly.
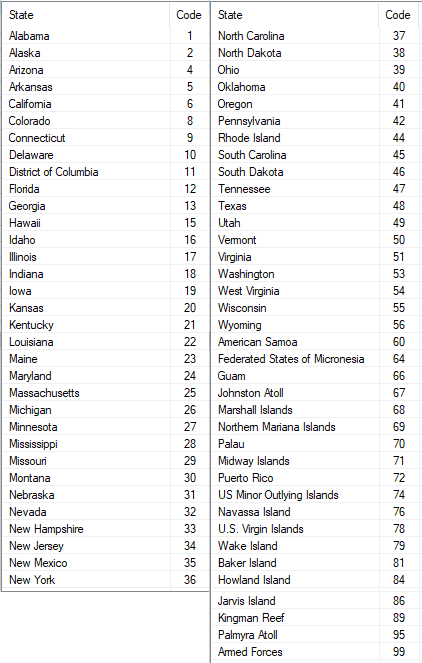
1.There is no need to create a "header" row with labeled columns. The system will read the first row in the text file as the first fee setup to be added. Each row in this text file will have 29 columns (tabs) total. 2.The first column (tab) in the text file is used to indicate the State. You must enter the appropriate one- or two-digit system code in this column, not the state's actual name or official two-letter abbreviation. For example, the number "49" must be used to represent Utah, not "Utah" or "UT." Click the State field on this screen to see the list of system state codes, or else view them in the image below:

3.The second column (tab) in the text file is used to indicate the Loan Type. You must enter the appropriate loan type number in this column. Loan type numbers are institution-defined and set up on the G/L Accounts By Loan Type screen. 4.The rest of the columns (#3-29) define the fee amounts to be used by the indicated State/Loan Type combination. The order of these columns, from left to right, are as follows:
•CIM ACH •CIM Recurring ACH •CIM Debit •CIM Recurring Debit •CIM Credit •CIM Recurring Credit/Debit •CIM One Time ACH •CIM One Time Debit •CIM One Time Credit/Debit •Web ACH •Web Recurring ACH •Web Debit •Web Recurring Debit •Web Credit •Web Recurring Credit/Debit •Web One Time ACH •Web One Time Debit •Web One Time Credit/Debit •GOLDPhone ACH •GOLDPhone Recurring ACH •GOLDPhone Debit •GOLDPhone Recurring Debit •GOLDPhone Credit •GOLDPhone Recurring Credit/Debit •GOLDPhone One Time ACH •GOLDPhone One Time Debit •GOLDPhone One Time Credit/Debit
5.Once completed, the text file should look something like the example below. In the example portrayed by the following two screenshots, two fee setups are being added. One setup is for Loan Type 10 in Utah, the other for Loan Type 12 in Utah.

6.Save the text file and return to the EZPay Convenience screen. Click <Import Fees> to open the Fees To Upload dialog (shown below). On this dialog, click <Load File> and select the text file. If there are any errors that would prevent the file from uploading to CIM properly, explanations of the errors will appear at the bottom of the dialog. If no errors are present, the <Upload> button will be available. Click this button to upload all fee setups to the screen. Once this dialog is closed, the uploaded fee setups will appear in the list at the top of the screen.
|
The fields on this screen are as follows:
Field |
Description |
Waive Fee if Late Charge Present
Mnemonic: FEWFLC |
If this field is marked, the selected fee setup will be waived if a late charge has been applied to the account at any time since opening. |
|
Mnemonic: FECDST |
Click the list icon |
|
Mnemonic: FELTYP |
Click the list icon |
|
Mnemonic: FECACH, FEWACH, FEGACH, FECRAF, FEWRAF, FEPRAF, FECOTF, FEWOTF, FEGOTF |
Use these fields to indicate the amount you want to charge customers when they make loan payments using regular, Recurring, and/or One Time ACH transactions. You can charge a different amount accordingly:
•If the payment is being made by an employee using the EZPay screen (CIM). •When the customer makes a payment from your website (WEB). •If the customer used GOLDPhone to make a payment (GOLDPhone).
These convenience fees can also be set up differently according to loan type and state (see above). |
|
Mnemonic: FECDBT, FEWDBT, FEGDBT, FECRDF, FEWRDF, FEGRDF, FECOCC, FEWOCC, FEGOCC |
In these fields, enter the amount you want to charge customers when they make loan payments using regular, Recurring, and/or One Time debit card transactions. You can charge a different amount accordingly:
•If the payment is being made by an employee using the EZPay screen (CIM). •When the customer makes a payment from your website (WEB). •If the customer used GOLDPhone to make a payment (GOLDPhone).
These convenience fees can also be set up differently according to loan type and state (see above). |
|
Mnemonic: FECCRD, FEWCRD, FEGCRD, FECRCF, FEWRCF, FEGRCF, FECOCC, FEWOCC, FEGOCC |
In these fields, enter the amount you want to charge customers when they make loan payments using using regular, Recurring, and/or One Time credit card transactions. You can charge a different amount accordingly:
•If the payment is being made by an employee using the EZPay screen (CIM). •When the customer makes a payment from your Web site (WEB). •If the customer used GOLDPhone to make a payment (GOLDPhone).
These convenience fees can also be set up differently according to loan type and state (see above). |
|
Record Identification: The fields on this screen are stored in the CSFE record (Convenience Fee). You can run reports for this record through GOLDMiner or GOLDWriter. See CSFE in the Mnemonic Dictionary for a list of all available fields in this record. Also see field descriptions in this help manual for mnemonics to include in reports. |
|---|
In order to use this screen, your institution must:
•Subscribe to System Setup Screens on the Security > Subscribe To Mini-Applications screen.
•Set up employees and/or profiles with either Inquire (read-only) or Maintain (edit) security for System Setup Screens on the CIM GOLD tab of the Security > Setup screen. |