Navigation: Deposit Screens > Definitions Screen Group >
Use the Rate Tiers screen to view and edit information about deposit interest rate tiers for your institution. See below for more information about rate tiers.
Tier Pointers are ID numbers that specify how the system should calculate interest for deposit accounts based on account balance levels. Tiers must be set up on this screen before they can be used on various screens throughout CIM GOLD, including the Deposits > Definitions > Product Codes screen (where your institution creates the products it offers its customers).
Rate tiers are used to allow the interest rate to vary within a type of account according to the balance of the account. Rate tiers are designated by a rate Tier Pointer, which is a number from 1 to 255 that specifies the parameters of the rate tier. These parameters include such information as the balance limits and rate offsets, and the effective date for rate offset changes.
Rate tier pointers work with Rate Pointers (see the Rate Table screen help). Rate Pointers establish the interest base rate for an account. Interest features for individual customer accounts can be adjusted on the Deposits > Account Information > Interest Fields screen as well as the Interest Fields field group on the Deposits > Account Information > Account Information screen (if you have the proper security). Simple rate pointers can also be set up using the Deposits > Definitions > Rate Table screen. When rate tier pointers are used, they establish the offset used with that base rate to calculate the interest rate for the account.
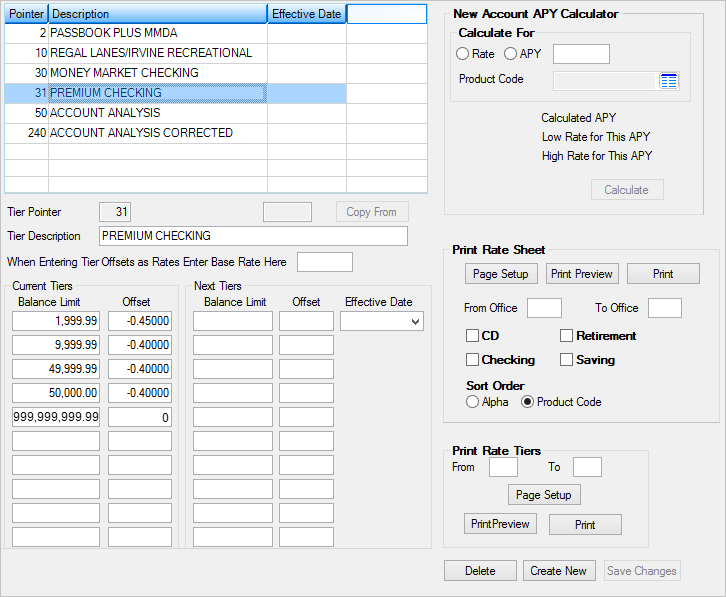
In the example screenshot below, you can see that Premium Checking accounts with a balance less than $2,000.00 will earn the Base Rate minus -0.4500 percent of that. So if the interest rate was 1.0 percent, and the balance on the account was $1,500.00, the account would be earning interest at .55 percent. |

Deposits > Definitions > Rate Tiers Screen
Afterhours changes to interest rates on customer accounts can be audited using the Interest Rate Rolling Report (FPSDR053). To audit other changes to rate fields, use the Rate Tracking Report (FPSDR082), Rate Offset Report (FPSDR115), or the Critical File Maintenance Report (FPSDR172).
The list view on this screen displays basic information about all rate tiers previously set up for your institution. Select a tier in the list to edit that tier's information in the fields on this screen. See below to learn how to create new rate tiers on this screen and add them to the list.
1.Click
2.In the Tier Pointer field (mnemonic TRTPTR), enter the number you want to assign this Rate Tier. This number must be different from any existing Rate Tiers. Once a Tier Pointer number has been created, it cannot be changed.
3.Enter a description for the tier in the Tier Description field. You could name it something generic, such as "Passbook." Or you could name it something more descriptive, such as "Passbook for accounts over $100,000." This description will appear alongside the Tier Pointer in CIM GOLD screens that request a rate tier designation.
4.Starting with the smallest balance, enter that amount for which the offset will take affect in the Balance Limit field in the Current Tiers field group. For example, entering "1,000.00" means any account balance less than that will earn the interest offset amount entered in the next step.
5.In the first Offset field in the Current Tiers field group, enter the offset amount of the Base Rate to apply to the accounts with less than this Balance Limit. For example, if "1,000.00" is entered in the Balance Limit field, and "-1.5000" is entered in the first Offset field (and assuming the Base Rate is 2 percent), accounts with a balance of less than $1,000.00 will earn 0.5 percent (2 percent minus the offset of 1.500 percent). This number can either be negative or positive. If it's a negative number, it indicates accounts will earn less than the Base Rate. If it's positive, accounts will earn more than the Base Rate.
6.Repeat steps 4 and 5 for as many balance limits and offsets as you want to apply.
7.For the last Balance Limit line, enter "999,999,999,99" and assign it the same offset as the second-to-last offset. If you want the last balance to earn the regular Base Interest, leave the Offset field blank.
8.Click
9.In the Next Tiers fields, repeat steps 4-7, but increase or decrease the Balance Limit or Offset according to how your institution wants to pay interest.
10.In the Effective Date field, enter the date the next tier amounts will take effect for these account types.
11.Click |
The fields on this screen are as follows:
When Entering Tier Offsets as Rates Enter Base Rate Here
New Account APY Calculator field group
|
Record Identification: The fields on this screen are stored in the FPTR record (Rate Tier Table). You can run reports for this record through GOLDMiner or GOLDWriter. See FPTR in the Mnemonic Dictionary for a list of all available fields in this record. Also see field descriptions in this help manual for mnemonics to include in reports. |
|---|
In order to use this screen, your institution must:
•Subscribe to it on the Security > Subscribe To Mini-Applications screen.
•Set up employees and/or profiles with either Inquire (read-only) or Maintain (edit) security for it on the CIM GOLD tab of the Security > Setup screen. |