|
Available Print Field Labels list view |
  

|
Navigation: Loans > Loan Screens > Check Printing Screen Group > Check Format Setup Screen >
Available Print Field Labels list view
|
Available Print Field Labels list view |
|
Items in this list view are used in conjunction with the Check Format grid at the bottom of the screen. The fields in this section are the fields that are available to be placed on a check, and they can be dragged and dropped into the Check Format grid. Fields in this box change based on the type of format. For example, LIP formats (10-99) include budget disbursement codes and descriptions that would not be needed for reserve disbursement or deposit interest checks. Fields and field names are predefined by GOLDPoint Systems and cannot be changed.
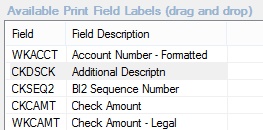
To place a field on the check, simply drag and drop the field from this section to the Check Format grid below. You can use any or all fields and can use them various times on the same check. For example, you may want certain data such as the check amount to be printed on the top section of the check and again on the lower section (stub). Hint: Use the <Shift> or <Ctrl> keys to select multiple fields and drag them all at one time.
As you are placing data on the check, be sure to allow for margins, logos, signature lines, and MICR lines. You can see what the check will look like by clicking <Print Preview> or using the <Print Test> button to print a test print.
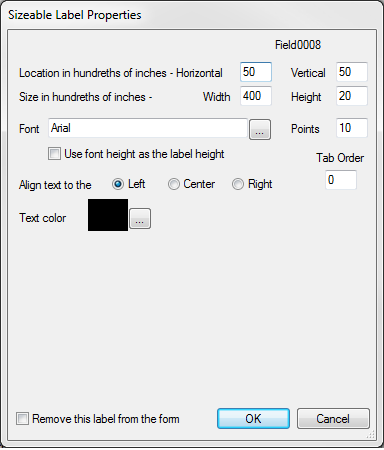
Right-clicking on fields placed in the grid brings up the Sizeable Label Properties dialog (see example below). You can use this dialog to change the size, font, alignment, and color of the text in the fields. Selecting the Remove This Label from the Form box will delete the field. You can also remove a field from a check by clicking on the field and clicking <Delete>.
Available Fields
Different fields are available, depending on the check format. The following paragraphs describe many of the most used fields available for checks.
Field |
Description |
||
|---|---|---|---|
Account Number Formatted
(WKACCT) |
This is the account number from which funds are disbursed. This will display the loan or deposit account number, based on your institution options. For example, a loan number can be BBBB-AAAAAA-CC. If your institution’s loan number option is BB-AAAAAA-CC, then the loan number on the check would appear the same as the option (it wouldn’t have 2 leading zeros for the branch). |
||
Check Amount
|
This is a numeric dollar amount. Asterisks are always displayed before the amount. The amount would appear as "***$1,500.00." No asterisks are displayed at the end.
|
||
Check Amount Legal |
This is a character dollar amount. The amount would appear as:
One Thousand Five Hundred And 00/100
Institution Option PASK will automatically place asterisks before and after the written legal amount. The amount would appear as:
***One Thousand Five Hundred And 00/100*** |
||
Check Date |
This is the date the check data was created. |
||
Check Description |
This is the description of the type of check being printed, e.g., Reserve Disbursement. |
||
Check Number |
This is the system’s number for the check and can be up to 8 digits long. Normally, you would enter the same number as the preprinted number on the check. As each check is printed, the system increments the check number by one.
Regardless of whether you are using preprinted checks with preassigned check numbers or you are having the system automatically assign a check number, you should also display the check number somewhere on the check and the check stub. This will help in reconciling checks.
Institution Option UNAC must be set if you are having the system automatically assign the check number. In addition, to use the automatic assignment of check numbers, be sure to coordinate this with the GOLDPoint Systems Financial department. |
||
Check Source |
The actual letters (e.g., "LIP") will be printed based on the format: 2–RSRV, 4–ESCS, 10-99–LIP. |
||
MICR Line Data |
Place this on the check where the MICR line would appear. Note: If you are not using preprinted checks, see the MICR Information section. |
||
Miscellaneous |
This is used for reserve disbursements for taxes (format 2). It will place the tax ID number that is stored in the Miscellaneous field on the Account Reserve Detail screen. This is only available for disbursement types 10, 12, 13, 16, 17, 19, 79, 80, 81, 82, 83, 94, 96, or 97. This is used when a check is created payable to a tax authority for an individual loan and you want the tax ID number to be displayed on the check. Only one tax ID number per reserve disbursement record can be printed on a check. See the Type on the Loans > Account Information > Reserves > Account Reserve Detail screen for more information. |
||
Payee N/A Lines 1-5 |
These are the five name and address lines for the payee. |
||
General Contractor (LIP formats 10-99) |
This is the name of the general contractor. The general contractor would need to be set up as a payee and then that payee number would be placed in the general contractor number on the LIP Budget Detail screen. It can be up to 30 characters long. This would be used, for example, if you want checks made payable to both the general contractor and/or someone else, such as a vendor. In this example you would place this field on the check above the Payee N/A Line 1. |
||
Borrower Name (LIP formats 10-99) |
This is the name of the IRS owner of the loan. This would be used, for example, when you are making checks payable to a general contractor and you want the name of the borrower either as part of the "payable to" line or on the stub of the check. |
||
Disb Amount 1-9, A, Disb Code 1-9, A and Disb Desc 1-9, A (LIP Formats 10-99) |
You can display up to 10 LIP disbursement amounts, codes, and descriptions on a check. Selections are 1 through 10 (A is 10). Hint: Use the <Shift> key to select a large group of fields to drag all at one time.
|
||
Property Address (LIP formats 10-99) |
This is the address of the property. The property (location) is connected to the loan in CIF. |
||
Teller Employee Who Made Check |
You can display the teller number of the person creating either the LIP or reserve check by placing this field in the Check Format grid. |