|
Check Format Setup screen buttons |
  

|
Navigation: Loans > Loan Screens > Check Printing Screen Group > Check Format Setup Screen >
Check Format Setup screen buttons
|
Check Format Setup screen buttons |
|
Button |
Description |
||
|---|---|---|---|
<Page Settings> |
Clicking this button brings up the Page Setup dialog, which you can use to set up paper size, orientation, and margins.
|
||
<Printer Settings> |
Clicking this button brings up the Print dialog, which you can use to print checks.
|
||
<New Format> |
To create a new format, click this button and then assign a format number between 1 and 99 in the Format field. Click <Save Format> and the new format will appear in the Select a Check Format list view. |
||
<Copy Format> |
This feature allows you to quickly copy a format that has already been created or to import a format from another file. Clicking this button brings up the Copy or Import Check Format dialog. See the following example.
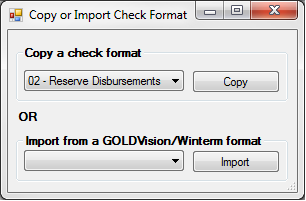
To copy a format:
1.Select the number of the format you want to copy from the Copy a check format drop-down box, then click <Copy>. This immediately copies the format and displays the data below. 2.Enter the new format number into the Format field. The words "(copy of)" and the name of the format you copied will automatically be displayed in the Description field. 3.Change the description of the new format, make any other modifications, such as what fields to display on the check, and click <Save Format>.
The Import from a GOLDVision/WinTerm Format drop-down list and <Import> button are used to import check formats that were not set up in CIM GOLD but were previously set up in either GOLDVision or WinTerm. A new format is created and data is imported into the new format. Fields, format description, physical size, and format number are imported into the new format. After importing the data, you can then make changes to the newly created format and save it. |
||
<Delete Format> |
To delete a format, select the format from the Select a Check Format list view, then click this button. |
||
<Save Format> |
After creating a new format, copying a format, or modifying a format, click this button to save it. |
||
If you print on blank check paper, you can print the Magnetic Ink Character Recognition (MICR) data on the check. Clicking this button first brings up the Routing Selection dialog box, as shown below. The routing and account numbers are entered on the GOLD Services > Office Routing Info screen.
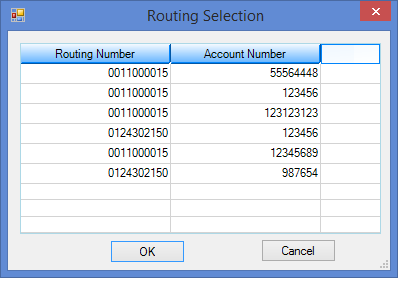
After selecting the routing and account number you want to use for this MICR line, the Create MICR Line dialog box appears, as shown below.
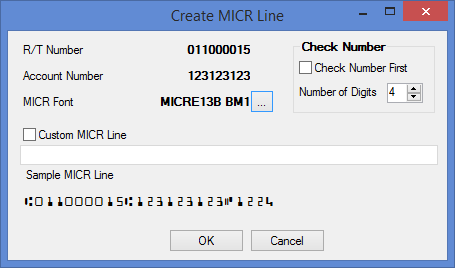
This dialog is used to designate the MICR Font and size. You can also control whether the check number appears at the beginning of the MICR line and the number of digits that appear in the account number. You can customize the MICR line if necessary; however, this feature would be rarely used. For more information on MICR, see the MICR Information help.
|
|||
<Print Preview> |
Click this button to see how data will actually appear on a check. This is helpful, for example, to see if the size of data would overlap other data, to see where asterisks appear, and how the account number would be displayed. |
||
<Print Test> |
This feature lets you print a test check. The purpose for printing a test check is to be sure the printer is set up correctly and to be sure the check format is printing everything in the correct places. |