|
Format Settings field group |
  

|
Navigation: Loans > Loan Screens > Check Printing Screen Group > Check Format Setup Screen >
Format Settings field group
|
Format Settings field group |
|
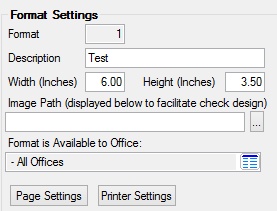
The fields in the Format Settings field group on the Check Format Setup screen are used to set up basic information pertaining to individual formats.
Select a format from the list view or click <Create New> to enter new information in these fields.
The fields in this field group are as follows:
Field |
Description |
|||||||||||||||||||||||||
|
Mnemonic: FMCFMT |
This field is accessible by clicking <New Format>. To set up a new format, enter the format number you want to set up. Use the following criteria when assigning format numbers:
See the Checks main help page for more information concerning when the system creates the check records to be printed. |
|||||||||||||||||||||||||
|
Mnemonic: FMFDSC |
This field is used to enter a brief description of the format you are setting up. For example, you could enter "LIP Check to Payee" or "LIP Check with Contractor." This information will appear in the Format field on the Loans > Check Printing > LIP Checks and/or Reserve Checks screen. |
|||||||||||||||||||||||||
|
Mnemonic: FMCWTH |
The Width and Height fields are used to enter the size of the check paper you will be printing on, using decimals if necessary. For example, "8.5" for the width and "11" for the height. |
|||||||||||||||||||||||||
|
Mnemonic: FMCHGT |
The Width and Height fields are used to enter the size of the check paper you will be printing on, using decimals if necessary. For example, "8.5" for the width and "11" for the height. |
|||||||||||||||||||||||||
|
Mnemonic: FMPATH |
When you want to scan a check, logo, or signature and save it to a file, this field allows you to locate the scanned file and import it to the format. Click the browse button
Scanning checks provides you with the ability to see an image of the actual check. Scanning logos and signatures allows you to have the items actually print on a check, which lets you use blank check paper.
The system can open the following file types: BMP, JPG, GIF, TIFF, and PNG.
|
|||||||||||||||||||||||||
|
Mnemonic: N/A |
This field is used to control which offices can access specific formats. This helps to reduce the risk of employees accessing formats they shouldn't. This does not control the printing of checks; it only controls the setup of the format. Employee security controls who is able to print checks. See the Security topic on the Checks screen for more information.
This reads the office name, which is set up in the GOLD Services > Office Information screen. |