View Attached Files |
  

|
Navigation: File Services Plus >
View Attached Files |
|
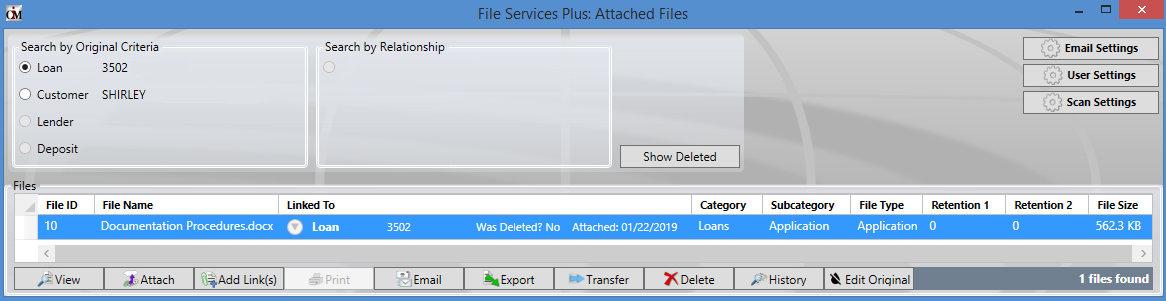
The Attached Files screen is the main File Services Plus (FSP) control screen. It is used to search files uploaded to the selected customer account, name, or lender number, and perform specific actions with those files (as well as display relevant information about them).
The Files list view on this screen displays all files attached to the loan number, customer name, lender number, or deposit number selected in the Search by Original Criteria field group (see table below). This list can be organized by various properties which are explained on the Attached Files list view properties help page. By right-clicking on any column header in the list, a drop-down menu of checkboxes appears which allows the user to select which properties will display on the screen. Click on any column header to organize the list by that column's category.
This screen is accessed from the File Services Plus drop-down menu in CIM GOLD or GOLDTrak PC. You must have a customer account selected in either program before you can access this screen.
File Services Plus > Attached Files Screen
The field groups and buttons on this screen are explained in the table below. Most of the features provided by the buttons at the bottom of the screen can also be accessed by right-clicking a file in the list.
Fields/Buttons |
Description |
||||
Search by Original Criteria |
Use this field group to filter attached files in the Files list by the customer record types they are linked to.
•If you select Loan, all files attached to the indicated loan number are displayed. •If you select Customer, all files attached to the indicated customer name are displayed. •If you select Lender, all files attached to any loan account with the indicated lender number are displayed. Lender numbers are established at loan origination through GOLDTrak PC. •If you select Deposit, all files attached to the indicated deposit number are displayed. This is only a valid selection on deposit accounts.
If you want to search for all files that have been attached to all accounts at your institution, use the History screen instead. However, files must be accessed from this screen in order to perform certain actions with them. |
||||
Search by Relationship |
This field group is for informational purposes. Once attached documents are displayed in the Files list, click the relationship in the Linked To column to display that relationship here, as shown below:
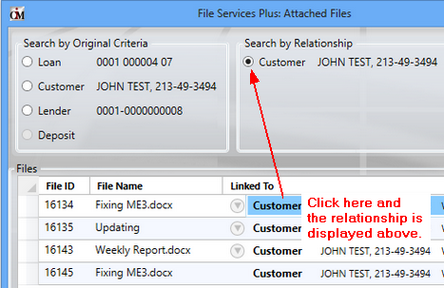
When you click on the relationship, many of the buttons on the bottom of this screen (see #7 below) are no longer accessible. Click an entry in the File Name column in to restore those buttons' functionality. |
||||
|
Click this button to show all files that have been deleted from the Files list but not yet purged from the system. Files are purged from the system as designated on the Settings screen. File purges can also be designated for each Category, Subcategory, and File Type on the Manage Categories, Sub-Categories, and File Type screens, respectively. |
||||
 |
Click this button to open the Email Settings screen. |
||||
|
Click this button to open the User Settings screen. |
||||
|
Click this button to open the Scan Settings screen. |
||||
|
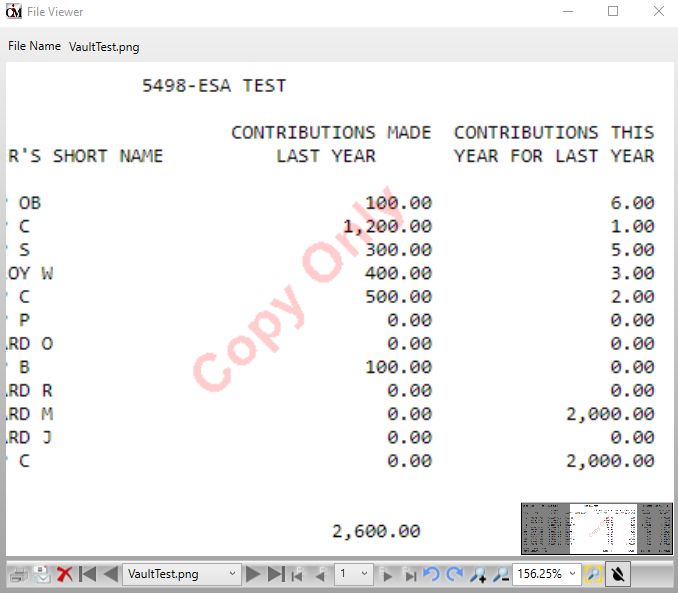
Click this button to view the file selected in the Files list above. Clicking this button opens the File Viewer dialog (shown below). Most file types will open externally and not make use of this dialog, but image files will appear in this dialog and can be printed, emailed, deleted, rotated, or zoomed in/out using the basic controls at the bottom of the dialog.
Regardless of the file type being viewed, the arrow buttons on this dialog can be used to view other files in the list. Note that an Edit Original button is also available on this dialog for those with proper security (see help for this button below for more information).
 |
||||
|
Click this button to attach additional files. Clicking this button opens the Attach Files screen. |
||||
|
Click this button to add links to the selected file. Clicking this button opens the Add Links to File(s) screen. |
||||
|
Click this button to print the selected file. If the file is a .pdf or Microsoft® Word document, it cannot be printed using this button. The file must be opened by clicking the View button and then printed from its source program on the user computer. |
||||
|
Click this button to email the selected file. When you click this button, your designated email program will open and automatically attach the file to an email draft. If the file is a Microsoft® Word or Excel document, it cannot be attached to an email using this button. The file must be opened by clicking the View button, saved on the user computer, and attached to an email manually.
See the Email Settings screen for more information about setting up options for this function. |
||||
|
Click this button to export the selected file to another location on your institution's network or the user computer.
See Export Bulk Files for more information about FSP's bulk export feature. |
||||
|
Click this button to open the Customer Search screen and begin the process of transferring a selected file to another customer account. |
||||
|
Click this button to delete the selected file from the system or remove its link to any loan number, customer name, lender number, or deposit number. Deleted files can still be seen by those at your institution with proper security until the deleted files are purged from FSP. Files are purged from the system as designated on the Settings screen. File purges can also be designated for each Category, Subcategory, and File Type on the Manage Categories, Sub-Categories, and File Type screens, respectively.
|
||||
|
Click this button to open the History screen. |
||||
On
Off
|
This button is only available to employees at your institution who have the proper security to view and edit original documents. The security requirements for this button pertain to the use of FSP's vaulting service, which is explained on the Vaulting help page. See that help page for further information on the subject of vaulting.
To users with proper security, this button can be clicked to toggle the ability to view or export original documents (which are not watermarked and are saved without "COPY" in the file name) on or off (see left).
•If this feature is on (blue button), documents that are viewed or exported by the user will not display a watermark or contain "COPY" in the file name.
•If this feature is off (gray button), image and PDF files that are viewed or exported by the user will display a watermark and all document types viewed or exported by the user will contain "COPY" in the file name.
Users without proper security will not be able to use this button and will always view/export copy files instead of originals.
|
||||
|
This information field displays how many attached files are connected to the customer record type (loan number, customer name, lender number, or deposit number) selected in the Search By Original Criteria field group. |
