Scan Settings screen |
  

|
Navigation: File Services Plus > View Attached Files >
Scan Settings screen |
|
Use this screen to set parameters for File Services Plus to follow when scanning images. Files are scanned and added to the database from the Attach Files screen.
This screen is accessed by clicking ![]() , either in the Miscellaneous field group on the the Settings screen or on the Attached Files screen.
, either in the Miscellaneous field group on the the Settings screen or on the Attached Files screen.
Use the Maximum File Size field on the Image Options field group of the Settings screen to indicate the maximum file size that your institution will allow. Files larger than the value specified in that field will not upload to your institution's database.
Several functions can be performed using the fields on this screen:
Field |
Description |
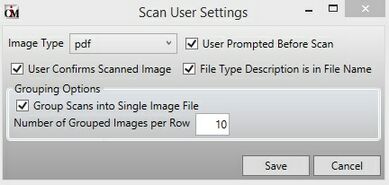
Image Type |
Use this field to indicate the file extension type to create when scanning files. Possible selections in this field are .bmp, .emf, .gif, .ico, .jpg, .pdf, png, .tif, and .wmf. |
User Prompted Before Scan |
Mark this field to enable a pop-up message that informs the user before a scan begins. |
User Confirms Scanned Image |
Mark this field to enable a pop-up message that allows the user to view a scanned image (and rescan if necessary) after the scan is complete but before the scanned image is saved to your institution's database. |
File Type Description is in File Name |
Mark this field to include the file type description in the file name. |
Group Scans into Single Image File |
When this field is marked, multiple files generated from a single scanning session will all combine into one save file. If this field is not marked, each scanned image will be saved in the database as a separate file. |
Number of Grouped Images per Row |
If the Group Scans into Single Image File field is marked, use this field to indicate how many documents should be displayed per display row when viewing the image file. |