Transaction Entry Options |
  

|
Navigation: Teller System > CIM GOLDTeller Overview > CIM GOLDTeller Screen Details > Functions > Administrator Options > Transaction Design >
Transaction Entry Options |
|
Selecting a transaction on the Transaction Design screen and then clicking ![]() brings up the Transaction Entry Options screen. Use this screen to set up additional options for the selected transaction. See the following example of this screen:
brings up the Transaction Entry Options screen. Use this screen to set up additional options for the selected transaction. See the following example of this screen:

CIM GOLDTeller Functions menu > Administrator Options > Transaction Design, then click <Options>
Using this screen you can:
•Change the name of the transaction.
•Apply an override request that is required before someone can process the transaction.
•Attach a receipt or check to be printed after the transaction is run.
The following table describes each of the fields on this screen and whether or not you can make changes to it.
Field |
Description |
|---|---|
Description |
This is the description or name of the transaction. If you change the name here, the name is changed for all users who share this DB4 Server. You can change the information in this field. |
Transaction Type |
This field displays whether this transaction is a debit or credit transaction. You cannot make changes to this field. |
Override Required |
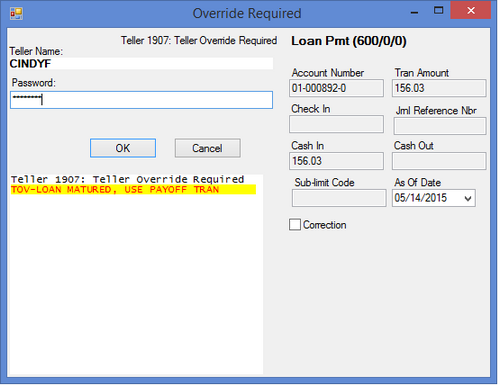
This is probably the most used field on the Transaction Entry Options screen. Here is where you will set what type of override is required to run this transaction. The default is No Override Required. If you choose a different override level, after the teller processes the transaction, an override message appears, as shown below: |
Field |
Description |
||||||||||
The teller will need to get the appropriate person with the correct security levels to override the message and allow the transaction to process.
The override assigned to individuals is set up on the Operator Information screen. |
|||||||||||
Transaction Amount Type |
This field displays whether the transaction debits (withdrawals) or credits (deposits) the account balance. You cannot make changes to this field. |
||||||||||
Default Output Destination |
This field shows which type of output destination will be used as a default. From the drop-list you can choose "Display," "Receipt," "Document," or "Passbook." We suggest leaving this field to "Display."
After the transaction is run, the results of the transaction are displayed in the 4th quadrant of the GOLDTeller screen if this field is set to " Display." If it is set to anything else, the results are printed or sent to another place designated on the System Configuration > Printer Defaults tab. |
||||||||||
Offline Receipt Form |
This field shows which form is used when the transaction is completed while offline (no host access). If you leave this field set to "None," then no receipt is printed when the transaction is run in offline mode.
You can choose a different receipt from the drop-list. To create a new receipt, use the Print Form Design screen.
See also: Tying Forms to Transactions. |
||||||||||
Default Check Form |
This field shows what check form is used after the transaction is run. Leave this field set to "None" and no check is printed after the transaction is run.
You will want to change this field to a specific check type if a check is written at the end of the transaction. To set up different check types, use the Print Form Design screen.
See also: Tying Forms to Transactions. |
||||||||||
Default Passbook Form |
This field allows you to choose whether you want a default passbook form. Passbooks are generally not used by GOLDPoint Systems. |
||||||||||
Default Header Form |
This field allows you to choose the kind of header form to use as a default for this transaction. |
||||||||||
Host Classes |
Generally, GOLDPoint Systems no longer uses these fields. In rare occasions, you may want to use these fields, but generally, you would use the Transaction Menu and Override fields to enable certain transactions for certain employees.
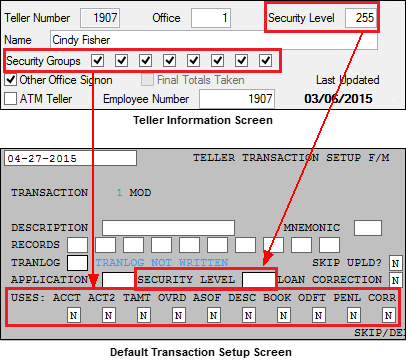
These fields display which host security is tied to this transaction. These fields cannot be file maintained. These options are set up by GOLDPoint Systems programmers in WinTerm (Institution Options > Default Transaction Setup (function 24)). They match up with the user's Security Groups settings on the Deposits > Definitions > Teller Information screen. The Security Level field matches up with the Host Level field on the Teller Information screen. Usually this is set to 0, which means no security requirement. See the following example:
|
||||||||||
Host Only |
When checked, this sends the transaction only to the host computer, not to the PC Teller side. You would only check this box for transactions not involving money coming in or out, such as inquiry transactions. |
||||||||||
PM Transaction |
Checking this box indicates the transaction was made after business hours. The transaction will be sent to the host if the host is online. |
||||||||||
Display Signature |
Don't check this box. This option is for an outdated function in GOLDTeller that allowed the signature attached to the account to be displayed after the transaction was run. If you want to view signatures on an account or attach one to an account, you will need to use the Functions > Administrator Options > Account Signatures functions. |
||||||||||
Don't Automatically Bring Up Check Writer For This Tran |
Checking this box determines whether Check Writer will automatically come up after this transaction is completed. See Check Writer for more information about that utility. Check Writer only comes up if the transaction involves writing a check to the customer. Usually we leave this box blank. |
||||||||||
Synchronize Teller Totals After This Transaction |
This field allows you to synchronize teller totals with the host totals once the transaction is complete. For more information about teller totals, see the Teller Total Functions topic. |
||||||||||
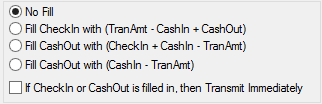
Transaction Fill Options |
These radio buttons determine whether or not the system automatically fills in the Check In or Check Out fields for users when this transaction is processed.
Possible choices are:
|
||||||||||
Print Item List after Tran has run |
When checked, this prints an Item List after a transaction has been processed. You must have the appropriate goldtller.dat file in order to enable the Item List to print. The list will print to the same printer to which receipts print. The list will print as a single, one-column page with a total and item number at the bottom of the list. |
||||||||||
Print Endorsement on Individual Checks In |
When checked, this prints endorsements on the backs of individual checks in. |
||||||||||
Disable Check Out Number Field (Auto filled from Host) |
Checking this box will disable the Check Out number field on transactions, and the Check Out number field will be automatically filled in with information from the host (GOLDPoint System's computer). If this option is not checked, you can manually enter the check number on which you are going to print. |
||||||||||
Send Inquiry after Account Entry |
This option allows a system-defined, automatic inquiry to run after the account number has been entered in the Transaction Entry screen. The inquiry information will show in the Output Display screen.
For deposit accounts, transaction 1006-01 (Dep Detail Inquiry) will be processed. For loan account, transaction 2270-00 (Ln Ext Gen Inquiry) will be processed. |
||||||||||
Disable use of Override required for Correction |
If you check this box, an override will not be required for corrections of this transaction. |
||||||||||
Number of Receipts |
Enter the number of receipts you want printed after this transaction is run. Usually, this is set to "1." To determine which printer to print receipts to, use the System Configuration > Printer Defaults tab, then the Receipt Destination field. |
||||||||||
Background Color |
If you want to change the background color of this transaction, you can use this field to select the color you'd like it to appear. This tool is handy if you want to designate all loan transactions with a certain background; payoff transactions with another background; etc. This will help tellers immediately recognize the type of transaction it is. |