Navigation: Teller System > CIM GOLDTeller Overview > CIM GOLDTeller Screen Details > Functions > Administrator Options > Transaction Design >
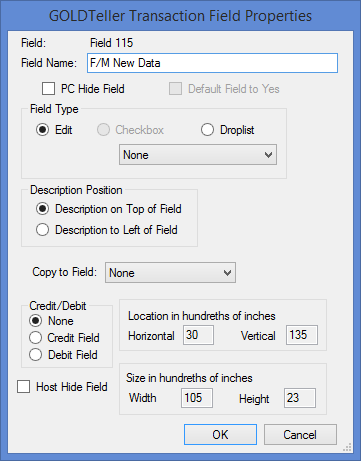
CIM GOLDTeller allows your institution to set up transactions with any information you want. You can change the names of fields; change fields to drop-lists or checkboxes; or hide fields. This is done by right-clicking a field on the Transaction Design screen and bringing up the GOLDTeller Transaction Field Properties screen, as shown below:

From time to time, programmers will add new fields to a transaction. When the field is added, it is defaulted to a generic name such as "F/M New Data" or "Y/n Field 1." The GOLDTeller administrator at your institution must change those field names to something more useful to tellers. Or they can choose to hide the field on the transaction.
•To change a field name, in the Field Name field, delete the name that is there, and then type the new name of the field. In the example above, we would change "F/M New Data" to "General Category." Your GOLDPoint Systems account manager can help you with what fields can be changed. Also see the Transactions section for detailed information concerning all GOLDPoint Systems transactions.
•To hide a field, check the PC Hide Field box. The field will be hidden on the transaction, and the teller will not be able to see it. If
You can also change a field to a droplist using this dialog box. See Creating a drop-list field for more information concerning this feature.
See the following definitions for each of the fields found on this dialog box.
Field |
Description |
|---|---|
Field |
This is the programmer name for this field. This name is not seen by the teller. You cannot make changes to this field; it is established by GOLDPoint Systems. |
Field Name |
This is the name of the field. You can change the name to something easier for your tellers to understand, if you want. This is what the tellers will see for this field when they process transactions. |
PC Hide Field |
Check this box if you want this field to be hidden from tellers. |
Default Field to Yes |
If this is a checkbox field, you can check this box to indicate that this field defaults to "Yes" (a checked box). |
Field Type |
This field allows you to choose what type of field you want this field to be. Choices are:
•Edit: This makes the field an edit field, where the user can enter any information in the field that is needed.
•Checkbox: This make the field a checkbox field, which is a simple yes or no the user indicates by either checking the box (yes) or leaving the box blank (no).
•Droplist: Droplists are a convenient way for users to select the field entry from a droplist. Once you select this radio button, select the type of droplist you want this field to be. Some pre-setup is required before a field can be a droplist. See Creating a drop-list field for more information. |
Description Position |
This field allows you to choose whether to place the field description (name) to the left of fields or above fields (see below):
|
Copy to Field |
This field allows you to copy the data to the destination selected in the drop-down box. |
Credit/Debit |
You cannot make changes to this field. This field is established by GOLDPoint Systems and shows whether the field is a credit, debit, or no monetary field. |
Location in hundredths of inches |
You cannot change these fields from this dialog box. Go back to the design screen and drag the field to a different location. Right-click the field again, and you can see where the location is in this field. |
Size in hundredths of inches |
You cannot change these fields from this dialog box. Go back to the design screen and click and hold on the end of a field, then drag it out to a new length. Unclick to let go of the field, then right-click the field to see how it affected the size of the field. |
Host Hide Field |
You cannot make changes to this field. This field is established by GOLDPoint Systems. It displays whether or not this field is hidden on the Host. |