Check Writer |
  

|
Navigation: Teller System > CIM GOLDTeller Overview > CIM GOLDTeller Screen Details > Functions >
Check Writer |
|
![]() Functions menu > Check Writer
Functions menu > Check Writer
Check Writer can either be selected from the Functions menu in CIM GOLDTeller, or it may show up automatically after a transaction is run. This may be determined by the Check Writer options explained on the PC Institution Settings screen > Settings Page Two tab, then see the Check Writer options.
|
CAUTION: If you access Check Writer directly from the Functions menu to print checks, use caution. GOLDPoint Systems suggests that this function be secured and only used when a reprint of a check is required. No audit trail is created for this function, and no corresponding transaction is processed. Check Writer should only be used at the end of a transaction when a check is printed due to the transaction. |
|---|
Before you can print checks from Check Writer, you must first set up the check formats (templates) using one of two screens:
1. |
For regular checks, use the Functions > Administrator Options > Print Form Design screen to create the check templates. Note: The MICR option must not be set in order to print regular checks. |
2. |
For MICR checks, use the Functions > Administrator Options > MICR Check Printing screen to create the check templates. Note: You must have an option set to print MICR Checks. |
To print a check from Check Writer in CIM GOLDTeller:
1.Select "Check Writer" from the Functions menu. If more than one check format has been set up, the Select Form dialog box is displayed, as shown below.
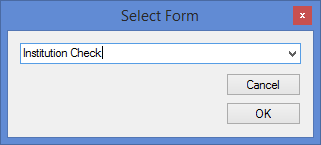
You will need to select the format you want to use from the drop-down list, then click <OK>.
If only one format is set up, then the system takes you directly to the Check Writer screen, as described in the next step.
Note: This first step is not needed if printing a check after a transaction is run, because Check Writer will automatically open (unless the PC Institution Settings do not allow it). Additionally, all the applicable fields will be automatically entered based on the transaction.
2.The Check Writer screen is displayed, as shown below.
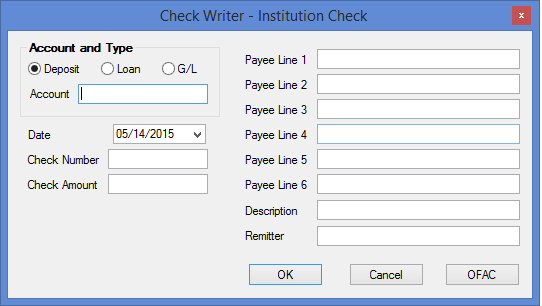
3.Select the radio button for this account, whether it's a Deposit, Loan, or G/L account.
4.Enter the account number in the Account field.
5.The Date will reflect today's date, but you can change it if you need to.
6.If your institution is using MICR checks, you will not be able to enter the Check Number. If you do not use MICR checks, check to see what check number is in the printer, and enter that number in this field.
7.Enter the amount of the check in the Check Amount field.
8.In the Payee Lines, enter the name of the person to whom the check is for. You can enter as many names as the check is for up to six names.
9.If you want to include a description for the check, enter it in the Description field. The Description field must be on the check format in order for the information to be printed on the check.
10.Enter the Remitter, if applicable.
11.Click ![]() . The check will print to the applicable printer. If the check destination is a printer, the Ready to Print Check dialog will display, if the Enable Ready to Print option is turned on from the Options menu.
. The check will print to the applicable printer. If the check destination is a printer, the Ready to Print Check dialog will display, if the Enable Ready to Print option is turned on from the Options menu.
Checks are printed using the Check Destination printer, as set up on the Functions > Administrator Options > System Configuration > Printer Defaults tab.