Navigation: Teller System > CIM GOLDTeller Overview > Setup Requirements > System Configuration >
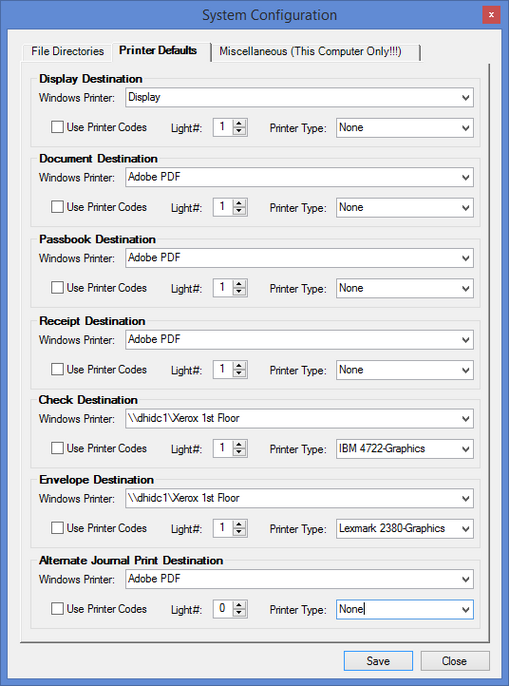
The Printer Defaults tab on the System Configuration screen allows you to set up the printers where print jobs in CIM GOLDTeller will automatically go. For example, if you print checks from CIM GOLDTeller, you would set up the Check Destination printer to be the printer you use to print checks.
The Printer Defaults tab applies to GOLDTeller printing only. Note: There are a few print options that use Windows Printer options (e.g., <Ctrl> + P).
With the installation of GOLDTeller in CIM GOLD version 7.5 and above, your institution's previous GOLDTeller printer settings are removed. By going to the Printer Defaults tab (shown below), you can easily set these back up by using the drop box selections to the right of each printer type. It is recommended that you take a screen capture of what printers you are currently using prior to the new install.
Note: If your institution works with terminals that reside in a different building than the DB4 server, you will need to set an option on the Settings Page Two tab of the PC Institution Setting screen (under Functions > Administrator Options). Checkmark the option called Match Base Printer Name for Terminal Server Client. Also, if the Use Operator Controlled Print Destination option is selected on the Operator Information screen, CIM GOLDTeller will use the Windows print controls. See the Print Options topic on the Operator Information help for more information.

Functions > Administrator Options > System Configuration Screen > Printer Defaults Tab
The following table describes the type of print jobs available from CIM GOLDTeller:
Print Name |
Description |
|---|---|
Display Destination |
After a transaction is run, the results of the transaction are displayed in the fourth quadrant of the main CIM GOLDTeller screen, also known as the Output Display. You should keep this selection set to "Display." Once you are done running the transaction, you can right-click it and select "Print Output Display." |
Document Destination |
Use this selection to designate to which printer documents are sent. Documents are set up under Functions > Administrator Options > Print Form Design. Examples of documents include balance sheets and journal reports. |
Passbook Destination |
If your institution prints passbook documents, this selection determines where the passbook is printed. |
Receipt Destination |
This selection determines where the receipt for a transaction is printed. Some transactions are configured to automatically print a receipt after the transaction is run. Other times, you can manually print a receipt after a transaction is run by right-clicking the Output Display and selecting "Print Output Display." You can also reprint the receipt by pressing <Ctrl> + R on your keyboard. |
Checks Destination |
This selection determines where checks are printed when a transaction is run that requires printing a check. Before the check is printed, the Check Writer function appears. See Check Writer for more information. |
Envelope Destination |
This selection determines where envelopes are printed. You can print envelopes from Functions > Print Functions. |
Alternate Journal Print Destination |
If you want to use a different printer for the Journal/Forwarding function, select the printer from this field. Please note that an option must be set on the Functions > Administrator Options > PC Institution Settings screen > Settings Page One tab. The option is called Use Alternate Journal Printer. |
Printer destinations can be connected to local or network printers. Use the Windows Printer drop-list for each applicable Printer Destination.
Note: An operator option is available for users who do not have security access to the System Configuration screen, and therefore, cannot make changes to their printer destinations. When this option, Change Print Destination at Signon, is set on the Print Options tab of the Operator Information screen, the Print Destinations screen is displayed after the user logs on. The user can then select the printers to print to.
Laser Printers
If a laser printer is the designated printer, the Printer Type must be "none." Deselect the Use Printer Codes checkbox.
Teller Printers
If a teller printer (e.g., Wincor, Epson, AdMaster) is the designated printer, in addition to the Windows Printer designation, you should also set up the following requirements:
•Check the Use Printer Codes box.
•Set the Light field to "1."
•Set Printer Type as instructed by GOLDPoint Systems. This gives the printer the programmed instructions on how to function.
See also: