Tying Forms to Transactions |
  

|
Navigation: Teller System > CIM GOLDTeller Overview > CIM GOLDTeller Screen Details > Functions > Administrator Options > Transaction Design >
Tying Forms to Transactions |
|
Some transactions require a check after the transaction is run. Other transactions require a receipt. This topic explains how to tie a forms (checks, total tellers, receipts, etc.) to a transaction that will print after a transaction is run. Where the form is printed (to the display, to a printer, to PDF, etc.) is determined using the Functions > Administrator Options > System Configuration screen > Printer Defaults tab.
Note: Before doing this step, you should set up checks and receipts using the Print Form Design screen. If you print MICR-encoded checks, you need to set them up using the Functions > Administrator Options > MICR Check Form Designer screen. Your GOLDPoint Systems account manager will need to help you with this step.
Note: Receipts must be set up and modified by GOLDPoint Systems. Programming is often involved. Contact your GOLDPoint Systems account manager or send in a work order if you would like to change any wording on receipts.
|
GOLDPoint Systems Only: If clients have a Word® file they want to use for receipts, see Creating Receipts from Text Files. |
|---|
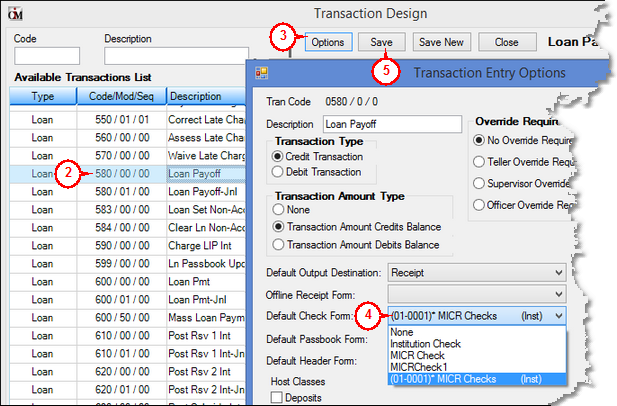
1. |
Select Functions > Administrator Options > Transaction Design. |
2. |
Scroll and select the transaction you want to add a check to in the transaction list on the left side of the screen. The transaction will be displayed on the right side of the screen. |
3. |
With the transaction displayed, click |
4. |
In the Default Check Form field, select the check format you want to apply when this transaction is run and a check is created. This drop-down list displays any checks you created on the Print Form Design screen; or if using MICR checks, it displays the checks created on the MICR Check Form Designer screen. |
5. |
Click
See the following example of these steps: |
|
|
1. |
Select Functions > Administrator Options > Transaction Design. |
2. |
Scroll and select the transaction you want to add a receipt to in the transaction list on the left side of the screen. The transaction will be displayed on the right side of the screen. |
3. |
With the transaction displayed, click |
4. |
In the Default Header Form field, select the receipt format you want to apply when this transaction is run and a receipt is required. This drop-down list displays any receipts you created on the Print Form Design screen. |
5. |
Click
See the following example of these steps: |
|
|
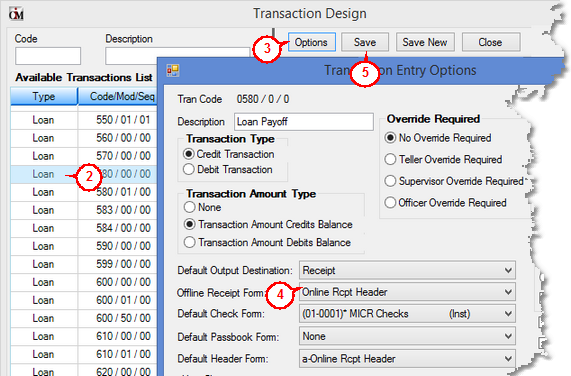
1. |
Select Functions > Administrator Options > Transaction Design. |
2. |
Scroll and select the transaction you want to add a receipt to in the transaction list on the left side of the screen. The transaction will be displayed on the right side of the screen. |
3. |
With the transaction displayed, click |
4. |
In the Offline Receipt Form field, select the receipt format you want to apply when this transaction is run and a receipt is required. This drop-down list displays any receipts you created on the Print Form Design screen. |
5. |
Click
See the following example of these steps: |
|
|
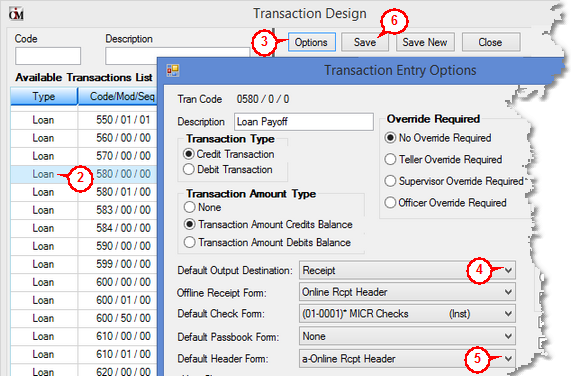
After a transaction is run, the output, or results of the transaction, are displayed, usually in the fourth quadrant of the main CIM GOLDTeller screen. However, you can change this destination per transaction by following these steps: |
||
|
||
|
||
|
||
|
||
See the following example of these steps: |
||
|