System Security Details |
  

|
Navigation: Security Screens > Setup Screen > System tab >
System Security Details |
|
The following tables list all possible security options on the System tab of the Security > Setup screen. Only personnel responsible for setting up security have access to set up these options for employees at your institution. These options affect which applications employees have access to, as well as other features and functions within applications, as detailed in this help topic.
|
Tip: Before making any changes to security, the Display Effective Security box on the Security > Setup screen must be unchecked. |
|
Tip: Changes to security requires users to close down the application they are using and log into it again before changes take affect. For that reason, we suggest you not update or change security until a time when no users are on the system. |
|
WARNING: Some users may be tied to a profile, or even two profiles, as well as have their own personal security settings. The system allows the highest security options available to that employee based on their profile or user security settings. The ranking of security settings are:
•Highest - Maintain •Middle - Inquire •Lowest - None
For example, employee Sally is tied to two profiles, Teller and Accounting, as well as her own security settings.
•The Teller Profile restricts Sally from accessing the Invoice screen in the Accounts Payable system (Accounts Payable Bit #08 set to None).
•The Accounting Profile allows inquiry-only access to the Invoice screen in the Accounts Payable system (Accounts Payable Bit #08 set to Inquire).
•Sally's personal security is set so that she has file maintainable access to the Invoice screen (Accounts Payable Bit #08 set to Maintain).
In this example, Sally would be able to access the Invoice screen in Accounts Payable and view, create, and make changes to invoices based on her personal security settings, even though the two profiles she's connected to would either not allow access or allow inquiry-only access.
See the System Profile tab for more information on how to set up System Profiles.
Field-level security does not affect fields in WinTerm/GOLDVision; it is only for CIM GOLD. |
|---|
Accounting Report Writer (Legacy)
Additional Loan Security (Legacy)
Alter Terminal ID (Legacy)
Change Terminal Options (Legacy)
Commercial Loan Menu (Legacy)
Customer Information File (Legacy)
Deposit System (Legacy)
Electronic Teller Journal (Legacy)
GOLD Services (Legacy)
GOLDTeller (Legacy)
Loan System (Legacy)
Materials Management (Legacy)
Old Report Warehouse (Legacy)
PC Check Image Utilities (Legacy)
System Print Batch Reports (Legacy)
Utility Programs (Legacy)
Accounting Report Writer - Application 7, Function 59
This security option is no longer used. This security option is now maintained within the Accounts Payable options described below. See 63 - Set Up Report Writer Reports below for more information on this security setting.
Accounts Payable - Application 7
Accounts Payable is accessed from Application 7 in either WinTerm or GOLDVision. If you mark either Inquire or Maintain for the main Accounts Payable option, as shown below, the user will have that type of access for all the functions inside Accounts Payable. If None is selected, the user will not be allowed to access Accounts Payable at all.
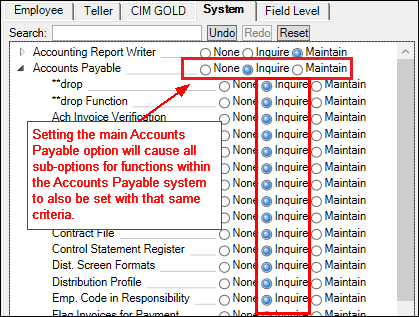
If you want the user to have a mix of some inquiry and some file maintenance access to Accounts Payable functions, indicate as such in each of the options described below.
|
Note: Always set the following two options to "None," regardless of whether or not the user should have access to these options. These options affect other options in the Accounts Payable system, so it's best to set these to None.
|
|---|
Description |
||
|---|---|---|
01 |
Report Formats (function 59, then Fct# 2 for variable reports) |
•If set to Maintain, employees can access function 59 in the Accounts Payable system, enter "2" in the Fct# field, and enter a variable report number in the Report # field. This allows them to access the variable screen and set up a new format for that report. They can select which fields will be printed on the report. They can also remove fields from already created report formats.
•If set to Inquire, employees can access function 59 and use Fct #1, Print Reports, but they will not be able to access Fct# 2 to view, change, or create a variable format. They will receive the following message at the bottom of the screen: "Security does not authorize this request."
•If set to None, employees cannot access function 59. They will receive the following message at the bottom of the screen: "Security does not authorize this request."
Many Accounts Payable reports have variable formats, meaning the fields and information that are printed on the report may vary. See section 6.1, Formatting Reports, in the Accounts Payable manual for more information. |
02 |
Print Reports (function 59, then Fct# 1) |
This security option is available for users with Inquire and Maintain security. If set to None, users are not allowed to access Function 59.
To print Accounts Payable reports, enter "59" in the main Accounts Payable application, then Fct# 1 and the number for the report you want to print. See Chapter 6, Reports, in the Accounts Payable manual on DocsOnWeb for more information. |
03 |
Print Checks (function 20) |
Only users with this security option set to Maintain will be able to print checks in the Accounts Payable system from function 20. Users set to Inquire or None are not authorized to access function 20 in Accounts Payable.
Printing checks is a multi-step process, starting with adding vendors to the Vendor Master file (function 18), creating invoices to pay to those vendors (function 30), flagging invoices for payment (function 8), or even setting up recurring payments (function 34).
However, to actually print checks for vendors, use function 20, as explained in section 5.6, Print Checks, in the Accounts Payable manual in DocsOnWeb. |
04 |
Flag Invoices for Payment (functions 8, 12, 15) |
•If this option is set to Maintain, users will have access to view and change information on the Flag Invoices for Payment screen (function 8), Remove "To Be Paid" Flag screen (function 12), and Invoices Flagged for Payment screen (function 15) in Accounts Payable.
•If this option is set to Inquire, users will have not have access to the Flag Invoices for Payment screen (function 8) and Remove "To Be Paid" Flag screen (function 12), but they can view which invoices have been flagged for payment on the Invoices Flagged for Payment screen (function 15) in Accounts Payable.
•If this option is set to None, users will not be able to access the Flag Invoices for Payment screen (function 8), Remove "To Be Paid" Flag screen (function 12), and Invoices Flagged for Payment screen (function 15) in Accounts Payable. |
05 |
Check Register (function 27) |
•If this option is set to Maintain or Inquire, users can access the Check Register screen (function 27 in Accounts Payable). The Check Register (function 27) is created to display or report all checks that have not been purged from the A/P Open Item file. When a check number has been printed, it will be recorded to the Check Register along with the vendor, amount, and invoice information.
•If this option is set to None, users will not have access to the Check Register screen. |
06 |
Cash Planning (function 4) |
•If this option is set to Maintain, users will have access to view and change information on the Cash Requirements screen (function 4) in Accounts Payable.
•If this option is set to Inquire or None, users will not have access to view or change information on the Cash Requirements screen. Instead, the following message will appear at the bottom of the screen: Security does not authorize this request. |
07 |
Transaction Processing (function 30) |
•If this option is set to Maintain, users will have access to create invoice transactions on the Transaction Posting screen (function 30) in Accounts Payable.
•If this option is set to Inquire, users will have view-only access to Transaction Posting but only if accessed from function 29 (not function 30). This will allow users to view invoices, but they cannot make changes to the invoices. The user will need to know the vendor and invoice number in order to view the details of the invoice. They will be able to search for vendors by pressing <F11> from function 29. They can also search for invoices in the system by pressing <F10> from function 29 and searching by invoice number. Once they find the invoice and vendor they are looking for, they can return to the Invoice Inquiry screen (function 29) and enter the invoice and vendor numbers to view the details of that invoice.
•If this option is set to None, users will not be allowed to access either function 29 or 30.
For more information about this function, see section 4.1, Invoice Processing, in the Accounts Payable manual on DocsOnWeb.
See also: |
08 |
Invoice Payee (function 30) |
•If this option is set to Maintain, users will have access to create invoice transactions on the Transaction Posting screen (function 30) in Accounts Payable.
•If this option is set to Inquire , users will have view-only access to Transaction Posting but only if accessed from function 29 (not function 30). This will allow users to view invoices, but they cannot make changes to the invoices. The user will need to know the vendor and invoice number in order to view the details of the invoice. They will be able to search for vendors by pressing <F11> from function 29. They can also search for invoices in the system by pressing <F10> from function 29 and searching by invoice number. Once they find the invoice and vendor they are looking for, they can return to the Invoice Inquiry screen (function 29) and enter the invoice and vendor numbers to view the details of that invoice.
•If this option is set to None, users will not be allowed to access either function 29 or 30.
For more information about this function, see section 4.1, Invoice Processing, in the Accounts Payable manual on DocsOnWeb.
See also: |
09 |
Post Recurring Payments (function 34) |
•If this option is set to Maintain, users will have access to post recurring payments for invoice control groups on the Post Recurring Payment screen (function 34) in Accounts Payable.
•If this option is set to Inquire or None, users will not have access to the Post Recurring Payment screen.
Before recurring payments can be posted, they must first be set up using the Recurring Payments screen (function 13/14). The security option to allow setting up recurring payments is bit 13, Recurring Payments.
For more information about this function, see section 4.3, Post Recurring Payments, in the Accounts Payable manual on DocsOnWeb.
See also: |
10 |
Distribution Profile (function 5/6) |
•If this option is set to Maintain, users will have access to set up and view distribution profiles on the Distribution Profile screen (function 5/6) in Accounts Payable.
•If this option is set to Inquire, users can access the Distribution Profile screen from function 5, but they will only be allowed to view information; they cannot set up or change information.
•If this option is set to None, users will not have access to the Distribution Profile screen from either function 5 or 6.
For more information about this function, see section 3.1, Distribution Profiles, in the Accounts Payable manual on DocsOnWeb. |
11 |
Void Checks (function 24) |
•If this option is set to Maintain, users will be able to void checks that have been flagged for payment using the Void Checks screen (function 24). Checks must have first been printed using function 20 (Print Checks).
•If this option is set to Inquire or None, users will be restricted from access function 24.
For more information about this function, see section 5.7, Void Checks, in the Accounts Payable manual on DocsOnWeb. |
12 |
Check Reconciliation (function 32) |
•If this option is set to Maintain, users will have access to the Check Reconciliation system (function 32), where they can view check details, a summary of all checks, and print a Check Reconciliation Report.
•If this option is set to Inquire or None, users cannot access the Check Reconciliation system.
For more information about the Check Reconciliation system in Accounts Payable, see section 5.9, Check Reconciliation, in the Accounts Payable manual on DocsOnWeb.
Note: The Check Reconciliation system in CIM GOLD also tracks and displays checks from Accounts Payable. Check Reconciliation in CIM GOLD is found under GOLD Services. See the help for that screen for more information on using Check Reconciliation in CIM GOLD. Security for the Check Reconciliation tab in CIM GOLD is controlled on the CIM GOLD tab of the Security > Setup screen. |
13 |
(function 13/14) |
•If this option is set to Maintain, users will have access to set up and view recurring payments on the Recurring Payments screen (function 14) in Accounts Payable.
•If this option is set to Inquire, users can access the Recurring Payments screen from function 13, but they will only be allowed to view information; they cannot set up or change information.
•If this option is set to None, users will not have access to the Recurring Payments screen from either function 13 or 14.
For more information about this function, see section 3.3, Recurring Payments, in the Accounts Payable manual on DocsOnWeb. |
14 |
Dist. Screen Formats (function 9/10) |
•If this option is set to Maintain, users will have access to set up and view distribution formats on the Distribution Formats screen (function 10) in Accounts Payable.
•If this option is set to Inquire, users can access the Distribution Formats screen from function 9, but they will only be allowed to view information; they cannot set up or change information.
•If this option is set to None, users will not have access to the Distribution Formats screen from either function 9 or 10.
For more information about this function, see section 3.2, Distribution Formats, in the Accounts Payable manual on DocsOnWeb. |
15 |
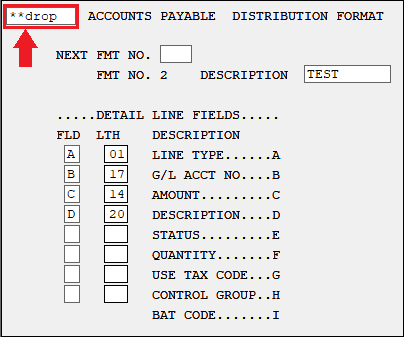
**drop (function 6, 10, 30) |
•If this option is set to Maintain, users can drop distribution profiles from the Distribution Profiles screen (function 6), as well as distribution formats from the Distribution Format screen (function 10). They can also drop invoices that have previously been created using function 30.
•If this option is set to Inquire or None, users will not be able to delete distribution profiles and formats.
To drop a profile or format:
1.Access the applicable screen (function 6 or 10). 2.Access the profile or format you want to delete. 3.In the top-left date field, delete the date and enter "**drop" as shown below: 4.Press <Enter>. The distribution profile or format has been deleted. You can always add it back later if you did these steps by mistake. See section 3.2, Distribution Formats, and section 3.1, Distribution Profiles, in the Accounts Payable manual on DocsOnWeb for more information.
 |
16 |
Report Writer (function 63) |
•If this option is set to Maintain, users will have access to create, modify, delete, and run reports in Report Writer (function 63) in Accounts Payable. See also the other Report Writer security options below.
•If this option is set to Inquire, users can access Report Writer (function 63) in Account Payable, but they will not be able to create, modify, or delete report; they will only be allowed to run reports (Function No. 1), if they have security access to do that. See also the other Report Writer security options below.
•If this option is set to None, users can access function 63, but they cannot create, modify, delete, or even run reports.
See Chapter 7, Report Writer, in the Accounts Payable manual on DocsOnWeb for more information. |
17 |
**drop |
This option is no longer used. |
18 |
Category Codes |
This security option is no longer used. It used to control who had access to the Category Master screen (function 2, then function 2) in Accounts Payable. GOLDPoint Systems no longer uses the Category Master screen. |
19 |
Ship to Locations |
•If this option is set to Maintain, users will have access to create, modify, and view records on the Ship to Location Master screen, accessed from function 1 or 2, then function 1.
•If this option is set to Inquire, users can view the Ship to Location Master screen, but only through function 1 (Control Functions), then function 1; not function 2 (Control Functions). This gives users view-only access to the Ship to Location Master screen.
•If this option is set to None, users cannot access the Ship to Location Master screen from either function 1 or 2 of Control Functions.
See section 2.2, Ship to Location, in the Accounts Payable manual for more information about this function. |
20 |
Responsibility File (function 2, then function 3) |
This security option is no longer used. It used to control who had access to the Responsibility Master screen (function 2, then function 3) in Accounts Payable. GOLDPoint Systems no longer uses the Responsibility Master screen. |
21 |
Vendor File (function 17/18) |
•If this option is set to Maintain, users will have access to create, modify, and view vendor records on the Vendor Master screen (function 18).
•If this option is set to Inquire, users can view the Vendor Master screen from function 17, but not from function 18. The user will not be allowed to make any changes to vendor information; only readable access.
•If this option is set to None, users cannot access the Vendor Master screen from either function 17 or 18.
See section 2.5.1, Vendor Master, in the Accounts Payable manual for more information about this function. |
22 |
Inventory Product |
No longer used. |
23 |
Inventory Product Spcl Changes |
No longer used. |
24 |
Item Profiles |
No longer used. |
25 |
Screen Formats |
No longer used. |
26 |
Print Requests (function 2, then function 5) |
•If set to Maintain, users will have access to the Materials Management Print Options screen to print a report listing all possible responsibility master names, report formats, or screen format listings. This screen is accessed from function 2, then function 5 in Accounts Payable.
•If set to Inquire, users can access the Materials Management Print Options screen through function 1, then function 5, but not through function 2, then function 5.
•If set to None, users cannot access the Materials Management Print Options screen.
See section 2.6, Print Options, in the Accounts Payable manual for more information. |
27 |
Contract File |
No longer used. |
28 |
Location Profiles |
No longer used. |
29 |
Multiple File Changes |
No longer used. |
30 |
Capital Approval |
No longer used. |
31 |
Emp. Code in Responsibility |
No longer used. |
32 |
Vendor Alternate Payee (function 17/18, then <F1>) |
•If set to Maintain, the user has access to create, change, or view the Vendor Alternate Payee information on the Vendor Master Screen 2, which is access via function 18, then <F1>.
•If set to Inquire, the user has access to view the Vendor Alternate Payee information on the Vendor Master Screen 2, but the user cannot make any changes to the information. Additionally, the user must access this screen from function 17, then <F1>, not function 18, then <F1>.
•If set to None, the user will not be able to view or change Vendor Alternate Payee information.
For more information on the Vendor Master Screen 2, see section 2.5.2, Additional Information, in the Accounts Payable manual. |
Restrict Detail Fields |
This option works backwards from what you might assume. This option should always be set to "None." If it is not set to None, users will not be able to set up vendors (function 18) and create invoice transactions for those vendors (function 30).
For example, if this option is set to Maintain, and the user tries creating an invoice for a vendor (function 30), the system will return the following error message after entering all the information on the screen and pressing <Enter>:
"**SECURITY** MAY NOT POST TO THIS BRANCH.**"
If you get this error message, make sure the Restrict Detail Fields and Only Post Term Table Office options are set to "None." You may also need to delete your cache files in CIM GOLD. |
|
36 |
ACH Invoice Verification |
This security option be set to Maintain in order to access the ACH Invoice Verification screen and mark the ACH VER field to "Y" (yes). |
39 |
ACH Pmt Threshold Verification |
This option must be set to Maintain in order to access the ACH Invoice Verification screen and mark the THR VER field to "Y" (yes).
Note: This security option only applies to institutions that have entered an amount that is greater than 0 in the ACH Payment Threshold field on the Accounts Payable Option screen (Application 18, Function 4). |
61 |
Change Client Number (function 66) |
Regardless of what security option is set (Maintain, Inquire, None), users can use Function 66 (Change Client Number) to change the client number used for Accounts Payable. Some institutions have many client numbers, usually associated with each office or branch, and other institutions only have one.
When users first access the Accounts Payable system, they can access the client number by enter "66" in the Function field, and the client number in the Number field. Once users press <Enter>, the client number is displayed in the top-left date field to show what client number is currently being accessed (see below).
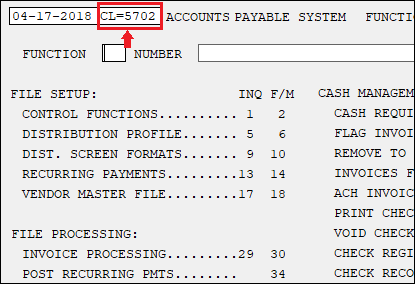
GOLDPoint Systems can assist your institution in setting up client numbers and their applicable settings. Once the client number is retrieved, users can use the Accounts Payable system according to the options for that client (office).
Tip: When you first log into Accounts Payable, the default branch of 0 is used. |
Only Post to Term Table Office (functions 30 and 34) |
This option works backwards from what you might assume. This option should always be set to "None." If it is not set to None, users will not be able to create invoice transactions for vendors (function 30), nor set up recurring payments for vendors (function 34).
For example, if this option is set to Maintain, and the user tries creating an invoice for a vendor (function 30), the system will return the following error message after entering all the information on the screen and press <Enter>:
"**SECURITY** MAY NOT POST TO THIS BRANCH.**"
If you get this error message, make sure the Restrict Detail Fields and Only Post Term Table Office options are set to "None." You may also need to delete your cache files in CIM GOLD. |
|
Set Up Report Writer Reports (function 63) |
If this option is set to "Maintain," users will have access to create, change, or delete reports in Report Writer in the Accounts Payable system in GOLDVision (or WinTerm if your institution uses that instead). After logging on to the Accounts Payable system (Application 7) and accessing the Report Writer function (function 63), users can create/change reports using any of the following functions:
•Function No 2 (Modify Report) •Function No 3 (Create New Report) •Function No 4 (Copy Report No)
Note: Currently, Function No 6 (Delete Report) does not respond to this security option. All users (None, Inquire, and Maintain) can delete Report Writer report setups.
If security is set up to Inquire or None, the user will not be able to access any of these functions. The system will display the following message at the bottom of the screen: "Security does not authorize this request."
See Chapter 8, The Accounting Report Writer, in DocsOnWeb for more information about these functions. |
|
64 |
Run Report Writer Reports (function 63, then Function No 1) |
If this option is set to Maintain, users will have access to run reports in Report Writer in the Accounts Payable system in GOLDVision (or WinTerm if your institution uses that instead).
To run a report in Report Writer:
1.Access the Report Writer screen (function 63) in the Accounts Payable System (Application 7). This brings up the Report Writer Function Selection screen. 2.Once on the Report Writer Function Selection screen, type "1" in the Function No field (designates running a report). 3.Enter the Report No or Screen No for which you want to run a report in one the provided fields. 4.Press <Enter> on your keyboard.
Users will also have access to modify logic before running the report, if the report has been set up to allow for logic modifications (function 63, then Function No 7).
If users are set up with Inquire or None, they will not be allowed to run reports in Report Writer in Accounts Payable.
See Chapter 8, The Accounting Report Writer, in DocsOnWeb for more information about this function. |
Additional Loan Security - Application 3
These security options are only used if your institution uses the legacy Loan system in GOLDVision/WinTerm (Application 3). If you use the Loan system in CIM GOLD, security to use those screens is set up on the CIM GOLD tab. The legacy Loan system in GOLDVision is no longer supported. This is for information purposes only.
|
CAUTION: If your institution still uses the legacy GOLDVision/WinTerm system, you must be cautious about who has access to these screens. If users change information in specific fields in GOLDVision/WinTerm, those changes will also update the Host record, which means those changes will be reflected in CIM GOLD. For example, if a user with Maintain access changes the Original Balance on a loan (the LNOBAL field) on function 10 in the Loan system in GOLDVision, that information will also be reflected in the LNOBAL field in CIM GOLD (in the Original Balance field on the Loans > Account Information > Additional Loan Fields screen). Only supervisors and managers should be given security access to legacy loan fields. Or better yet, do not turn on these settings for anyone at your institution. Instead, use the CIM GOLD tab to establish who has access to screens in CIM GOLD.
Additionally, field-level security doesn't work in GOLDVision/WinTerm. So even if a user is restricted from making changes to a field (such as the Original Balance field) on the Field-level Security screen in CIM GOLD, if they have access to function 10 in GOLDVision/WinTerm, they would be able to change the field (e.g., Original Balance). |
|---|
The following functions are found in Sub Menu 2 (function 43) of the legacy Loan system (Application 3) in GOLDVision/WinTerm.
Description |
CIM GOLD Companion Screen |
||
|---|---|---|---|
01 |
LOC Sub-limits |
For editor users only (GOLDPoint Systems). |
Not available in CIM GOLD. |
02 |
LOC Sub-limits Descriptions |
For editor users only (GOLDPoint Systems). |
Not available in CIM GOLD. |
03 |
Stop Payment Screen |
For editor users only (GOLDPoint Systems). |
Not available in CIM GOLD. |
04 |
Private Mortgage Insurance |
•If set to Maintain or Inquire, the user has access to create, edit, or view information on the Private Mortgage Insurance screen (function 43, then 23/24) in the Loan system in GOLDVision/WinTerm.
•If set to None, the user will not be able to view or change information on the Private Mortgage Insurance screen.
For more information on the Private Mortgage Insurance screen, see Chapter 23, Private Mortgage Insurance, in the legacy Loan System Reference manual on DocsOnWeb. |
Not available in CIM GOLD. |
05 |
Credit Bureau Reporting |
For editor users only (GOLDPoint Systems). |
Loans > Credit Reporting Screen |
06 |
Consumer Loan Fields |
For editor users only (GOLDPoint Systems). |
Not available in CIM GOLD. |
07 |
Skip History On Statements |
For editor users only (GOLDPoint Systems). |
Not available in CIM GOLD. |
08 |
Access to Employee Accounts |
No longer used. Note: Access to employee accounts is now controlled on the System tab under PC Applications and setting the following security options:
•CIM Can See Employee Dep Hist •CIM Can See Employee Ln Accts •CIM Can See Employee Ln Hist •CIM Can View Employee Accts •Crmgold Access to Emp/off Acct |
|
09 |
Transaction Reversal |
For editor users only (GOLDPoint Systems). |
Loans > Transactions > Payment Reversal |
10 |
Pre-payment Penalty Codes |
For editor users only (GOLDPoint Systems). |
Loans > System Setup Screens > Pre-Payment Penalty Option Screen |
11 |
Loan Pre-payment Penalty |
For editor users only (GOLDPoint Systems). |
Loans > Account Information > Account Detail Screen > Pre-Payment Penalty Tab |
12 |
Average Balances |
For editor users only (GOLDPoint Systems). |
Loans > Account Information > Account Detail Screen > Statistics Tab > Average Balances Tab |
13 |
Loan Type Descriptions |
For editor users only (GOLDPoint Systems). |
Loans > System Setup Screens > Loan Product Types Screen |
14 |
Exception Status Fields |
Not used. |
Not available in CIM GOLD. |
15 |
LIP Descriptions |
For editor users only (GOLDPoint Systems). |
Loans > System Setup Screens > Construction Budget Descriptions |
16 |
Payee Range 0-999 |
For editor users only (GOLDPoint Systems). |
Loans > Payee Information Screen |
17 |
Payee Range 1000-1999 |
For editor users only (GOLDPoint Systems). |
Loans > Payee Information Screen |
18 |
Payee Range 2000-2999 |
For editor users only (GOLDPoint Systems). |
Loans > Payee Information Screen |
19 |
Payee Range 3000-3999 |
For editor users only (GOLDPoint Systems). |
Loans > Payee Information Screen |
20 |
Payee Range 4000-4999 |
For editor users only (GOLDPoint Systems). |
Loans > Payee Information Screen |
21 |
Payee Range 5000-5999 |
For editor users only (GOLDPoint Systems). |
Loans > Payee Information Screen |
22 |
Contract Type Descriptions |
For editor users only (GOLDPoint Systems). |
Loans > System Setup Screens > Contract Type Descriptions Screen |
23 |
Convert Precompute Loans |
Use CIM GOLD for this process. Not available in GOLDVision/WinTerm. |
Loans > Transactions > Charge-off Transactions Screen > Convert Precomputed to Simple Tab |
24 |
Miscellaneous Fees |
Use CIM GOLD for this process. Not available in GOLDVision/WinTerm. |
Loans > System Setup Screens > Client Code Setup > Miscellaneous Fee Codes |
25 |
Amortizing Fees |
Use CIM GOLD for this process. Not available in GOLDVision/WinTerm. |
Loans > System Setup Screens > Amortization Descriptions |
64 |
Access to Employee Accounts |
No longer used. Note: Access to employee accounts is now controlled on the System tab under PC Applications and setting the following security options:
•CIM Can See Employee Dep Hist •CIM Can See Employee Ln Accts •CIM Can See Employee Ln Hist •CIM Can View Employee Accts •Crmgold Access to Emp/off Acct |
Alter Terminal ID - Application 30
This security option is no longer used.
This option is only used and maintained by GOLDPoint Systems.
Commercial Loan Menu - Application 5
These security options are currently not used. Moving Commercial Loans into CIM GOLD will be available in future releases of CIM GOLD. We will notify you through the CIM GOLD What's New when these screens are available.
CORE Tools are essential to setting up institutions on different GOLDPoint Systems applications, such as CIM GOLD and GOLDPhone. This option is only maintained by GOLDPoint Systems.
Customer Information File - Application 9
These security options are only used if your institution uses the legacy CIF system in GOLDVision/WinTerm (Application 9). If you use the new CIF system in CIM GOLD (also referred to as the Customer Relationship Management system), security to use those screens is set up on the CIM GOLD tab. Legacy CIF in GOLDVision is no longer supported. This is for information purposes only.
|
CAUTION: If your institution still uses the legacy GOLDVision/WinTerm system, you must be cautious about who has access to these screens. If users change information in specific fields in GOLDVision/WinTerm, those changes will also update the Host record, which means those changes will be reflected in CIM GOLD. For example, if a user with Maintain access changes the Original Balance on a loan (the LNOBAL field) on function 10 in the Loan system in GOLDVision, that information will also be reflected in the LNOBAL field in CIM GOLD (in the Original Balance field on the Loans > Account Information > Additional Loan Fields screen). Only supervisors and managers should be given security access to legacy fields. Or better yet, do not turn on these settings for anyone at your institution. Instead, use the CIM GOLD tab to establish who has access to screens in CIM GOLD.
Additionally, field-level security doesn't work in GOLDVision/WinTerm. So even if a user is restricted from making changes to a field (such as the Original Balance field) on the Field-level Security screen in CIM GOLD, if they have access to function 10 in GOLDVision/WinTerm, they would be able to change the field (e.g., Original Balance). |
|---|
Description |
||
|---|---|---|
01 |
Access to CIF Management |
•If set to Maintain, users can access and make changes to screens in the legacy CIF system in GOLDVision (Application 9). However, to make changes to information on other screens within the CIF system, the user must also have Maintain access for the screens explained below.
•If set to Inquire, users have view-only access to screens in the legacy CIF system in GOLDVision (Application 9). However, to view information on other screens within the CIF system, the user must also have Inquiry access for the screens explained below.
•If set to None, users do not have access to the legacy CIF system. The other options explained below will all be set to None as well. |
02 |
CIF Inquiry |
•If set to Maintain, users can access and look for information using the CIF Inquiry screen (function 2) in the legacy CIF system in GOLDVision (Application 9).
•If set to Inquire, users have view-only access to search for information using the CIF Inquiry screen (function 1) in the legacy CIF system in GOLDVision (Application 9). They can only access the screen from function 1, not function 2.
•If set to None, users do not have access to search for CIF information in the legacy CIF system using either function 1 or 2.
See section 9.2.1, CIF/Extended Inquiry (Function 1/2), in the legacy CIF System manual on DocsOnWeb for more information. |
03 |
Simple Entry |
•If set to Maintain, users can access, view, and change address and name information linked to accounts using the Simple Entry screen (function 6) in the legacy CIF system in GOLDVision (Application 9).
•If set to Inquire, users have view-only access to address and name information linked to accounts on the Simple Entry screen (function 5) in the legacy CIF system in GOLDVision (Application 9). They can only access this screen from function 5, not function 6.
•If set to None, users do not have access to the Simple Entry screen from either function 5 or 6.
See section 2.1, Simple Entry Screen (Function 5/6), in the legacy CIF System manual on DocsOnWeb for more information. |
04 |
Head of Household Information |
•If set to Maintain, users can access, view, and change head of household information using the Head of Household Information screen (function 10) in the legacy CIF system in GOLDVision (Application 9).
•If set to Inquire, users have view-only access to head of household information on the Head of Household Information screen (function 9) in the legacy CIF system in GOLDVision (Application 9). They can only access this screen from function 9, not function 10, and they cannot make any changes to information on this screen.
•If set to None, users do not have access to the Head of Household Information screen from either function 9 or 10.
See section 3.2, Head of Household Information (Function 9/10), in the legacy CIF System manual on DocsOnWeb for more information. |
05 |
Household Names |
•If set to Maintain, users can access, view, and change names in households using the Households Names screen (function 14) in the legacy CIF system in GOLDVision (Application 9).
•If set to Inquire, users have view-only access to names in households on the Households Names screen (function 17) in the legacy CIF system in GOLDVision (Application 9). They can only access this screen from function 13, not function 14, and they cannot make any changes to information on this screen.
•If set to None, users do not have access to the Household Names screen from either function 13 or 14.
See section 4.1, Household Names (Function 13/14), in the legacy CIF System manual on DocsOnWeb for more information. |
06 |
Household Addresses |
•If set to Maintain, users can access, view, and change addresses in households using the Households Addresses screen (function 18) in the legacy CIF system in GOLDVision (Application 9).
•If set to Inquire, users have view-only access to addresses in households on the Households Addresses screen (function 17) in the legacy CIF system in GOLDVision (Application 9). They can only access this screen from function 17, not function 18, and they cannot make any changes to information on this screen.
•If set to None, users do not have access to the Households Addresses screen from either function 17 or 18.
See section 5.1, Household Addresses (Function 17/18), in the legacy CIF System manual on DocsOnWeb for more information. |
07 |
Household Accounts |
•If set to Maintain, users can access, view, and change accounts tied to households using the Household Accounts screen (function 22) in the legacy CIF system in GOLDVision (Application 9).
•If set to Inquire, users have view-only access to accounts tied to households on the Households Addresses screen (function 21) in the legacy CIF system in GOLDVision (Application 9). They can only access this screen from function 21, not function 22, and they cannot make any changes to information on this screen.
•If set to None, users do not have access to the Households Addresses screen from either function 21 or 22.
See section 6.1, Household Accounts (Function 21/22), in the legacy CIF System manual on DocsOnWeb for more information. |
08 |
F/M History |
•If set to Maintain, users can access, view, and drop history items from the File Maintenance History screen (function 26) in the legacy CIF system in GOLDVision (Application 9).
•If set to Inquire, users have view-only access to account history on the File Maintenance History screen (function 25). They can only access this screen from function 25, not function 26, and they cannot drop history items.
•If set to None, users do not have access to the File Maintenance History screen from either function 25 or 26.
See section 8.1, File Maintenance History (function 25/26), in the legacy CIF System manual on DocsOnWeb for more information. |
09 |
Advertising Messages |
•If set to Maintain, users can access, view, and create advertising messages to be printed on statements using the Advertising Messages screen (function 30) in the legacy CIF system in GOLDVision (Application 9).
•If set to Inquire, users have view-only access to advertising messages on the Advertising Messages screen (function 29). They can only access this screen from function 29, not function 30, and they cannot create, change, or delete any advertising messages.
•If set to None, users do not have access to the Advertising Messages screen from either function 29 or 30.
See section 11.1, Advertising Messages (Function 29/30), in the legacy CIF System manual on DocsOnWeb for more information. |
10 |
Household Members Inquiry |
•If set to Maintain or Inquire, users can view member names in a household using the Household Members Inquiry screen (function 33) in the legacy CIF system in GOLDVision (Application 9).
•If set to None, users do not have access to the Household Members Inquiry screen.
See section section 9.1.1, Household Members Inquiry (Function 33), in the legacy CIF System manual on DocsOnWeb for more information. |
11 |
Household Addresses Inquiry |
•If set to Maintain or Inquire, users can view addresses tied to households on the Household Addresses Inquiry screen (function 37) in the legacy CIF system in GOLDVision (Application 9).
•If set to None, users do not have access to the Household Addresses Inquiry screen.
See section 9.1.2, Household Addresses Inquiry (Function 37), in the legacy CIF System manual on DocsOnWeb for more information. |
12 |
Household Account Inquiry |
•If set to Maintain or Inquire, users can view accounts tied to households on the Household Accounts Inquiry screen (function 41) in the legacy CIF system in GOLDVision (Application 9).
•If set to None, users do not have access to the Household Accounts Inquiry screen.
See section 9.1.3, Household Accounts Inquiry (Function 41), in the legacy CIF System manual on DocsOnWeb for more information. |
13 |
CIF Keyed Lookup |
•If set to Maintain or Inquire, users can use the CIF Keyed Lookup screen (function 3) to view at-a-glance households, names, addresses, or account records. Then users can click the box-with-an-arrow icon to quickly view detailed information about that household, name, address, or account.
•If set to None, users do not have access to the CIF Keyed Lookup screen.
See section 10.1, CIF Keyed Lookup (Function 3), in the legacy CIF System manual on DocsOnWeb for more information. |
14 |
Batch N/A Record by Account |
•If set to Maintain or Inquire, users can use the Batch Name/Address Display screen (function 7) to view name, account, and address information for a household.
•If set to None, users do not have access to the Batch Name/Address Display screen.
See section 9.2.2, Batch Name/Address Record By Account (Function 7), in the legacy CIF System manual on DocsOnWeb for more information. |
15 |
Household Services |
•If set to Maintain, users can access, view, and add services offered to specific households using the Household Services screen (function 12) in the legacy CIF system in GOLDVision (Application 9).
•If set to Inquire, users have view-only access to the Household Services screen (function 11). They can only access this screen from function 11, not function 12, and they cannot add, change, or delete any household services.
•If set to None, users do not have access to the Advertising Messages screen from either function 29 or 30.
See section 11.1, Advertising Messages (Function 29/30), in the legacy CIF System manual on DocsOnWeb for more information. |
16 |
Detailed Name Information |
•If set to Maintain, users can access, view, and change name information using the Detailed Name Information screen (function 16) in the legacy CIF system in GOLDVision (Application 9).
•If set to Inquire, users have view-only access to the Detailed Name Information screen (function 15). They can only access this screen from function 15, not function 16, and they cannot change or delete any name information.
•If set to None, users do not have access to the Detailed Name Information screen from either function 15 or 16.
See section 4.2, Detailed Name Information (Function 15/16), in the legacy CIF System manual on DocsOnWeb for more information. |
17 |
Detailed Address Information |
•If set to Maintain, users can access, view, and change address information using the Detailed Address Information screen (function 20) in the legacy CIF system in GOLDVision (Application 9).
•If set to Inquire, users have view-only access to the Detailed Address Information screen (function 19). They can only access this screen from function 19, not function 20, and they cannot change or delete any address information.
•If set to None, users do not have access to the Detailed Address Information screen from either function 19 or 20.
See section 5.2, Detailed Address Information (Function 19/20), in the legacy CIF System manual on DocsOnWeb for more information. |
18 |
Detailed Account Information |
•If set to Maintain, users can access, view, and change account information using the Account Detail screen (function 24) in the legacy CIF system in GOLDVision (Application 9).
•If set to Inquire, users have view-only access to the Account Detail screen (function 23). They can only access this screen from function 23, not function 24, and they cannot change or delete any field data.
•If set to None, users do not have access to the Account Detail screen from either function 23 or 24.
See section 6.2, Account Detail (Function 23/24), in the legacy CIF System manual on DocsOnWeb for more information. |
19 |
Customer History |
•If set to Maintain, users can access, view, and change customer history using the Customer History screen (function 28) in the legacy CIF system in GOLDVision (Application 9).
•If set to Inquire, users have view-only access to the Customer History screen (function 27). They can only access this screen from function 27, not function 28, and they cannot change or delete any field data.
•If set to None, users do not have access to the Customer History screen from either function 27 or 28.
See section 8.2, Customer History (Function 27/28), in the legacy CIF System manual on DocsOnWeb for more information. |
20 |
Warning Messages |
Not used. |
21 |
Optional Key Display/Setup |
•If set to Maintain, users can access, view, and change customer variables/keys on the Manual Key Display/Setup screen (function 36) in the legacy CIF system in GOLDVision (Application 9).
•If set to Inquire, users have view-only access to the Manual Key Display/Setup screen (function 35). They can only access this screen from function 35, not function 36, and they cannot change or delete any variables.
•If set to None, users do not have access to the Manual Key Display/Setup screen from either function 35 or 36.
See section 10.3, Optional Key Display/Setup (Function 35/36), in the legacy CIF System manual on DocsOnWeb for more information. |
22 |
Define Search Keys |
•If set to Maintain, users can access, view, and change search key options on the Define Search Key Options screen (function 40) in the legacy CIF system in GOLDVision (Application 9).
•If set to Inquire, users have view-only access to the Define Search Key Options screen (function 39). They can only access this screen from function 39, not function 40, and they cannot change or delete any variables.
•If set to None, users do not have access to the Define Search Key Options screen from either function 39 or 40.
See section 10.2, Defining Search Keys (Function 40), in the legacy CIF System manual on DocsOnWeb for more information. |
23 |
Batch Report Assignments |
•If set to Maintain, users can access, view, and change information on the Assign Data To Batch Reports screen (function 44) in the legacy CIF system in GOLDVision (Application 9).
•If set to Inquire, users have view-only access to the Assign Data To Batch Reports screen (function 43). They can only access this screen from function 43, not function 44, and they cannot change or delete any data.
•If set to None, users do not have access to the Assign Data To Batch Reports screen from either function 43 or 44.
See section 6.3, Assign Data To Batch Reports (Function 43/44), in the legacy CIF System manual on DocsOnWeb for more information. |
24 |
ZIP Code Directory |
•If set to Maintain or Inquire, users can access the ZIP Code Directory screen (function 47) in the legacy CIF system in GOLDVision (Application 9) to search for Zip codes by number or city name.
•If set to None, users do not have access to the ZIP Code Directory screen.
See Appendix A.1, Function 47, in the legacy CIF System manual on DocsOnWeb for more information. |
25 |
Utility Functions |
•If set to Maintain, users can access the CIF Utility Function Menu (function 98) in the legacy CIF system in GOLDVision (Application 9).
•If set to Inquire or None, users do not have access to the CIF Utility Function Menu (function 98).
See section 7.1, The CIF Utilities Functions Menu, in the legacy CIF System manual on DocsOnWeb for more information. |
26 |
Card Management |
This security option is no longer used. Card Management can be found in CIM GOLD. Use the CIM GOLD tab of the Security > Setup screen to set up Card Management security in CIM GOLD. |
27 |
ATM Options |
This security option is no longer used. Card Management can be found in CIM GOLD. Use the CIM GOLD tab of the Security > Setup screen to set up Card Management security in CIM GOLD. |
28 |
Heloc Card Information |
This security option is no longer available. |
29 |
Opt Out Information |
•If set to Maintain, users can access, view, and change opt-out information on the Institution Opt-Out Definition screen (function 94) in the legacy CIF system in GOLDVision (Application 9).
•If set to Inquire, users have view-only access to the Institution Opt-Out Definition screen (function 93). They can only access this screen from function 93, not function 94, and they cannot change or delete any data.
•If set to None, users do not have access to the Institution Opt-Out Definition screen from either function 93 or 94.
See section 13.1, Privacy Opt-Out or Opt-In Screen (Function 93/94), in the legacy CIF System manual on DocsOnWeb for more information. |
42 |
Test Security for CIF Call |
No longer used. |
51 |
Drop History Utility |
•If set to Maintain, users can access and delete file maintenance history on the Delete File Maintenance Histories screen (function 98, then function 1) in the legacy CIF system in GOLDVision (Application 9).
•If set to Inquire or None, users do not have access to the Delete File Maintenance Histories screen.
See section 7.2, Delete File Maintenance History (Function 1), in the legacy CIF System manual on DocsOnWeb for more information. |
52 |
Merge Names Utility |
•If set to Maintain, users can merge two households together using the Household Merge Utility screen (function 98, then function 9) in the legacy CIF system in GOLDVision (Application 9).
•If set to Inquire or None, users do not have access to the Household Merge Utility screen.
See section 7.4.1, Merging Two Households (Function 9), in the legacy CIF System manual on DocsOnWeb for more information. |
53 |
Drop Household Utility |
•If set to Maintain, users can drop a household from the system using the Drop Household Utility screen (function 98, then function 5) in the legacy CIF system in GOLDVision (Application 9).
•If set to Inquire or None, users do not have access to the Drop Household Utility screen.
See section 7.3, Delete a Household (Function 5), in the legacy CIF System manual on DocsOnWeb for more information. |
54 |
Merge Address Utility |
•If set to Maintain, users can merge addresses in a household using the Combine Address Utility screen (function 98, then function 7) in the legacy CIF system in GOLDVision (Application 9).
•If set to Inquire or None, users do not have access to the Combine Address Utility screen.
See section 7.5, Replace and Drop Names and Addresses (Functions 3 and 7), in the legacy CIF System manual on DocsOnWeb for more information. |
55 |
Merge Household Utility |
•If set to Maintain, users can merge two households together using the Household Merge Utility screen (function 98, then function 9) in the legacy CIF system in GOLDVision (Application 9).
•If set to Inquire or None, users do not have access to the Household Merge Utility screen.
See section 7.4.1, Merging Two Households (Function 9), in the legacy CIF System manual on DocsOnWeb for more information. |
56 |
Switch Name Utility |
•If set to Maintain, users can switch the order of names in the household using the Switch Names Utility screen (function 98, then function 11) in the legacy CIF system in GOLDVision (Application 9).
•If set to Inquire or None, users do not have access to the Switch Names Utility screen.
See section 7.6, Switching Names, Addresses, and Accounts (Functions 11, 15, 19), in the legacy CIF System manual on DocsOnWeb for more information. |
57 |
Renumber Household Utility |
•If set to Maintain, users can renumber address sequence in a household using the Renumber Household Sequences screen (function 98, then function 13) in the legacy CIF system in GOLDVision (Application 9).
•If set to Inquire or None, users do not have access to the Renumber Household Sequences screen.
See section 7.4.2, Renumbering Households (Functions 13), in the legacy CIF System manual on DocsOnWeb for more information. |
58 |
Switch Address Utility |
•If set to Maintain, users can switch the order of addresses in the household using the Switch Addresses Utility screen (function 98, then function 15) in the legacy CIF system in GOLDVision (Application 9).
•If set to Inquire or None, users do not have access to the Switch Addresses Utility screen.
See section 7.6, Switching Names, Addresses, and Accounts (Functions 11, 15, 19), in the legacy CIF System manual on DocsOnWeb for more information. |
59 |
Split Household Utility |
•If set to Maintain, users can split accounts from a household into a new household using the Split Accounts From Household screen (function 98, then function 17) in the legacy CIF system in GOLDVision (Application 9).
•If set to Inquire or None, users do not have access to the Split Accounts From Household screen.
See section 7.4.3, Splitting Households (Function 17), in the legacy CIF System manual on DocsOnWeb for more information. |
60 |
Switch Account Utility |
•If set to Maintain, users can switch the order of accounts in the household using the Switch Account Utility screen (function 98, then function 19) in the legacy CIF system in GOLDVision (Application 9).
•If set to Inquire or None, users do not have access to the Switch Account Utility screen.
See section 7.6, Switching Names, Addresses, and Accounts (Functions 11, 15, 19), in the legacy CIF System manual on DocsOnWeb for more information. |
Deposit System - Application 4
These security options are only used if your institution uses the legacy Deposit system in GOLDVision/WinTerm (Application 4). If you use the new Deposit system in CIM GOLD, security to use those screens is set up on the CIM GOLD tab. Legacy Deposit System in GOLDVision is no longer supported. This is for information purposes only.
The following table explains the security options available for the legacy Deposit system:
Description |
CIM GOLD Companion Screen |
||
|---|---|---|---|
01 |
Master Screen |
•If set to Maintain, users can access, view, and change account information on the Deposit Master Fields screen (function 2) in the legacy Deposit system in GOLDVision (Application 4).
•If set to Inquire, users have view-only access to the Deposit Master Fields screen (function 1). They can only access this screen from function 1, not function 2, and they cannot change or delete any data.
•If set to None, users do not have access to the Deposit Master Fields screen from either function 1 or 2.
See Chapter 2, Master Screens, in the legacy Deposits Master Menu manual on DocsOnWeb for more information. |
Deposits > Account Information > Account Information screen |
02 |
Additional Fields |
•If set to Maintain, users can access, view, and change account information on the Deposit Additional Fields screen (function 4) in the legacy Deposit system in GOLDVision (Application 4).
•If set to Inquire, users have view-only access to the Deposit Additional Fields screen (function 3). They can only access this screen from function 3, not function 4, and they cannot change or delete any data.
•If set to None, users do not have access to the Deposit Additional Fields screen from either function 3 or 4.
See Chapter 3, Account Information, in the legacy Deposits Master Menu manual on DocsOnWeb for more information. |
Deposits > Account Information > Activity Information screen |
03 |
History Summary |
•If set to Maintain and Inquire, users can view history for accounts on the History Summary screen (function 5) in the legacy Deposit system in GOLDVision (Application 4).
•If set to None, users cannot view history on the History Summary screen.
See section 4.2, History Summary, in the legacy Deposits Master Menu manual on DocsOnWeb for more information. |
Deposits > Account Information > History screen |
04 |
Detailed History |
•If set to Maintain and Inquire, users can view detailed history for deposit accounts on the Detail History screen (function 7/8 or function 45) in the legacy Deposit system in GOLDVision (Application 4).
•If set to None, users cannot view deposit history on the Detail History screen.
See section 4.4, Detail History, in the legacy Deposits Master Menu manual on DocsOnWeb for more information. |
Deposits > Account Information > History screen, then double-click a history item |
05 |
Interest Fields |
•If set to Maintain, users can access, view, and change account information on the Deposit Interest Fields screen (function 10) in the legacy Deposit system in GOLDVision (Application 4).
•If set to Inquire, users have view-only access to the Deposit Interest Fields screen (function 9). They can only access this screen from function 9, not function 10, and they cannot change or delete any data.
•If set to None, users do not have access to the Deposit Interest Fields screen from either function 9 or 10.
See section 5.1, Interest Fields, in the legacy Deposits Master Menu manual on DocsOnWeb for more information. |
Deposits > Account Information > Interest Fields screen |
06 |
Hold/Action Codes |
•If set to Maintain, users can view, add, and change hold/action codes on accounts on the Hold/Action Codes screen (function 12) in the legacy Deposit system in GOLDVision (Application 4).
•If set to Inquire, users have view-only access to the Hold/Action Codes screen (function 11). They can only access this screen from function 11, not function 12, and they cannot change or delete any data.
•If set to None, users do not have access to the Hold/Action Codes screen from either function 11 or 12.
See section 6.1, Hold/Action Codes, in the legacy Deposits Master Menu manual on DocsOnWeb for more information. |
Deposits > Account Information > Restrictions & Warnings > Restriction/Action Codes tab |
07 |
Monetary Holds |
•If set to Maintain, users can view, add, and change monetary holds on accounts on the Monetary Holds screen (function 14) in the legacy Deposit system in GOLDVision (Application 4).
•If set to Inquire, users have view-only access to the Monetary Holds screen (function 13). They can only access this screen from function 13, not function 14, and they cannot change or delete any data.
•If set to None, users do not have access to the Monetary Holds screen from either function 13 or 14.
See section 6.2, Monetary Holds Screen, in the legacy Deposits Master Menu manual on DocsOnWeb for more information. |
Deposits > Account Information > Restrictions & Warnings > Monetary Holds tab |
08 |
Uncollected Funds |
•If set to Maintain, users can view, add, and change uncollected funds on accounts on the Uncollected Funds screen (20 and 21) in the legacy Deposit system in GOLDVision (Application 4).
•If set to Inquire, users have view-only access to the Uncollected Funds screen (function 19 and 21). They can only access this screen from function 19 and 21, not function 20, and they cannot change or delete any data.
•If set to None, users do not have access to the Uncollected Funds screen from either function 19, 20, or 21.
See Chapter 7, Uncollected Funds, in the legacy Deposits Master Menu manual on DocsOnWeb for more information. |
Deposits > Account Information > Funds Holds screen > Uncollected Funds and Deposit Delay tab
|
09 |
Stop Payments |
•If set to Maintain, users can view, add, and change stop payments on accounts on the Check Stop Payment screen (function 16) in the legacy Deposit system in GOLDVision (Application 4).
•If set to Inquire, users have view-only access to the Check Stop Payment screen (function 15). They can only access this screen from function 15, not function 16, and they cannot change or delete any data.
•If set to None, users do not have access to the Check Stop Payment screen from either function 15 or 16.
See section 6.4, Check Stop Payment Screen, in the legacy Deposits Master Menu manual on DocsOnWeb for more information. |
Deposits > Account Information > Restrictions & Warnings screen > Check Stop Payment tab |
10 |
OTC Holds |
•If set to Maintain, users can view, add, and change over-the-counter holds on accounts on the Over-the-Counter Holds screen (function 18) in the legacy Deposit system in GOLDVision (Application 4).
•If set to Inquire, users have view-only access to the Over-the-Counter Holds screen (function 17). They can only access this screen from function 17, not function 18, and they cannot change or delete any data.
•If set to None, users do not have access to the Over-the-Counter Holds screen from either function 17 or 18.
See section 6.6, Over-The-Counter Holds Screen, in the legacy Deposits Master Menu manual on DocsOnWeb for more information. |
Deposits > Account Information > Restrictions & Warnings screen > Over the Counter Holds tab |
11 |
Withholding Information |
•If set to Maintain, users can view, add, and change withholding information on accounts on the Withholding Information screen (function 24) in the legacy Deposit system in GOLDVision (Application 4).
•If set to Inquire, users have view-only access to the Withholding Information screen (function 23). They can only access this screen from function 23, not function 24, and they cannot change or delete any data.
•If set to None, users do not have access to the Withholding Information screen from either function 23 or 24.
See section 8.1, Withholding Information Screen, in the legacy Deposits Master Menu manual on DocsOnWeb for more information. |
Deposits > Account Information > Interest Fields screen > Withholding Information tab |
12 |
Product Code Schedule |
•If set to Maintain, users can view, add, and change product code and C/D rate and term schedules using either the Product Code Schedule screen (function 26) or the C/D Rate and Term Schedule screen (function 52) in the legacy Deposit system in GOLDVision (Application 4).
•If set to Inquire, users have view-only access to the Product Code Schedule screen (function 25) or the C/D Rate and Term Schedule screen (function 51). They can only access those screens from functions 25 and 51, not functions 26 and 52, and they cannot change or delete any data.
•If set to None, users do not have access to the Product Code Schedule screen (function 25/26) or the C/D Rate and Term Schedule screen (function 51/52).
See section 3.4, Product Code Schedule, and section section 3.7, C/D Rate and Term Schedule, in the legacy Deposits Master Menu manual on DocsOnWeb for more information. |
Deposits > Account Information > Roll Schedules Screen > Product Code Schedule tab and Certificate Rate and Term Schedule tab |
13 |
Service Charge Info / Qualifying Accounts |
•If set to Maintain, users can view, add, and change service charge information and qualifying accounts using either the Service Charge Information screen (function 28) or the Qualifying Accounts screen (function 66) in the legacy Deposit system in GOLDVision (Application 4).
•If set to Inquire, users have view-only access to the Service Charge Information screen (function 27) or the Qualifying Accounts screen (function 65). They can only access those screens from functions 27 and 65, not functions 28 and 66, and they cannot change or delete any data.
•If set to None, users do not have access to the Service Charge Information screen (function 27/28) or the Qualifying Accounts screen (function 65/66).
See section 9.1, Service Charge Information Screen, and section 9.2, Qualifying Accounts, in the legacy Deposits Master Menu manual on DocsOnWeb for more information. |
Deposits > Account Information > Service Charge Fields screen > Service Charge Information tab and Qualifying Accounts tab |
14 |
Overdrafts/Secured Loans |
•If set to Maintain, users can view, add, and change overdraft information for deposit accounts using the Overdraft Accounts screen (function 30) in the legacy Deposit system in GOLDVision (Application 4).
•If set to Inquire, users have view-only access to the Overdraft Accounts screen (function 29). They can only access that screen from function 29, not function 30, and they cannot change or delete any data.
•If set to None, users do not have access to the Overdraft Accounts screen from function 29 or 30.
See Chapter 10, Overdraft Information, in the legacy Deposits Master Menu manual on DocsOnWeb for more information. |
Deposits > Account Information > Overdraft & Secured Loans screen |
15 |
Account Activity Fields |
•If set to Maintain, users can view and change certain account activity on the Deposit Account Activity screen (function 36) in the legacy Deposit system in GOLDVision (Application 4).
•If set to Inquire, users have view-only access to the Deposit Account Activity screen (function 35). They can only access that screen from function 35, not function 36, and they cannot change or delete any data.
•If set to None, users do not have access to the Deposit Account Activity screen from function 35 or 36.
See section 3.3, Deposit Account Activity, in the legacy Deposits Master Menu manual on DocsOnWeb for more information. |
Deposits > Account Information > Activity Information Screen |
16 |
Miscellaneous Fields |
•If set to Maintain, users can view and change information on the Miscellaneous Fields screen (function 38) in the legacy Deposit system in GOLDVision (Application 4).
•If set to Inquire, users have view-only access to the Miscellaneous Fields screen (function 37). They can only access that screen from function 37, not function 38, and they cannot change or delete any data.
•If set to None, users do not have access to the Miscellaneous Fields screen from function 37 or 38.
See section 3.6, Miscellaneous Fields, in the legacy Deposits Master Menu manual on DocsOnWeb for more information. |
Deposits > Account Information > Additional Fields screen > Miscellaneous Fields tab |
17 |
New Accounts |
•If set to Maintain, users can create new accounts using the New Accounts function (function 58). Users can also view a list of available accounts that can be used when setting up new accounts using the Available Account List screen (function 55).
•If set to Inquire, users can have view-only access to the New Accounts function (function 57, but they can't actually set up a new account. They can only access this screen from function 57, not function 58. They can also view available accounts using the Available Account List screen (function 55).
•If set to None, users cannot view or create new accounts using the New Accounts screen (function 57/58) or the Available Account List (function 55).
See Chapter 15, New Accounts, in the legacy Deposits Master Menu manual on DocsOnWeb for more information.
Note: This is the legacy way of setting up new deposit accounts. The best way to set up new deposit accounts is using GOLDTeller Platform. |
Deposits > Miscellaneous > New Account Setup
Or
Set up new accounts starting with the Customer Relationship Management > Customer Profile screen > Platform tab, then finish following the steps and opening the account through Platform. |
18 |
Loans on Savings |
•If set to Maintain or Inquire, users can view deposit loan account information on the Deposit Loan Accounts screen (function 31) in the legacy Deposit system in GOLDVision (Application 4).
•If set to None, users do not have access to the Deposit Loan Accounts screen (function 31).
See Chapter 11, Deposit Loan Accounts, in the legacy Deposits Master Menu manual on DocsOnWeb for more information. |
Deposits > Deposit Loans > Master & Activity |
19 |
Card Management |
•If set to Maintain, users can issue and replace cards on deposit accounts using the Card Management screen (function 60) in the legacy Deposit system.
•If set to Inquire, users can have view-only access to the Card Management screen (function 59), but they can't issue or replace cards, or make any changes. They can only access this screen from function 59, not function 60.
•If set to None, users cannot access the Card Management screen from function 59 or 60.
See section 16.1, Card Management, in the legacy Deposits Master Menu manual on DocsOnWeb for more information. |
See the Cards manual on DocsOnWeb. |
20 |
Variable Screens |
Not available in GOLDVision/WinTerm. |
Deposits > Variable Screens |
21 |
Average Balance Calc |
•If set to Maintain or Inquire, users can calculate average balances on an account from a designated time period using the Average Daily Balance screen (function 43) in the legacy Deposit system in GOLDVision (Application 4).
•If set to None, users do not have access to the Average Daily Balance screen (function 43).
See section 16.2, Average Balance Calculation, in the legacy Deposits Master Menu manual on DocsOnWeb for more information. |
Deposits > Miscellaneous > Calculations screen > Average Balance Calculation tab |
22 |
Interest Calculation |
•If set to Maintain or Inquire, users can calculate interest earned on an account from a specified time period using the Interest Calculation screen (function 41) in the legacy Deposit system in GOLDVision (Application 4).
•If set to None, users do not have access to the Interest Calculation screen (function 41).
See section 5.3, Interest Calculations, in the legacy Deposits Master Menu manual on DocsOnWeb for more information. |
Deposits > Miscellaneous > Calculations screen > Interest Calculation tab |
23 |
Cust Dir Transfer Groups |
•If set to Maintain, users can set up groups for customer directed transfers using the Customer Directed Transfer Groups screen (function 50) in the legacy Deposit system in GOLDVision (Application 4).
•If set to Inquire or None, users do not have access to the Customer Directed Transfer Groups screen (function 50).
See section 13.3, Group Transfers, in the legacy Deposits Master Menu manual on DocsOnWeb for more information. |
Deposits > Account Information > Customer Directed Transfers > Customer Directed Transfers screen |
24 |
Cust Dir Transfers Setup |
•If set to Maintain, users can set up transfers on the Customer Directed Transfers screen (function 48) in the legacy Deposit system.
•If set to Inquire, users can have view-only access to the Customer Directed Transfers screen (function 47), but they can't set up or change transfers. They can only access this screen from function 47, not function 48.
•If set to None, users cannot access the Customer Directed Transfers screen from function 48 or 47.
See section 13.1, Individual Transfer Setup, in the legacy Deposits Master Menu manual on DocsOnWeb for more information. |
Deposits > Account Information > Customer Directed Transfers > Customer Directed Transfers screen |
25 |
Retirement Fields |
•If set to Maintain, users can set up information for retirement accounts using the Deposit Retirement screen (function 54) in the legacy Deposit system.
•If set to Inquire, users can have view-only access to the Deposit Retirement screen (function 53), but they can't set up or change retirement information. They can only access this screen from function 53, not function 54.
•If set to None, users cannot access the Deposit Retirement screen from function 53 or 54.
See section 14.1, Deposit Retirement Screen, in the legacy Deposits Master Menu manual on DocsOnWeb for more information. |
Deposits > Retirement > Retirement Plan screen |
26 |
Acct Features and Options |
•If set to Maintain, users can set up account features and options using the Account Features and Options screen (function 34) in the legacy Deposit system.
•If set to Inquire, users can have view-only access to the Account Features and Options screen (function 33), but they can't set up or change account features and options. They can only access this screen from function 33, not function 34.
•If set to None, users cannot access the Deposit Retirement screen from function 33 or 34.
See section 3.2, Account Features and Options screen, in the legacy Deposits Master Menu manual on DocsOnWeb for more information. |
Deposits > Account Information > Account Information screen > Features/Options tab |
27 |
Service Charge Definition |
•If set to Maintain, users can set up service charge definitions using the following screens in the legacy Deposit system: oService Charge Definition Summary (function 402) oService Charge Definition (function 404) oService Charge Verification (function 406) oCosted Fields Default (function 448)
•If set to Inquire, users can have view-only access to the following service charge screens: oService Charge Definition Summary (function 401) oService Charge Definition (function 403) oCosted Fields Default (function 447)
•If set to None, users cannot access the any of the service charge screens from view-only mode or file maintainable mode.
See Chapter 2, Service Charge Definition, in the legacy Deposits System Definitions manual on DocsOnWeb for more information. |
Deposits > Definitions > Service Charges screen |
28 |
Hold/Action Code Definition |
•If set to Maintain, users can set up hold and action code definitions using the Hold/Action Code Definition screen (function 408) in the legacy Deposit system.
•If set to Inquire, users can have view-only access to the Hold/Action Code Definition screen (function 407), but they can't set up or change hold codes or action codes. They can only access this screen from function 407, not function 408.
•If set to None, users cannot access the Hold/Action Code Definition screen from function 407 or 408.
See section 3.2, Hold/Action Code screen, in the legacy Deposits System Definitions manual on DocsOnWeb for more information. |
Deposits > Definitions > Hold Code Definitions screen |
29 |
Product Code Setup |
•If set to Maintain, users can set up product code definitions using the Product Code Setup screen (function 410) in the legacy Deposit system.
•If set to Inquire, users can have view-only access to the Product Code Setup screen (function 409), but they can't set up or change product codes. They can only access this screen from function 409, not function 410.
•If set to None, users cannot access the Product Code Setup screen from function 409 or 410.
See Chapter 4, Product Code Setup, in the legacy Deposits System Definitions manual on DocsOnWeb for more information. |
Deposits > Definitions > Product Codes screen |
30 |
Rate Tables/Tiers |
•If set to Maintain, users can set up rate tables and rate tiers using the Rate Tier Summary (function 412) and the Deposit System Rate Table screen (function 414) in the legacy Deposit system.
•If set to Inquire, users can have view-only access to the Rate Tier Summary (function 411) and Deposit System Rate Table screen (function 413), but they can't set up or change rate tables and tiers. They can only access these screens from functions 411 and 413, not functions 412 and 414.
•If set to None, users cannot access the Rate Tier Summary (function 411/412) or Deposit System Rate Table (function 413/414) screens.
See Chapter 5, Rate Tiers and Tables, in the legacy Deposits System Definitions manual on DocsOnWeb for more information. |
Deposits > Definitions > Rate Table screen and Rate Tiers screen |
31 |
Variable Screen Setup |
Not available in GOLDVision/WinTerm. |
Deposits > Variable Screens |
32 |
User Defined Help |
•If set to Maintain, users can set up user-defined help using the User Defined Help Screen Setup (function 418) in the legacy Deposit system.
•If set to Inquire, users can have view-only access to the User Defined Help Screen Setup (function 417), but they can't set up or change help. They can only access this screen from function 417, not function 418.
•If set to None, users cannot access the User Defined Help Screen Setup from function 417 or 418.
See section 8.1, User-Defined Help, in the legacy Deposits System Definitions manual on DocsOnWeb for more information. |
See the CIM GOLD main menu under Help > User-Defined Help in the CIM GOLD User's Guide. |
33 |
Teller Info |
•If set to Maintain, users can set up teller information using the Teller Information screen (function 420) in the legacy Deposit system.
•If set to Inquire, users can have view-only access to the Teller Information screen (function 419), but they can't set up or change teller information. They can only access this screen from function 419, not function 420.
•If set to None, users cannot access the Teller Information screen from function 419 or 420.
See section 10.1, Teller Information, in the legacy Deposits System Definitions manual on DocsOnWeb for more information. |
Deposits > Definitions > Teller Information screen |
34 |
Field Level Security Setup |
This function is no longer used. If you attempt to set up field-level security for records in GOLDVision/WinTerm, users will not be able to access the screens those fields are found on. DO NOT SET UP THIS OPTION IN GOLDVISION/WINTERM!
Note: If users ever get the following error message in GOLDVision/WinTerm:
FAILURE IN ONLINE APPLICATION
Check to see if the user has any field-level security restrictions set up on function 420 in the legacy Deposit system (Application 4). |
Security > Setup screen > Field-level Security tab |
35 |
User Defined Teller Inq Setup |
No longer used. |
Not used. See Deposits > Definitions > Teller Information screen instead. |
36 |
Report Categories |
•If set to Maintain, users can set up category numbers to account types using the Report Category Description screen (function 426) in the legacy Deposit system.
•If set to Inquire, users can have view-only access to the Report Category Description screen (function 425), but they can't set up or change category numbers. They can only access this screen from function 425, not function 426.
•If set to None, users cannot access the Report Category Description screen from function 425 or 426.
See section 6.1, Report Category Description Screen, in the legacy Deposits System Definitions manual on DocsOnWeb for more information. |
Deposit > Definitions > Report Categories screen |
37 |
Holiday Scheduling |
This security option is no longer used. Instead, the system uses the Holiday Scheduling option (bit #16) in the GOLD Services legacy system.
See the Holiday Scheduling option in GOLD Services for more information. |
|
38 |
Afterhours Functions |
No longer used. |
|
39 |
Afterhours Reports |
No longer used. |
|
40 |
Global File Change Requests |
No longer used. |
|
41 |
System Definition History |
•If set to Maintain or Inquiry, users have access to view information on the following screens: oSystem Definition History (function 427) oAccount Analysis Estimate Screen (function 449)
•If set to None, users cannot access either of those screens.
See section 11.1, System Definition History Screen, and section 13.2, Account Analysis Estimate Screen, in the legacy Deposits System Definitions manual on DocsOnWeb for more information. |
Deposits > Definitions > System History screen |
42 |
Retirement Plan System |
•If this option is set to Maintain, users can access the Retirement Plan system (function 200) in file maintenance mode, meaning they can make changes to retirement accounts.
•If this option is set to Inquire, users can only view retirement plans in the Retirement Plan system (function 200). The user will have access to any function within the Retirement Plan system, but only in view-only access.
•If this option is set to None, users cannot access the Retirement Plan system (function 200).
Refer to the legacy Retirement System manual on DocsOnWeb for more information. |
Deposits > Retirement |
43 |
Disclosure Projection |
•If this option is set to Maintain or Inquire, users can view retirement projectors on the Disclosure Projection Screen (function 209) in the legacy Deposit system.
•If this option is set to None, users cannot access the Disclosure Projection Screen (function 209).
See section 4.1, Disclosure Projection Screen, in the legacy Deposit Retirement System manual for more information. |
Deposits > Retirement > Retirement Calculations screen > Disclosure Projection tab |
44 |
Access to Employee Acct (MSTR) |
•If this option is set to Maintain, users can view and make changes to employee accounts from the following screens: oDeposit Master Fields (function 2) oAccount Features and Options (function 34)
•If this option is set to Inquire, users can only view employee accounts from the following screens; they cannot make changes to employee account information: oDeposit Master Fields (function 1) oAccount Features and Options (function 33)
•If this option is set to None, users cannot view or access employee accounts from either of those screens (functions 1/2 or 33/34).
Example: A user has Maintain access to the Account Features and Options screen (function 33/34), but they only have Inquire access to Employee Accounts (bit 44). When the user tries to access function 34 while viewing an employee account, the following error message will appear at the bottom of the screen: "NOT AUTHORIZED BY SECURITY FOR THIS ACCOUNT." The user will only be able to view the account from function 33, not function 34.
Note: Accounts are flagged as employee accounts by checking the Employee Account? box, which is found on many screens including the Deposit Master Fields screen (function 2), the Additional Fields screen > Account Options tab (function 4), and the Account Features and Options screen (function 34). |
The CIM GOLD equivalent to this option is found under PC Applications > CIM Can See Employee Deposit Accounts (bit 27). |
45 |
Access to Employee Acct (HIST) |
•If this option is set to Maintain, users can view deposit history for employee accounts from the following screens: oDeposit History Summary (function 5) oDeposit Detail History (function 7/8) oDetailed History/Statement (function 45)
•If this option is set to Inquire, users can view employee account history from the following screens: oDeposit History Summary (function 5) oDeposit Detail History (function 7, but not function 8) oDetailed History/Statement (function 45)
•If this option is set to None, users cannot view employee history information from any of those screens.
Example: A user has Maintain access to the Deposit Detail History screen (function 7/8), but they only have Inquire access to Employee Account History (bit 45). When the user tries to access function 8 while viewing an employee account, the following error message will appear at the bottom of the screen: "NOT AUTHORIZED BY SECURITY FOR THIS ACCOUNT." The user will only be able to view the account history from function 7, not function 8.
Note: Accounts are flagged as employee accounts by checking the Employee Account? box, which is found on many screens including the Deposit Master Fields screen (function 2), the Additional Fields screen > Account Options tab (function 4), and the Account Features and Options screen (function 34). |
The CIM GOLD equivalent to this option is found under PC Applications > CIM Can See Employee Deposit History (bit 38). |
46 |
Officer Code Setup |
•If this option is set to Maintain, users can set up officer codes using the Account Representative Set-up screen (function 432).
•If this option is set to Inquire, users can only view officer codes that have already been set up on the Account Representative Set-up screen (function 431; no access to function 432).
•If this option is set to None, users cannot access the Account Representative Set-up screen from function 431 or 432.
See section 10.2, Account Representative Set-up, in the legacy Deposit System Definitions manual for more information. |
Deposit > Definitions > Account Representatives screen |
47 |
Transaction Descriptions |
•If this option is set to Maintain, users can set up descriptions for deposit transactions that will overwrite the default settings using the Institution Teller Transaction Override screen (function 430).
•If this option is set to Inquire, users can only view the Institution Teller Transaction Override screen through function 429 (not 430). They cannot make or save changes to those descriptions.
•If this option is set to None, users cannot access the Transaction Descriptions screen through function 429 or 430.
See section 7.2, Transaction Descriptions, in the legacy Deposit System Definitions manual for more information. |
Deposit > Definitions > Transaction Options screen > Transaction Override tab |
48 |
Transaction Condition Override |
•If this option is set to Maintain, users can set up overrides required when certain transaction conditions exist using the Transaction Conditions and Overrides screen (function 434).
•If this option is set to Inquire, users can only view the Transaction Conditions and Overrides screen through function 433 (not 434). They cannot make or save changes to those overrides.
•If this option is set to None, users cannot access the Transaction Conditions and Overrides screen through function 433 or 434.
See section 7.3, Transaction Conditions and Override Levels, in the legacy Deposit System Definitions manual for more information. |
Deposits > Definitions > Transaction Options screen > Transaction Condition Overrides tab |
49 |
Incoming ACH Information |
•If this option is set to Maintain, users can access the Incoming ACH Information Detail screen (function 40) to view and make changes to ACH information.
•If this option is set to Inquire, users can only view the Incoming ACH Information Detail screen from function 39, not function 40. No changes can be made to ACH information.
•If this option is set to None, users cannot access the Incoming ACH Information Detail screen through function 39 or 40.
See section 12.2, Incoming ACH Information Detail Screen, in the legacy Deposits Master Menu manual on DocsOnWeb for more information. |
Deposits > Account Information > Account Information screen > Incoming ACH tab |
50 |
Deposit Loan Functions |
•If this option is set to Maintain, users can access the Deposit Loan system (function 500) in file maintenance mode, meaning they can make changes to deposit loan accounts.
•If this option is set to Inquire, users can only view deposit loan accounts in the Deposit Loan system (function 500). The user will have access to any function within the Deposit Loan system, but only in view-only access.
•If this option is set to None, users cannot access the Deposit Loan system (function 500).
Refer to the legacy Deposit Loan manual on DocsOnWeb for more information. |
Deposits > Deposit Loans |
51 |
Administrative Teller |
•If this option is set to Maintain, users can access the Administrative Teller system (function 904). This option should only be given to supervisors who may need to manually run transactions for balancing and who have excellent knowledge of transactions.
•If this option is set to Inquire or None, users cannot access the Administrative Teller system (function 904). |
No CIM GOLD equivalent. Basically this is the CIM GOLDTeller system when users run transactions. All security for which transactions users are able to run are set up within CIM GOLDTeller (see GOLDTeller security options below). |
52 |
CDT - Institution Payees |
•If this option is set to Maintain, users can access the Customer Directed Transfer Institution Payees screen (function 436) to set up, view, and make changes to institution payees for Customer Directed Transfers.
•If this option is set to Inquire, users can only view the Customer Directed Transfer Institution Payees screen from function 435, not function 436. No changes can be made to institution payees for Customer Directed Transfers.
•If this option is set to None, users cannot access the Customer Directed Transfer Institution Payees screen through function 435 or 436.
See section 12.1, Institution Payees, in the legacy Deposit System Definitions manual on DocsOnWeb for more information. |
Deposits > Definitions > CDT Institution Payees screen |
53 |
CDT - Account Payees |
•If this option is set to Maintain, users can access the Customer Account Payees screen (function 438) to set up, view, and make changes to account payees for Customer Directed Transfers.
•If this option is set to Inquire, users can only view the Customer Account Payees screen from function 437, not function 438. No changes can be made to account payees for Customer Directed Transfers.
•If this option is set to None, users cannot access the Customer Account Payees screen through function 437 or 438.
See section 12.2, Account Payees, in the legacy Deposit System Definitions manual on DocsOnWeb for more information. |
Deposits > Account Information > Customer Directed Transfers > Account Payees screen |
54 |
Descriptor Setup |
•If this option is set to Maintain, users can set up, view, or change transaction descriptors using the Transaction Descriptor Setup screen (function 442).
•If this option is set to Inquire, users can only view the Transaction Descriptor Setup screen from function 441, not function 442. No changes can be made to transaction descriptors when in Inquire mode.
•If this option is set to None, users cannot access the Transactions Descriptor Setup screen from function 441 or 442.
See section 14.2, Transaction Descriptor Setup, in the legacy Deposit System Definitions manual on DocsOnWeb for more information. |
Deposits > Definitions > Transaction Options screen > Descriptor Code Setup tab |
55 |
Balance Inquiry Screen |
•If this option is set to Maintain or Inquire, users view deposit account balances on the Balance Inquiry screen (function 69) in the legacy Deposit system.
•If this option is set to None, users cannot access the Balance Inquiry screen (function 69).
See section 3.9, Balance Inquiry Screen, in the legacy Deposit System Definitions manual on DocsOnWeb for more information. |
Combination of the following screens: |
56 |
Statement Cycle Table |
•If this option is set to Maintain, users can set up, view, or change statement cycles using the Statement Cycle Table screen (function 444).
•If this option is set to Inquire, users can only view the Statement Cycle Table screen from function 443, not function 444. No changes can be made to statement cycles when in Inquire mode.
•If this option is set to None, users cannot access the Statement Cycle Table screen from function 443 or 444.
See section 14.3, Statement Cycle Table, in the legacy Deposit System Definitions manual on DocsOnWeb for more information. |
Deposits > Definitions > Statement Cycle screen |
57 |
GOLDPhone/Internet PIN Reset |
•If this option is set to Maintain, users can reset the GOLDPhone/Internet PIN by clicking the <Reset Pin> button (or press <F1>) on the Deposits Miscellaneous Fields screen, Remote Banking Fields tab (function 38)
•If this option is set to Inquire or None, users will not be able to reset PINs by clicking the <Reset PIN> button (or press <F1>). Instead, users will get the following message when they attempt those actions:
PIN # NOT RESET - SECURITY NOT FOUND
See section 3.6.3, Remote Banking Fields Tab, in the legacy Deposit Master Menu manual on DocsOnWeb for more information. |
Deposits > Account Information > Remote Banking Reset PIN Number screen |
58 |
Deposit Box System |
•If this option is set to Maintain, users can access the Safe Deposit Box system (function 300) in file maintenance mode, meaning they can make changes in the Safe Deposit box system.
•If this option is set to Inquire, users can only view information in the Safe Deposit Box system (function 300). The user will have access to any function within the Safe Deposit Box system, but only in view-only access.
•If this option is set to None, users cannot access the Safe Deposit Box system (function 300).
Note: GOLDPoint Systems no longer offers or supports this functionality. |
Deposits > Safe Deposit Boxes
This section is not documented at this time, as no GOLDPoint Systems clients use this system. |
59 |
Statement Fields |
•If this option is set to Maintain, users can set up, view, or change statement options using the Statement Fields screen (function 64).
•If this option is set to Inquire, users can only view the Statement Fields screen from function 63, not function 64. No changes can be made to statement field information when in Inquire mode.
•If this option is set to None, users cannot access the Statement Fields screen from function 63 or 64.
See section 3.5, Deposit Statement Fields Screen, in the legacy Deposit Master Menu manual on DocsOnWeb for more information. |
Deposits > Account Information > Statement Fields screen |
60 |
Account Analysis Costed Fields |
•If this option is set to Maintain, users can set up, view, or change costed services information using the Account Analysis Costed Services screen (function 62).
•If this option is set to Inquire, users can only view the Account Analysis Costed Services screen from function 61, not function 62. No changes can be made to costed services when in Inquire mode.
•If this option is set to None, users cannot access the Account Analysis Costed Services screen from function 61 or 62.
See section 3.8, Account Analysis Costed Services Screen, in the legacy Deposit Master Menu manual on DocsOnWeb for more information. |
Deposits > Account Information > Commercial Account Analysis screen |
Electronic Teller Journal - Application 27
This security option is only used if your institution uses the legacy Electronic Teller Journal in GOLDVision/WinTerm (Application 27). If you use the new Electronic Transaction Journal in CIM GOLD (found under Teller System in the left tree navigation), security to use that screen is set up on the CIM GOLD tab of the Security > Setup screen under Teller System, then set the Electronic Transaction Journal to either None, Inquire, or Maintain. Legacy Electronic Teller Journal in GOLDVision is no longer supported. This is for information purposes only.
Bit # |
Function Name |
Description |
|---|---|---|
01 |
Access |
Set this option to Maintain or Inquiry for the user or profile if you want them to access and view the Electronic Teller Journal in GOLDVision/WinTerm (Application 27).
If this option is set to None, the user/profile will be restricted from viewing this screen.
See section 3.1, Electronic Teller Journal (Application 27), in the legacy GOLD Services manual on DocsOnWeb for more information. |
Financial Options - Application 18
The Financial Options security is still used to set up security options for the General Ledger, Accounts Payable, Payroll, and Fixed Assets systems. Financial Options are accessed from Application 18 in either WinTerm or GOLDVision.
These security settings are for your institution's financial system managers and supervisors; those in your institution who work with the General Ledger, Accounts Payable, Payroll, and Fixed Assets systems.
See the following options:
Description |
||
01 |
Company Name/Accounting Prds |
•If set to Maintain, users can view and change company information and accounting periods on the Company Options screen in the General Ledger system (Application 1, function 2).
•If set to Inquire, users have view-only access to the Company Options screen (function 1). They can only access that screen from function 1, not function 2, and they cannot change or delete any data.
•If set to None, users do not have access to the Company Options screen from function 1 or 2 in the General Ledger system.
See section 3.2, Company Options, in the General Ledger manual on DocsOnWeb for more information. |
02 |
Financial Options |
•If set to Maintain, users can view and change information on the Financial Options screen (function 2) in the Financial Options system (Application 18).
•If set to Inquire, users have view-only access to the Financial Options screen (function 1). They can only access that screen from function 1, not function 2, and they cannot change or delete any data.
•If set to None, users do not have access to the Financial Options screen from function 1 or 2 in the Financial Options system (Application 18).
See Chapter 1, Initial Setup, in the Accounts Payable manual on DocsOnWeb for more information. |
03 |
Requisition/Purchase Order |
•If set to Maintain, users can view and change purchase order options on the Purchase Order Options screen (function 8) in the Financial Options system (Application 18).
•If set to Inquire, users have view-only access to the Purchase Order Options screen (function 7). They can only access that screen from function 7, not function 8, and they cannot change or delete any data.
•If set to None, users do not have access to the Purchase Order Options screen from function 7 or 8 in the Financial Options system (Application 18).
Note: The Purchase Order system is no longer supported by GOLDPoint Systems. |
04 |
Inventory |
No longer supported by GOLDPoint Systems. |
05 |
Accounts Payable |
•If set to Maintain, users can view and change Accounts Payable company information on the Accounts Payable Options screen (function 4) in the Financial Options system (Application 18).
•If set to Inquire, users have view-only access to the Accounts Payable Options screen (function 3). They can only access that screen from function 3, not function 4, and they cannot change or delete any data.
•If set to None, users do not have access to the Accounts Payable Options screen from function 3 or 4 in the Financial Options system (Application 18).
See section 1.2, Accounts Payable Options screen, in the Accounts Payable manual on DocsOnWeb for more information. |
06 |
Accounts Receivable |
No longer supported by GOLDPoint Systems. |
07 |
Payroll Options |
•If set to Maintain, users can view and change Payroll options on the Payroll Options screen (function 6) in the Financial Options system (Application 18).
•If set to Inquire, users have view-only access to the Payroll Options screen (function 5). They can only access that screen from function 5, not function 6, and they cannot change or delete any data.
•If set to None, users do not have access to the Payroll Options screen from function 5 or 6 in the Financial Options system (Application 18).
See section 1.3, Payroll Options screen, in the Payroll manual on DocsOnWeb for more information. |
16 |
Account Number Structure |
•If set to Maintain, users can view and change the General Ledger account number structure on the Account Structure screen in the General Ledger system (Application 1, function 6).
•If set to Inquire, users have view-only access to the Account Structure screen (function 5). They can only access that screen from function 5, not function 6, and they cannot change or delete any data.
•If set to None, users do not have access to the Account Structure screen function 5 or 6 in the General Ledger system.
See section 3.3, Account Structure, in the General Ledger manual on DocsOnWeb for more information. |
61 |
Change Client Number |
If your institution has more than one company set up in the Financial Applications system in GOLDVision/WinTerm, only users with this option set to Maintain will be able to change the client number in the General Ledger, Accounts Payable, Fixed Assets, or Payroll system.
If set to Inquire or None, and a user tried entering function "66" in any of those systems, the following message will be displayed at the bottom of the screen:
"NOT AUTHORIZED TO USE REQUESTED FUNCTION" or "SECURITY DOES NOT AUTHORIZE THIS REQUEST" |
Fixed Assets is accessed from Application 33 in either WinTerm or GOLDVision. See the following options:
Description |
||
|---|---|---|
01 |
Access to Program |
Gives access to the Fixed Assets system in GOLDVision/WinTerm. |
02 |
Allow Drop Distribution Profile |
Depreciation Distribution (function 10).
•If this option is set to Maintain, users have the security clearance to drop (delete) depreciation distributions from the system.
•If this option is set to Inquire or Maintain, users cannot drop depreciation distributions.
See help for the Distribution Profile screen in the Fixed Assets manual for more information. |
03 |
Allow Zero Purchase Price |
Asset Financial Data screen (function 22).
•If this option is set to Maintain, users can enter zero (0) or nothing in the Purchase Price field on the Asset Financial Data screen.
•If this option is set to Inquire or None, users must enter an amount in the Purchase Price field on the Asset Financial Data screen in Fixed Assets. |
04 |
Change Client Number |
To access clients other than 0 (zero) in the Fixed Assets system, the Maintain radio button must be selected for this option. This is mainly for GOLDPoint Systems use only. Changing client numbers is done through function 66 in the Fixes Assets system.
If this option is set to Inquire or None, you cannot change the client number. |
05 |
Distribution Profiles (F8) |
•If set to Maintain, users who can access the Asset Financial Data screen (function 22) in the Fixed Assets system can press <F8> on that screen and be transferred to the Distribution Profile screen in the Accounts Payable system. If you press <F8> while in file maintenance mode (function 22), you will access the Distribution Profile screen in file maintenance mode, meaning you can make and save changes to information on that screen.
•If set to Inquire, users who can access the Asset Financial Data screen (function 21) in the Fixed Assets system. If you press <F8> while in inquiry mode (function 21), you will access the Distribution Profile screen in inquiry-mode, meaning you can only view information on that screen, not make and save changes.
•If set to None, when users are on the Asset Financial Data screen (function 21/22) and they press <F8>, the system will return the following error message:
"NOT AUTHORIZED TO USE REQUESTED FUNCTION" or "SECURITY DOES NOT AUTHORIZE THIS REQUEST"
See section 3.1, Distribution Profiles, in the Accounts Payable system for more information about the Distribution Profiles screen. |
63 |
Report Writer Report Setup |
If this option is set to "Maintain," users will have access to create, change, or delete reports in Report Writer in the Fixed Assets system in GOLDVision (or WinTerm if your institution uses that instead). After logging on to the Fixed Assets system (Application 33) and accessing the Report Writer function (function 63), users can create/change reports using any of the following functions:
•Function No 2 (Modify Report) •Function No 3 (Create New Report) •Function No 4 (Copy Report No)
Note: Currently, Function No 6 (Delete Report) does not respond to this security option. All users (None, Inquire, and Maintain) can delete Report Writer report setups.
If security is set up to Inquire or None, the user will not be able to access any of these functions. The system will display the following message at the bottom of the screen: "Security does not authorize this request."
See Chapter 8, The Accounting Report Writer, in DocsOnWeb for more information about these functions. |
64 |
Run Report Writer |
If this option is set to Maintain, users will have access to run reports in Report Writer in the Fixed Assets system in GOLDVision (or WinTerm if your institution uses that instead).
To run a report in Report Writer:
1.Access the Report Writer screen (function 63) in the Fixed Assets system (Application 33). This brings up the Report Writer Function Selection screen. 2.Once on the Report Writer Function Selection screen, type "1" in the Function No field (designates running a report). 3.Enter the Report No or Screen No for which you want to run a report in one the provided fields. 4.Press <Enter> on your keyboard.
Users will also have access to modify logic before running the report, if the report has been set up to allow for logic modifications (function 63, then Function No 7).
If users are set up with Inquire or None, they will not be allowed to run reports in Report Writer in Fixed Assets.
See Chapter 8, The Accounting Report Writer, in DocsOnWeb for more information about this function. |
General Ledger System - Application 1
General Ledger is accessed from Application 1 in either WinTerm or GOLDVision. See the following options:
Description |
||
|---|---|---|
01 |
Company Options Definitions |
•If set to Maintain, users can view and change company information and accounting periods on the Company Options screen in the General Ledger system (Application 1, function 2).
•If set to Inquire, users have view-only access to the Company Options screen (function 1). They can only access that screen from function 1, not function 2, and they cannot change or delete any data.
•If set to None, users do not have access to the Company Options screen from function 1 or 2 in the General Ledger system.
See section 3.2, Company Options, in the General Ledger manual on DocsOnWeb for more information. |
02 |
Custom Report Definitions |
•If set to Maintain, users can view and change custom reports on the Report Definitions screen (function 42) in the General Ledger system (Application 1).
•If set to Inquire, users have view-only access to the Report Definitions screen (function 41) and customer reports. They can only access that screen from function 41, not function 42, and they cannot change or delete any data.
•If set to None, users do not have access to the Report Definitions screen from function 41 or 42 in the General Ledger system.
See Chapter 7, Customer Reports, in the General Ledger manual on DocsOnWeb for more information. |
Account File Maintenance |
•If set to Maintain, users can view, add, and change General Ledger accounts from either the Single Account screen (function 54) or the Multiple Account screen (function 58) in the General Ledger system (Application 1).
•If set to Inquire, users have view-only access to the Single Account screen (function 53) and Multiple Account screen (function 57). They can only access those screens from function 53 and 57, not 54 and 58 respectively, and they cannot change or delete any data.
•If set to None, users do not have access to the Single Account screen (function 53/53) or the Multiple Account screen (function 57/58) in the General Ledger system.
See section 3.5.1, Single Account, and section 3.5.2, Multiple Accounts, for more information.
Caution: Another security option may be set that will affect access to this screen. See bit 14, Employee Report Security, below for more information. |
|
04 |
Trans Dsply/Corr/Drop/Xfer |
•If set to Maintain, users can view, correct, drop, or transfer transactions using the Transaction Correction screen (function 12) in the General Ledger system (Application 1).
•If set to Inquire, users have view-only access to the Transaction Correction screen (function 11). They can only access that screen from function 11, not function 12, and they cannot change or delete any data.
•If set to None, users do not have access to the Transaction Correction screen from function 11 or 12 in the General Ledger system.
See section 4.5, Corrections, in the General Ledger manual on DocsOnWeb for more information. |
05 |
Trans F-M/Delete/Xfer/Clsd Grp |
This option is only available if the user has Maintain access to option 04, Trans Dsply/Corr/Drop/Xfer (see above). If this option (and that option) are set to Maintain, then the user can view, correct, drop, or transfer transactions for closed groups. A closed group means reports have been run that include that control group data, so if the user makes changes to any transactions in that closed group, the reports should be re-run. This option gives more security to ensure that not everyone is able to make changes to data from a prior date (control group). This security option should only be given to select supervisors.
If this option is set to Inquire or None, users will not be able to make changes to transactions in closed groups.
See section 4.5, Corrections, in the General Ledger manual on DocsOnWeb, and scroll down to the Correcting Closed Control Groups section for more information. |
06 |
Transaction Entry |
This option is only available if the user has Maintain access. If this option is set to Maintain, the user can access the Multiple Transaction Entry system (function 8) in the General Ledger system (Application 1). Users can set up that screen to create multiple General Ledger transactions.
If this option is set to Inquire or None, users will not be able to access this screen.
See section 4.3, Transaction Entry, in the General Ledger manual on DocsOnWeb.
Caution: Another security option may be set that will affect access to this screen. See bit 14, Employee Report Security, below for more information. |
07 |
Transaction Entry Past/Future |
This option is only available if the user has Maintain access to option 06, Transaction Entry (see above). If this option (and that option) are set to Maintain, then the user can post transactions to a previous or future accounting period. This option gives more security to ensure only select personnel are able to post transactions to other than the current period. This security option should only be given to select supervisors.
If this option is set to Inquire or None, but option 06 is set to Maintain, users can post transactions only to the current accounting period.
If both options are set to Inquire or Maintain, users will not be able to post transactions.
See section 4.3, Transaction Entry, in the General Ledger manual on DocsOnWeb. |
08 |
Print Standard Reports |
•If set to Inquire or Maintain, users can view and print General Ledger standard reports using the Standard Reports screen (function 19/20) in the General Ledger system (Application 1). This option also allows users with Inquire and Maintain access to view a report showing all sub-field titles generated from Report Utilities (function 32), function 5.
•If set to None, users do not have access to view or print Standard Reports (function 19/20) or view the Report Utilities (function 32).
See Chapter 6, Standard Reports, and section 3.4.6, Report Utilities, in the General Ledger manual on DocsOnWeb for more information.
Caution: Another security option may be set that will affect access to this screen. See bit 14, Employee Report Security, below for more information. |
09 |
Print Custom Reports |
•If set to Maintain, users can view and print General Ledger custom reports using the Custom Reports screen (function 24) or Group of Custom Reports (function 28) in the General Ledger system (Application 1) and to view reports generated from the Report Utilities function (function 32).
•If set to Inquire, users do not have access to print custom reports (function 24 or 28), but they still have access to print reports from the Report Utilities function (function 32).
•If set to None or Inquire, users do not have access to print custom reports (function 24) or access the Report Utilities (function 32).
See Chapter 7, Custom Reports, in the General Ledger manual on DocsOnWeb for more information.
Caution: Another security option may be set that will affect access to this screen. See bit 14, Employee Report Security, below for more information. |
10 |
Print Custom Reports Outofbal |
When printing custom reports (function 24 or 28), if the custom report is out of balance, the message "ACCOUNTS OUT OF BALANCE - PRESS F1 TO CONTINUE" will appear at the bottom of the screen.
•If the user has Maintain access to this option, the user will be able to press <F1> and still print the custom report.
•If the user has Inquire access to this option, pressing <F1> after getting that message will return the following message: SECURITY DOES NOT AUTHORIZE REQUESTED FUNCTION. They will not have access to print an out-of-balance report. Note: The user must have Maintain access to custom reports (bit 09, Print Custom Report) before they can even print custom reports, out-of-balance or not.
•If this option is set to None, the user will not have access to the Print Custom Reports screen (function 24 or 28).
See section 7.8.2, Run Time Parameters, in the General Ledger manual then scroll down to the Out of Balance topic for more information. |
11 |
Close Balances to Next Year |
•If set to Maintain, users can total and close year-end balances for General Ledger accounts (function 64). This option should only be set for accounting supervisors who know how to perform General Ledger account balancing at end of year.
•If set to Inquire or None, users do not have access to close year-end balances (function 64)
See section 8.1, Close Balances to Next Year, in the General Ledger manual on DocsOnWeb for more information. |
12 |
Post From Other Applications |
Post Transactions from Other Applications (function 68) is no longer in use. The General Ledger System has an automatic interface with the accounting applications: Payroll Management, Fixed Assets, and Accounts Payable. DHI's loan and deposit systems also allow Autoposting to the General Ledger system.
For more information on Autoposting, see the General Ledger Autopost Overview for more information in the GOLD Services in CIM GOLD manual. |
Account Budget F/M |
The Account Budget screens are similar to the Single Account and Multiple Accounts screen (see bit 03 above), but instead of viewing the Account Amount, users will view the Budget Amount, as shown below:
") Single Account Screen (function 57/58)
Budgets must already be set on the Budget Preparation screen (function 72, see bit 15 below) before users can view and change budgets.
•If this option is set to Maintain, users can view and change budget amounts on the Single Account (function 54) and Multiple Accounts (function 58) screens. Users will have access to enter the Year and budget Plan number in order to retrieve the budget information for accounts (see example above). Note: Users must also have bit 03 set to Maintain.
•If this option is set to Inquire, users have view-only access to budgets on the Single Account (function 53) and Multiple Accounts (function 57) screens. They cannot access those screens from function 54 and 58 respectively, and they cannot make and save changes. oNote: If users have the 03 bit set to Maintain, and this bit set to Inquire or None, they will not be able view budgets from functions 54 or 58. If the user is set with Maintain access for bit 03 and Inquire access for this bit, they can still view budgets, but only from functions 53 and 57.
•If this option is set to None, users do not have security to view or change budgets on the Single Account and Multiple Accounts screen. oNote: If users have the 03 bit set to Maintain, but this bit set to None, they can access functions 54 and 58, but if they try entering a Year and Plan number and press <Enter>, they will get the following error message instead: SECURITY CODE DOES NOT AUTHORIZE REQUESTED FUNCTION.
For more information about budgets, see Chapter 5, Budgets, in the General Ledger manual. |
|
Employee Report Security |
•If set to Maintain, users can view and setup special employee security that potentially overrides security setup on this tab. The Report Security screen (function 81/82) can be set up so additional security options can be set in the G/L system for employees. You can only set up additional security if this option is set to Maintain.
•If this option is set to Inquire, you will only be able to view the security screen, not set up or change security, but only when accessing the screen from function 81. You will not have access to function 82.
•If set to None, users do not have access to this screen.
See section 8.4, Report Security, in the General Ledger manual on DocsOnWeb for more information. Note: Two options on the Company Options screen (function 1/2) must be set to "Y" for the Employee Report Security to work: Employee Report Security and Use Cost Center Posting Security. |
|
Budget Rec Disp/Del/Prep/Spred |
•If users have this option set to Maintain, they will have access to set up, view, and change budget information on the following screens in the Budget system:
G/L Budget Preparation (function 72) G/L Budget Plans (function 84) G/L Budget Spreading (function 76)
•If this option is set to Inquire, users will have view-only access to the following screen in inquiry mode:
G/L Budget Plans (function 83)
•If set to None, users will not have access to any screens in the Budget system.
See these sections in the General Ledger manual for more information:
See also bit 13 above for account budgets. |
|
16 |
Account Number Structure |
•If this option is set to Maintain, users have access to designate the account number structure for your institution using the Account Number Structure screen (function 6) in the General Ledger system (Application 1).
•If this option is set to Inquire, users have view-only access to the Account Number Structure screen, but they can only access that screen from function 5, not function 6.
•If this option is set to None, users do not have access to function 5 or 6 of the Account Number Structure screen.
See section 3.3, Account Structure, in the General Ledger manual for more information. |
17 |
Transaction Deletion |
•If this option is set to Maintain, users have access to delete transactions using the Transaction Deletion screen (function 16) in the General Ledger system (Application 1).
•If this option is set to Inquire or None, users cannot access the Transaction Deletion screen (function 16).
See section 4.5.1, Deleting Transaction Groups, in the General Ledger manual for more information. |
18 |
Sub-Account Titles |
Creating organizational charts in the General Ledger system requires that his option be set to Maintain. When this option is set to Maintain, the user can use the following screens to set up the sub-fields for the G/L account structure (click the link to view information about that function):
If this option is set to Inquire, the user has view-only access to those screen: function 17, function 21, function 25, function 29, and function 33.
If this option is set to None, the user does not have access to set up sub-accounts. |
19 |
Organizational Chart |
•If this option is set to Maintain, the user has access to print the organizational charts using the G/L Print Organization Chart screen (function 36).
•If this option is set to Inquire or None, the user does not have access to function 36.
See section 3.4.5, Print Organizational Chart, in the General Ledger manual for more information. |
20 |
Custom Report Line Detail |
•If this option is set to Maintain, the user has access to print custom report details on the G/L Custom Report Detail screen (function 40).
•If this option is set to Inquire or None, the user does not have access to function 40.
See section 7.11, Report Details, in the General Ledger manual for more information. |
21 |
Define Group of Reports |
•If this option is set to Maintain, the user has access to set up groups of reports on the G/L Report Group screen (function 56).
•If this option is set to Inquire, the user has view-only access to view what groups have been set up on the G/L Report Group screen. The user will only be able to access this screen through function 55, not function 56.
•If this option is set to None, the user does not have access to function 55 or function 56.
See section 7.9.1, Setting Up Groups, in the General Ledger manual for more information. |
22 |
Statement Pre-requisites |
•If this option is set to Maintain, the user has access to set up prerequisites for statements on the G/L Statement Prerequisites screen (function 60).
•If this option is set to Inquire, the user has view-only access to view statement prerequisites on the G/L Statement Prerequisites screen. The user will only be able to access this screen through function 59, not function 60.
•If this option is set to None, the user does not have access to function 59 or function 60.
See section 4.1, Statement Prerequisites, in the General Ledger manual for more information. |
23 |
Enter Client Number |
•If this option is set to Maintain, the user has access to select a different client number than the default number using function 66.
•If this option is set to Inquire or None, the user cannot change the client number using function 66.
See section 3.1, Client Number, in the General Ledger manual for more information. |
24 |
Custom Report Messages |
•If this option is set to Maintain, the user has access to set up messages on the Custom Report Message screen (function 70).
•If this option is set to Inquire, the user has view-only access to view custom report messages on the Custom Report Message screen. The user will only be able to access this screen through function 69, not function 70.
•If this option is set to None, the user does not have access to function 69 or function 70.
See section 7.10, Report Messages, in the General Ledger manual for more information. |
25 |
Calculate Avg Daily Balance |
•If this option is set to Maintain, users can manually calculate or recalculate the average daily balance for any asset, liability, or capital accounts using the Calculate Average Daily Balance screen (function 78).
•If this option is set to Inquire or None, the user cannot access the Calculate Average Daily Balance screen (function 78).
See section 8.2, Average Daily Balance, in the General Ledger manual for more information. |
26 |
Account Defaults |
•If this option is set to Maintain, the user has access to set up account defaults on the G/L Default Accounts screen (function 80).
•If this option is set to Inquire, the user has view-only access to the G/L Default Accounts screen. The user will only be able to access this screen through function 79, not function 80.
•If this option is set to None, the user does not have access to function 79 or function 80.
See section 3.7, Account Defaults, in the General Ledger manual for more information. |
27 |
Copy a Control Group |
The Copy Control Group function posts transactions to a new control group by copying transactions from an existing control group. This is helpful for reoccurring entries or the reversal of a complete group, such as accruals.
•If set to Maintain, users will have access to the G/L Post By Copying a Ctl Group screen (function 86).
•If set to Inquire or None, users will not have access to function 86.
See section 8.3, Copy Control Group, for more information. |
28 |
Distribution Profile, Branch Allocation Table |
•If this option is set to Maintain, users has access to set up distribution profiles on the Distribution Profile screen (function 88) and branch allocation tables on the Branch Allocation Table screen (function 92).
•If this option is set to Inquire, users have view-only access to the Distribution Profile (function 87) and Branch Allocation Table (function 91). The user will only be able to access these screens through functions 87 and 91 respectively, not functions 88 and 92.
•If this option is set to None, the user does not have access to these screens.
See section 8.5, Distribution Profiles, and section 8.6, Branch Allocation, in the General Ledger manual for more information. |
29 |
Allow Acct Drop with Bal/Trans |
•If this option is set to Maintain, users have access to drop (delete) account records on the Single Account screen (function 54) and Multiple Accounts screen (function 58). Note: Security bit 03 must also be set to Maintain.
•If this option is set to Inquire or None, users cannot drop account records from function 54 or 58.
See section 3.5.1, Single Account, and section 3.5.2, Branch Allocation, and scroll down to the Drop Account sections for more information. |
30 |
Allow G/L Sweeps |
General Ledger sweeps processing encompasses two screens: the Sweeps screen (function 95/96) for online entry of sweeps and the Existing Sweeps Report screen (function 99) for online reporting of sweeps.
•If this option is set to Maintain, users will have access to both screen to create and print sweep information. Users should access function 96 to create sweep records and function 99 to print sweep information.
•If this option is set to Inquire, users will have view-only access to the Sweeps screen (function 95) but they will have no access to the Existing Sweeps Report screen (function 99).
•If this option is set to None, users will not have access to either screen. |
64 |
Reserved |
Set this option to Maintain if the user should have access to G/L GOLD. If set to Inquire, the user will have view-only access to G/L GOLD, which isn't very helpful as they won't be able to create transactions or run standard or customer reports. If set to None, the user will not have access to G/L GOLD. G/L GOLD is a stand-alone PC version of the General Ledger system. See the G/L GOLD User's Guide for more information.
GOLD ExceptionManager is a standalone application designed to process exception items failing to post to deposit and loan accounts through inclearing checks, ACH, ATM, POD, lockbox, and automated loan payments. When an item is received and it cannot be posted to the account because of holds, balances, dates, etc., the system rejects the interface capabilities to quickly view, report, process, and print customer notices for the exception items. It includes balancing capabilities and the option to allow users to enter manual return items, charge backs, and notifications of change.
The following security options are available for GOLD ExceptionManager. These security options are explained in detail in the GOLD ExceptionManager User's Guide (see Security Options).
Description |
||
|---|---|---|
01 |
Download Exception Items |
•Set this option to Maintain if you want the user to be able to download exception items for the day in GOLD ExceptionManager.
•Set this option to Inquire and the user will not have access to download exception items but they will be able to view exception items for the day.
•Set this option to None and the user will not be able to view or download exception items in GOLD ExceptionManager.
See Download Exception Items in the GOLD ExceptionManager User's Guide for more information. |
02 |
Process Exception Items |
•Set this option to Maintain if you want the user to be able to process exception items in GOLD ExceptionManager.
•Set this option to Inquire and the user will not have access to process exception items but they will be able to view exception items.
•Set this option to None and the user will not be able to view or process exception items in GOLD ExceptionManager.
See Processing Exception Items in the GOLD ExceptionManager User's Guide for more information. |
03 |
Return All Remaining Items |
•Set this option to Maintain if you want the user to be able to return remaining exception items back to the FRB in GOLD ExceptionManager.
•Set this option to Inquire and the user will not have access to return remaining exception items but they will be able to view returning items.
•Set this option to None and the user will not be able to view or return exception items in GOLD ExceptionManager.
See Post, Return, Disregard, Bank of First Deposit, or Charge a Fee to Exception Items in the GOLD ExceptionManager User's Guide for more information. |
04 |
Create Notification of Change |
•Set this option to Maintain if you want the user to be able to create notifications of change for exception items in GOLD ExceptionManager.
•Set this option to Inquire and the user will not have access to create notifications of change for exception items but they will be able to view notifications of change.
•Set this option to None and the user will not be able to view or create notifications of change in GOLD ExceptionManager.
See Create and Edit Notification of Change in the GOLD ExceptionManager User's Guide for more information. |
05 |
Create a Return Item |
•Set this option to Maintain if you want the user to be able to create a return item back to the FRB in GOLD ExceptionManager.
•Set this option to Inquire and the user will not have access to create a return item back to the FRB but they will be able to view return items.
•Set this option to None and the user will not be able to view or create return items in GOLD ExceptionManager.
See Create a Return Item in the GOLD ExceptionManager User's Guide for more information. |
06 |
Create a Chargeback Item |
•Set this option to Maintain if you want the user to be able to create a chargeback item in GOLD ExceptionManager.
•Set this option to Inquire and the user will not have access to create a chargeback item but they will be able to view chargeback items.
•Set this option to None and the user will not be able to view or create chargeback items in GOLD ExceptionManager.
See Create a Chargeback Item in the GOLD ExceptionManager User's Guide for more information. |
07 |
Print Reports and Notices |
•Set this option to Maintain if you want the user to be able to print reports and notices in GOLD ExceptionManager.
•Set this option to Inquire or None and the user will not have access to print reports and notices in GOLD ExceptionManager.
See Exception Item Report; Full Report; Overdraft, Return, and Paid Notices; Inclearing Returned Checks; and ACH Returns in the Printer Setup and Options chapter of the GOLD ExceptionManager User's Guide for more information. |
08 |
Calibrate Printer |
•Set this option to Maintain if you want the user to be able to calibrate printers in GOLD ExceptionManager.
•Set this option to Inquire or None and the user will not have access to calibrate printers in GOLD ExceptionManager.
See Calibrating Your Printer in the GOLD ExceptionManager User's Guide for more information. |
09 |
Save Notice Headers |
•Set this option to Maintain if you want the user to be able to change and save notice headings when printing Overdraft, Return, and Paid Notices.
•Set this option to Inquire or None and the user cannot make changes to the notice heading. Instead, the default heading set up on the GOLD ExceptionOptions screen in GOLD Services (legacy) will be used.
See Setting Up GOLD ExceptionOptions in GOLDVision in the GOLD ExceptionManager User's Guide for more information. |
10 |
Can Post Loan Items |
•Set this option to Maintain if you want the user to be able to post loan exceptions in GOLD ExceptionManager.
•Set this option to Inquire or None and the user cannot post loan exceptions in GOLD ExceptionManager.
See Post, Return, Disregard, Bank of First Deposit, or Charge a Fee to Exception Items in the GOLD ExceptionManager User's Guide for more information. |
11 |
Officer/Employee Acct Access |
•Set this option to Maintain if you want the user to be able to view and process exception items against an officer or employee account in GOLD ExceptionManager.
•Set this option to Inquire or None and the user cannot view or process exception items from officer or employee accounts.
See Security Options in the GOLD ExceptionManager User's Guide for more information. |
12 |
User List Maintenance |
•Set this option to Maintain if you want the user to be able to access the User List and add teller names who are able to process exception items in GOLD ExceptionManager.
•Set this option to Inquire or None and the user cannot access the User List in GOLD ExceptionManager.
See Setting Up Tellers in the GOLD ExceptionManager User's Guide for more information. |
13 |
Allow Save/Remove Selections |
•Set this option to Maintain if you want the user to be able to set up selections in GOLD ExceptionManager.
•Set this option to Inquire or None and the user cannot set up selections in GOLD ExceptionManager.
See Setting Up Selections in GOLD ExceptionManager for more information. |
14 |
Allow Change To/From Demo Set |
This option is for GOLDPoint Systems only. |
15 |
Allow Change to Transaction |
If an exception item is in the file with an incorrect transaction code, this security allows the change of the transaction code to the correct one. For instance, sometimes a loan check will be processed with the wrong account number, and in the exception file, it looks like a deposit account check. You can change it to the miscellaneous debit transaction that it should be, or vice versa, with this security option turned on (set to Maintain).
If this option is set to Inquire or None, the user will not be able to change a transaction.
See Post, Return, Disregard, Bank of First Deposit, or Charge a Fee to Exception Items in the GOLD ExceptionManager User's Guide for more information. |
16 |
Allow Other User Pref Setup |
•If this option is set to Maintain, the processor is allowed to setup user preferences and selections for themselves and other users.
•If this option is set to Inquire or None, the user cannot set up user preferences.
See User Preferences in the GOLD ExceptionManager User's Guide for more information. |
17 |
May Make Posting Decisions |
•If this option is set to Maintain, the processor allowed to to handle each exception item in a "decision-making" mode.
•If this option is set to Inquire or None, the user is not allowed to make posting decisions in GOLD ExceptionManager.
See Post, Return, Disregard, Bank of First Deposit, or Charge a Fee to Exception Items in the GOLD ExceptionManager User's Guide for more information. |
GOLD Services is now found within CIM GOLD. However, if you have security, you can still maintain some fields on screens in the legacy GOLD Services system in GOLDVision/WinTerm.
Each of these options is explained below:
Description |
CIM GOLD Companion Screen |
||
|---|---|---|---|
01 |
G/L Autopost Setup |
•If this option is set to Maintain, the user has access to set up Autopost details using the functions in the Autopost system (function 600) in the legacy GOLD Services system (Application 8).
•If this option is set to Inquire, the user has view-only access to the screens in the Autopost system (function 600) in the legacy GOLD Services system (Application 8). The user will only be able to access screens in inquiry mode.
•If this option is set to None, the user does not have access to the Autopost screens in the legacy GOLD Services system.
See Chapter 6, General Ledger Autopost, in the GOLD Services (GOLDVision) manual.
Note: Any information set up in legacy GOLD Services in the G/L Autopost Setup screens are saved to the accompanying screen in CIM GOLD. |
GOLD Services > General Ledger |
02 |
IRS Information Returns |
No longer used in GOLDVision/WinTerm. Refer to the IRS GOLD in CIM GOLD system. |
GOLD Services > IRS GOLD > Forms |
03 |
IRS Print All Returns (INQ) |
No longer used in GOLDVision/WinTerm. Refer to the IRS GOLD in CIM GOLD system. |
GOLD Services > IRS GOLD > Forms |
04 |
IRS Create Returns (F/M) |
No longer used in GOLDVision/WinTerm. Refer to the IRS GOLD in CIM GOLD system. |
GOLD Services > IRS GOLD > Forms |
05 |
IRS Delete All Returns (INQ) |
No longer used in GOLDVision/WinTerm. Refer to the IRS GOLD in CIM GOLD system. |
GOLD Services > IRS GOLD > Mass Delete |
06 |
Online ACH Posting |
•If this option is set to Maintain, the user has access to view ACH batches on the ACH Batch Viewer screen (function 30) in the legacy GOLD Services system (Application 8).
•If this option is set to Inquire or None, users do not have access to the ACH Batch Viewer screen.
See section 2.7, Online ACH Item Batch Viewer (Function 30), in the GOLD Services (GOLDVision) manual. |
No CIM GOLD screen. |
07 |
Check Recon Detail/Summary |
•If this option is set to Maintain, users will have access to the Check Reconciliation system (function 3/4) in the legacy GOLD Services system (Application 8). They will also have access to the following screens in inquire and file-maintenance modes: oCheck Recon Detail (function 61/62) oCheck Recon Summary (function 65/66)
•If this option is set to Inquire, the user can access the Check Reconciliation system in either function 3 or 4, but they will only have inquiry access to the following screens: oCheck Recon Detail (function 61) oCheck Recon Summary (function 65)
•If this option is set to None, users do not have access to the legacy Check Reconciliation system (function 3/4) in GOLD Services (Application 8).
See section 2.2, Check Reconciliation, in the GOLD Services (GOLDVision) manual. |
GOLD Services > Check Reconciliation > Check Detail |
08 |
Check Recon Print Reports |
•If this option is set to Maintain or Inquire, users will have access to print the Check Recon Detail Report (function 4, then function 63) and Check Recon Summary Report (function 4, then function 67) in the legacy GOLD Services system (Application 8).
•If this option is set to None, users do not have access to print reports in the Check Reconciliation system (function 3/4) in GOLD Services (Application 8).
See section 2.2.4, Check Reconciliation Reports, in the GOLD Services (GOLDVision) manual. |
GOLD Services > Check Reconciliation > Check Detail screen, then click <Reports> |
09 |
Check Recon Mass Deletes |
•If this option is set to Maintain, users can drop cleared (<F8>) or all (<F9>) check records using function 68 in the Check Recon system (function 4) in the legacy GOLD Services system (Application 8).
•If this option is set to Inquire or None, users do not have access to drop/delete check records (function 68) in the Check Reconciliation system (function 3/4) in GOLD Services (Application 8). |
GOLD Services > Check Reconciliation > Mass Void/Delete Screen |
10 |
Check Recon Void Checks |
•If this option is set to Maintain, users can void all non-cleared check records using function 69 in the Check Recon system (function 4) in the legacy GOLD Services system (Application 8).
•If this option is set to Inquire or None, users do not have access to void check records (function 69) in the Check Recon system (function 3/4) in GOLD Services (Application 8). |
GOLD Services > Check Reconciliation > Mass Void/Delete Screen |
11 |
Check Recon Transmission Hist |
•If this option is set to Maintain, users can view the transmission history (function 70) in the Check Recon system (function 4) in the legacy GOLD Services system (Application 8).
•If this option is set to Inquire or None, users do not have access to view transmission history (function 70) in the Check Recon system (function 3/4) in GOLD Services (Application 8). |
GOLD Services > Check Reconciliation > Check Detail screen, then click <Import History> |
12 |
Bank table Inquiry |
•If this option is set to Maintain or Inquire, users will have access to view bank routing numbers, addresses, and phone numbers on the Bank Table Information screen (function 9) in the legacy GOLD Services system (Application 8).
•If this option is set to None, users do not have access to the Bank Table Information screen (function 9) in GOLD Services (Application 8).
See section 2.4, Bank Table (Function 9), in the GOLD Services (GOLDVision) manual. |
Miscellaneous > ABA Number Lookup |
13 |
Cashing Government Bonds |
•If this option is set to Maintain, users will have access to the Government Bond Redemption screen (function 6) in the legacy GOLD Services system (Application 8).
•If this option is set to Inquire or None, users do not have access to the Government Bond Redemption screen (function 6) in the legacy GOLD Services system (Application 8).
See section 2.3, Government Bond Redemption (Function 6), in the GOLD Services (GOLDVision) manual. |
No CIM GOLD screen. |
14 |
Online ATM Journal |
•If this option is set to Maintain or Inquire, users will have access to ATM totals on the ATM Comparative Totals screen (function 27) in the legacy GOLD Services system (Application 8).
•If this option is set to None, users do not have access to the ATM Comparative Totals screen (function 27) in the legacy GOLD Services system (Application 8).
See section 2.6, ATM Comparative Totals Screen (Function 27), in the GOLD Services (GOLDVision) manual. |
No CIM GOLD screen. |
15 |
Store/Forward Display/Print |
This function is no longer used. |
No CIM GOLD screen. |
Holiday Scheduling |
•If this option is set to Maintain, users will have access to set up institution-specific holidays on the Holiday Scheduling screen (function 700, then function 752) in the legacy GOLD Services system (Application 8).
•If this option is set to Inquire, the user has view-only access to the Holiday Scheduling screen, but will only be able to access the screen from function 751, not function 752.
•If this option is set to None, users do not have access to the Holiday Scheduling screen from function 751 or 752.
Note: Any information set up in legacy GOLD Services on the Holiday Scheduling screen is saved to the accompanying screen in CIM GOLD. |
Loans > System Setup Screens > Holiday Scheduling screen |
|
17 |
Field Level Security |
This function is no longer used. If you attempt to set up field-level security for records in GOLDVision/WinTerm, users will not be able to access the screens those fields are found on. DO NOT SET UP THIS OPTION IN GOLDVISION/WINTERM!
Note: If users ever get the following error message in GOLDVision/WinTerm:
FAILURE IN ONLINE APPLICATION
Check to see if the user has any field-level security restrictions set up on function 20 in the legacy GOLD Services system (Application 8). |
Security > Setup > Field Level Security Tab |
18 |
Loan Additional Fields Services |
This function is no longer used. |
No CIM GOLD screen. |
19 |
Deposit Event Setup |
Note: This screen is still used to set up deposit events you want generated to the GOLD EventLetters program. This screen has not been moved into CIM GOLD yet.
•If this option is set to Maintain, users can set up deposit events on the Deposit Event Setup screen (function 36) in the legacy GOLD Services system (Application 8).
•If this option is set to Inquire, the user can have view-only access to the Deposit Event Setup screen from function 35; they will be unable to access the screen from function 36.
•If this option is set to None, users do not have access to the Deposit Event Setup screen (function 35/36) in GOLD Services (Application 8).
See Deposit Event Descriptions in the GOLD EventLetters User's Guide for more information about this screen. |
No CIM GOLD screen. |
20 |
Calculate Date or Days |
•If this option is set to Maintain or Inquire, users can use the Calculate Date or Days screen (function 25) to calculate the number of days from a start to end date.
•If this option is set to None, users do not have access to the Calculate Date or Days screen (function 25) in the legacy GOLD Services (Application 8).
See section 2.5, Calculate Date or Days Screen (Function 25), in the GOLD Services (GOLDVision) manual for more information. |
Miscellaneous > Days Different Calculator Screen |
21 |
ATM Comparative Totals |
•If this option is set to Maintain or Inquire, users will have access to ATM totals on the ATM Comparative Totals screen (function 27) in the legacy GOLD Services system (Application 8).
•If this option is set to None, users do not have access to the ATM Comparative Totals screen (function 27) in the legacy GOLD Services system (Application 8).
See section 2.6, ATM Comparative Totals Screen (Function 27), in the GOLD Services (GOLDVision) manual. |
No CIM GOLD screen. |
22 |
Deposit Audit Confirmation |
•If this option is set to Maintain, users can set up deposit audit details on the Deposit Audit Confirmation screen (function 32) in the legacy GOLD Services system (Application 8).
•If this option is set to Inquire, the user can have view-only access to the Deposit Audit Confirmation screen from function 31; they will be unable to access the screen from function 32.
•If this option is set to None, users do not have access to the Deposit Audit Confirmation screen (function 31/32) in GOLD Services (Application 8).
See section 2.9.1, Deposit Audit Confirmation Field Descriptions, for more information about this screen.
Note: Any information set up in legacy GOLD Services on the Deposit Audit Confirmation screen is saved to the accompanying screen in CIM GOLD. |
GOLD Services > Audit Confirmations > Deposit Audit Confirmation |
23 |
Loan Audit Confirmation |
•If this option is set to Maintain, users can set up loan audit details on the Loan Audit Confirmation screen (function 34) in the legacy GOLD Services system (Application 8).
•If this option is set to Inquire, the user can have view-only access to the Loan Audit Confirmation screen from function 33; they will be unable to access the screen from function 34.
•If this option is set to None, users do not have access to the Loan Audit Confirmation screen (function 33/34) in GOLD Services (Application 8).
See section 2.9.2, Loan Audit Confirmation Field Descriptions, for more information about this screen.
Note: Any information set up in legacy GOLD Services on the Loan Audit Confirmation screen is saved to the accompanying screen in CIM GOLD. |
GOLD Services > Audit Confirmations > Loan Audit Confirmation |
24 |
System Printing |
•If this option is set to Maintain, users can use the System Printing Utility (function 38) in the legacy GOLD Services system (Application 8).
•If this option is set to Inquire, the user can view information in the System Printing Utility (function 37) but they cannot make changes. They will only be able to access this screen through function 37, not function 38.
•If this option is set to None, users do not have access to the System Printing Utility (function 37/38) in GOLD Services (Application 8).
See Chapter 11, System Printing Utility, in the GOLD Services (GOLDVision) manual for more information about this screen. |
|
25 |
WWW ACH Batch Queue |
This function is no longer used in GOLDVision/WinTerm. |
No CIM GOLD screen. |
26 |
WWW ACH Security |
This function is no longer used in GOLDVision/WinTerm. |
Internet and Phone Systems > User Profile Screen |
27 |
Privacy Options |
This function is no longer used in GOLDVision/WinTerm. |
No CIM GOLD screen. |
28 |
Comp Track Hist Summary (INQ) |
•If this option is set to Maintain or Inquire, users can view compensation tracking history on the Compensation Tracking History Summary screen (function 100, then function 101) in the legacy GOLD Services system (Application 8).
•If this option is set to None, users do not have access to the Compensation Tracking History Summary screen (function 11, then function 101) in GOLD Services (Application 8).
See section 12.4, Compensation Tracking History Summary (Function 101), in the GOLD Services (GOLDVision) manual for more information. |
No CIM GOLD screen. |
29 |
Comp Track History Detail |
•If this option is set to Maintain or Inquire, users can view detailed compensation tracking history on the Compensation Tracking History Detail screen (function 100, then function 103/104) in the legacy GOLD Services system (Application 8).
•If this option is set to None, users do not have access to the Compensation Tracking History Detail screen (function 11, then function 103/104) in GOLD Services (Application 8).
See section 12.5, Compensation Tracking History Detail (Function 103/104), in the GOLD Services (GOLDVision) manual for more information. |
No CIM GOLD screen. |
30 |
Comp Track Pay Setup |
•If this option is set to Maintain, users can set up compensation tracking pay on the Compensation Tracking Pay Set Up screen (function 100, then function 106) in the legacy GOLD Services system (Application 8).
•If this option is set to Inquire, the user can have view-only access to the Compensation Tracking Pay Set Up screen from function 105; they will be unable to access the screen from function 106.
•If this option is set to None, users do not have access to the Compensation Tracking Pay Set Up screen (function 100, then function 105/106) in GOLD Services (Application 8).
See section 12.3, Compensation Tracking Pay Setup (Function 105/106), in the GOLD Services (GOLDVision) manual for more information. |
No CIM GOLD screen. |
31 |
Comp Track Branch Setup |
•If this option is set to Maintain, users can set up branch threshold limits for compensation tracking using the Compensation Tracking Branch Setup screen (function 100, then function 108) in the legacy GOLD Services system (Application 8).
•If this option is set to Inquire, the user can have view-only access to the Compensation Tracking Branch Setup screen from function 107; they will be unable to access the screen from function 108.
•If this option is set to None, users do not have access to the Compensation Tracking Branch Setup screen (function 100, then function 107/108) in GOLD Services (Application 8).
See section 12.2.1, Branch Setup, in the GOLD Services (GOLDVision) manual for more information. |
No CIM GOLD screen. |
32 |
Comp Track Teller Setup |
•If this option is set to Maintain, users can set up teller threshold limits for compensation tracking using the Compensation Tracking Teller Setup screen (function 100, then function 110) in the legacy GOLD Services system (Application 8).
•If this option is set to Inquire, the user can have view-only access to the Compensation Tracking Teller Setup screen from function 109; they will be unable to access the screen from function 110.
•If this option is set to None, users do not have access to the Compensation Tracking Teller Setup screen (function 100, then function 109/110) in GOLD Services (Application 8).
See section 12.2.3, Teller Setup, in the GOLD Services (GOLDVision) manual for more information. |
No CIM GOLD screen. |
33 |
Comp Track Default Setup |
•If this option is set to Maintain, users can set up default threshold limits for compensation tracking using the Compensation Tracking Default Setup screen (function 100, then function 112) in the legacy GOLD Services system (Application 8).
•If this option is set to Inquire, the user can have view-only access to the Compensation Tracking Default Setup screen from function 111; they will be unable to access the screen from function 112.
•If this option is set to None, users do not have access to the Compensation Tracking Default Setup screen (function 100, then function 111/112) in GOLD Services (Application 8).
See section 12.1, Introduction, in the GOLD Services (GOLDVision) manual for more information. |
No CIM GOLD screen. |
34 |
Comp Track Calculation (INQ) |
•If this option is set to Maintain or Inquire, users can view and print compensation tracking reports based on teller, date, or branch using the Compensation Tracking Calculation screen (function 100, then function 113) in the legacy GOLD Services system (Application 8).
•If this option is set to None, users do not have access to the Compensation Tracking Calculation screen (function 100, then function 113) in GOLD Services (Application 8).
See section 12.6, Compensation Tracking Calculation (Function 113), in the GOLD Services (GOLDVision) manual for more information. |
No CIM GOLD screen. |
35 |
GOLD Exception Options |
Note: This screen is still used to set up GOLD ExceptionManager options to be used in GOLD ExceptionManager. GOLD ExceptionManager is a standalone application.
•If this option is set to Maintain, users can set up specifications for GOLD ExceptionManager using the GOLDException Options screen (function 46) in the legacy GOLD Services system (Application 8).
•If this option is set to Inquire, the user can have view-only access to the GOLDException Options screen from function 45; they will be unable to access the screen from function 46.
•If this option is set to None, users do not have access to the GOLDException Options screen (function 45/46) in GOLD Services (Application 8).
See Setting Up GOLD ExceptionManager Options in GOLDVision in the GOLD ExceptionManager User's Guide. |
No CIM GOLD screen. |
36 |
WWW Security System Options |
This function is no longer used in GOLDVision/WinTerm. |
Internet and Phone Systems > Setup > Security Options Screen |
37 |
WWW Institution Ownerships |
This function is no longer used in GOLDVision/WinTerm. |
Internet and Phone Systems > Setup > Ownership Selections Screen |
38 |
WWW Administrator Setup |
This function is no longer used in GOLDVision/WinTerm. |
Internet and Phone Systems > User Profile Screen > Administrator tab |
39 |
Insurance G/L Account Ident. |
•If this option is set to Maintain, users can set up insurance premiums and commission G/Ls for the Autopost using the Insurance Premium G/L and Commission Percentages screen (function 622) in legacy GOLD Services (Application 8).
•If this option is set to Inquire, users have view-only access to the Insurance Premium G/L and Commission Percentages screen from function 621, not function 622, in legacy GOLD Services (Application 8).
•If this option is set to None, users do not have access to the Insurance Premium G/L and Commission Percentages screen (function 621/622) in GOLD Services (Application 8).
See section 6.12, Setup G/L and Commissions, in the GOLD Services (GOLDVision) manual. |
GOLD Services > General Ledger > Setup G/L and Commissions |
40 |
Cp2 Rule Setup |
•If this option is set to Maintain, users can set up CP2 transaction processing rules using function 800 (Loan Additional Services Menu), then function 804 (CP2 Transaction Processing Rules screen) in legacy GOLD Services (Application 8).
•If this option is set to Inquire, users have view-only access to the CP2 Transaction Processing Rules screen from function 803, not function 804, in legacy GOLD Services (Application 8).
•If this option is set to None, users do not have access to the CP2 Transaction Processing Rules screen (function 803/804) in GOLD Services (Application 8).
See section 10.5, Transaction Processing Rules, in the GOLD Services (GOLDVision) manual. |
No CIM GOLD screen. |
41 |
Office Information Setup |
•If this option is set to Maintain, users can set up office information using the Office Information Display screen (function 40) in legacy GOLD Services (Application 8).
•If this option is set to Inquire, users have view-only access to the Office Information Display screen from function 39, not function 40, in legacy GOLD Services (Application 8).
•If this option is set to None, users do not have access to the Office Information Display screen (function 39/40) in GOLD Services (Application 8).
Note: Any information set up in legacy GOLD Services on the Office Information screen is saved to the accompanying screen in CIM GOLD. |
GOLD Services > Office Information screen |
42 |
Loan Type G/L Account Ident. |
•If this option is set to Maintain, users can set up G/L accounts for loan types using the G/L Account Identifiers by Loan Type screen (function 600, then function 624) in legacy GOLD Services (Application 8).
•If this option is set to Inquire, users have view-only access to the G/L Account Identifiers by Loan Type screen from function 623, not function 624, in legacy GOLD Services (Application 8).
•If this option is set to None, users do not have access to the G/L Account Identifiers by Loan Type screen (function 623/624) in GOLD Services (Application 8).
Note: Any information set up in legacy GOLD Services on the G/L Account Identifiers by Loan Type screen is saved to the accompanying screen in CIM GOLD. |
GOLD Services > General Ledger > GL Account By Loan Type screen |
43 |
Fee Code G/L Account Ident. |
•If this option is set to Maintain, users can set up G/L accounts for amortizing fees using the G/L Account Identifiers by Amortizing Fee Code screen (function 600, then function 628) in legacy GOLD Services (Application 8).
•If this option is set to Inquire, users have view-only access to the G/L Account Identifiers by Amortizing Fee Code screen from function 627, not function 628, in legacy GOLD Services (Application 8).
•If this option is set to None, users do not have access to the G/L Account Identifiers by Amortizing Fee Code screen (function 627/628) in GOLD Services (Application 8).
Note: Any information set up in legacy GOLD Services on the G/L Account Identifiers by Amortizing Fee Code screen is saved to the accompanying screen in CIM GOLD. |
GOLD Services > General Ledger > Amortization Descriptions screen |
44 |
Delinquency Demand Days |
•If this option is set to Maintain, users can set up delinquency demand days using the Delinquency Demand Days screen (function 800, then function 806) in legacy GOLD Services (Application 8).
•If this option is set to Inquire, users have view-only access to the Delinquency Demand Days screen from function 805, not function 806, in legacy GOLD Services (Application 8).
•If this option is set to None, users do not have access to the Delinquency Demand Days screen (function 805/806) in GOLD Services (Application 8).
See section 10.6, Delinquency Demand Days, in the GOLD Services (GOLDVision) manual. |
No CIM GOLD screen. |
45 |
Next Check Nbr - Access |
•If this option is set to Maintain, users can access the Next Check Number Entry screen in Check Reconciliation (function 4, then function 76) in legacy GOLD Services (Application 8).
•If this option is set to Inquire or None, users cannot access the Check Number Entry screen (function 4, then function 76) in legacy GOLD Services (Application 8).
See section 2.2.7, Next Check Number, in the GOLD Services (GOLDVision) manual. |
GOLD Services > Check Reconciliation > Check Detail screen, then click <Next Check Number> |
46 |
Next Check Nbr - All Offices |
This option is similar to bit 45 above, but this option allows the user to have access to the Next Check Number screen for all your institution's offices. If set to Maintain, the user has access to the Next Check Number for all offices at your institution.
If this option is set to None or Inquire, the user only has access to the office currently displayed. |
GOLD Services > Check Reconciliation > Check Detail screen, then click <Next Check Number> |
47 |
WWW Switch Personal to Company |
This function is no longer used in GOLDVision/WinTerm. |
Internet and Phone Systems > User Profile Screen |
48 |
Allow Email Address Change |
This function is no longer used in GOLDVision/WinTerm. |
Internet and Phone Systems > User Profile Screen |
49 |
Allow Password Generation |
This function is no longer used in GOLDVision/WinTerm. |
Internet and Phone Systems > User Profile Screen |
50 |
Allow Logon Unrestricting |
This function is no longer used in GOLDVision/WinTerm. |
Internet and Phone Systems > User Profile Screen |
GOLDPhone Processing - Application 35
If your institution uses GOLDPhone, you must assign one user with access to set up GOLDPhone options. This user would be an administrator for GOLDPhone. Only one security setting is available for GOLDPhone, as shown below. See Chapter 7, GOLDPhone, in the GOLD Services (GOLDVision) manual on DocsOnWeb. Note: Security option CORE Tools (Application 61) must also be set up, as described in section 7.2.2, Host Administration Setup.
Bit # |
Function Name |
Description |
|---|---|---|
01 |
Access |
•If this option is set to Maintain or Inquire, users can set up GOLDPhone settings for your institution. The user will then have access to all the GOLDPhone Program Files (see section 7.3, GOLDPhone Program Files).
•If this option is set to None, users do not have access to the GOLDPhone program files. |
These security options affect both legacy GOLDTeller and CIM GOLDTeller. If using CIM GOLDTeller, in addition to setting these options, you should also set up the main GOLDTeller option on the CIM GOLD tab (under Teller System > GOLDTeller) of the Security > Setup screen. For more information on security settings for CIM GOLDTeller, see the GOLDTeller Security Features topic in the CIM GOLDTeller User's Guide.
See the descriptions for the following options:
Description |
||
|---|---|---|
01 |
Operator File |
This option allows an operator to set up other operators within CIM GOLDTeller. It also provides the operator with security to force a teller off GOLDTeller. GOLDPoint Systems recommends that at least one employee at each branch have this security set to Maintain (e.g., a supervisor). If this option is not set up, the Functions > Operator Functions > Operator Information item is grayed out.
For more information, see Operators.dat File. |
02 |
System Configuration |
This option allows the operator to view and/or change the server name and path locations of GOLDTeller files. This option also accesses the printer configurations so that an operator can change, set up, or view the printer destinations. GOLDPoint Systems recommends that at least one operator at each branch have this security (e.g., a supervisor). If this option is not set up for a user, the Functions > Administrator Options > System Configuration item is grayed out. |
03 |
Not Used |
Currently, this option is unavailable for GOLDPoint Systems. |
04 |
Check Imaging |
When this option is set to Maintain, the teller has access to the Functions > Administrator Options > Print Form Design screen to view and edit check designs.
Note: An institution option, GTLR CHIM (Allow Check Image Access?), must also be set up in order to use the Check Imaging feature in CIM GOLDTeller. |
05 |
Forms Design |
When this option is set to Maintain, users are allowed to modify form and font configurations. GOLDPoint Systems recommends that only a few operators at your institution have this security (e.g., a supervisor). If this option is not set up (or set to None), the Functions > Administrator Options > Form/Font Configuration item is grayed out. |
06 |
Transaction Design |
If set to Maintain, this option allows the operator to modify transactions using the Functions > Administrator Options > Transaction Design screen. If the user does not have this option set up, that screen is grayed out on the Functions menu.
GOLDPoint Systems recommends that a few operators of your institution have this security (e.g., a supervisor). The operators should have security for PC Institution Settings and System Field Dictionary (see below), too. |
07 |
Transaction Selection Design |
If set to Maintain, this option allows the operator to modify the transaction menu using the Functions > Administrator Options > Menu Design screen. If the user does not have this option set up, that screen is grayed out on the Functions menu.
GOLDPoint Systems recommends that only a few operators at your institution have this security (e.g., a supervisor). The operators should have security for Transaction Design, System Field Dictionary, and PC Institution Settings also. |
08 |
Print Configuration |
When this option is set to Maintain, users are allowed to modify print configurations. GOLDPoint Systems recommends that only a few operators at your institution have this security (e.g., a supervisor). If this option is not set up (or set to None), the Functions > Administrator Options > Form/Font Configuration item is grayed out. |
09 |
Clear/Synchronize Totals |
This option allows the operator to synchronize PC teller totals to match host teller totals. When run in offline mode, the system keeps the teller totals on the PC. Once back online, tellers should synchronize their host totals with their PC totals. To synchronize totals, select Functions > Teller Total Functions > Synchronize PC Totals with Host Totals. If this option is not set up, the Synchronize PC Totals with Host Totals selection is grayed out on the Functions menu. |
10 |
System Fields Dictionary |
This option allows the operator to make changes to the System Field dictionary. This option is associated with the Transaction Design option (see below). GOLDPoint Systems recommends that a few operators at your institution have this security (e.g., a supervisor). If this option is not set up for a user, the Functions > Administrator Options > System Field Dictionary item is grayed out. |
11 |
Signature Capture |
This option allows the operator to perform various functions associated with Signature Capture. Generally, the security for this option is dependent on your institution. If this option is not set up, the Functions > Administrator Options > Account Signatures > Upload and Link Signatures item is grayed out. |
12 |
Jrnl Search on Other Opers |
This option allows the operator to perform journal searches on other operators' journal files. Generally, all operators should have security for this option if your institution wants operators to help other operators balance totals. See Journal / Forwarding in the CIM GOLDTeller User's Guide for more information. |
13 |
Upload/Download Data File |
This option allows the operator to transfer data from the PC to the host (File Transfer Utility). Generally, security for this option is dependent on your institution's needs. |
14 |
Allow Changing Institutions |
This option allows the operator to change institution numbers. This option works only if your institution has more than one institution number assigned to it.
Note: There is also an institution option that allows changing institutions. The institution option, GTLR CHIN, supersedes this option. |
15 |
GOLDTeller Platform |
This option allows the operator to access the GOLDTeller Platform system. This option works only if you have GOLDTeller Platform installed and other GOLDTeller Platform security options have been set up.
Note: There is also an institution option that allows the use of GOLDTeller Platform. The institution option, GTLR PLAT, supersedes this option. |
16 |
Database Backup/Restore |
This option allows the operator to backup the GOLDTeller database. GOLDPoint Systems recommends that one employee of your institution have this security per DB4 Server. See Back Up Files for more information. |
33 |
Platform Setup |
This option allows the user to have access to the Setup menu in GOLDTeller Platform. If this options is not selected, the user cannot access that menu. For more information on the Setup menu, see Setup Menu in the GOLDTeller Platform User's Guide in DocsOnWeb. |
34 |
Platform Options |
This option allows users to make changes to Platform Options. Users can select Options > Platform Options in GOLDTeller Platform, and then make changes to the screen. If this option is not set up, that selection is grayed out on the Options menu. See the Platform Options section in the GOLDTeller Platform User's Guide in DocsOnWeb for more information. |
35 |
Platform File Directories |
This option, when set to Maintain, allows users to set up Platform's file directories (under File > File Directories). If this option is set to Inquire or None, that option will be grayed out for the user under the File menu. See File Menu in the GOLDTeller Platform User's Guide for more information. |
36 |
Platform Delete/Merge Sessions |
This option allows users to merge two different customer sessions, which are located on two different servers, into one customer session on one server. |
37 |
Platform Sales Tracking |
This is no longer used in Platform. |
These security options affect both legacy GOLDView and GOLDView Plus in CIM GOLD (under Report Warehouse in the left tree navigation). If using GOLDView in CIM GOLD, in addition to setting these options, you should also set up the main GOLDView Plus option on the CIM GOLD tab (under Report Warehouse > GOLDView Plus) of the Security > Setup screen.
See the descriptions for the following options:
Description |
||
|---|---|---|
01 |
Access to Loan Reports |
If set to Maintain or Inquire, users will have access to view all loan reports in the GOLDView system. For more information concerning all possible loan reports, see the Loan Reports manual on DocsOnWeb.
If this security option is set to None, the user will not have access to view loan reports in GOLDView. |
02 |
Access to Deposit Reports |
If set to Maintain or Inquire, users will have access to view all deposit reports in the GOLDView system. For more information concerning all possible loan reports, see the Deposit Reports manual on DocsOnWeb.
If this security option is set to None, the user will not have access to view deposit reports in GOLDView. |
03 |
Access to General Ledger Rpts |
If set to Maintain or Inquire, users will have access to view all General Ledger reports in the GOLDView system. For more information concerning General Ledger reports, see these reports in the Deposit Reports manual on DocsOnWeb.
Multiple Use Deposit Report (FPSDR145) General Ledger Autopost Error List (FPSDR013) General Ledger Autopost Recap (FPSDR016) General Ledger Autopost Resolution Detail (FPSDR205) General Ledger Autopost Summary (FPSDR017) General Ledger Clearing Account Balancing Report (FPSDR075) General Ledger File Balancing Report (FPSDR076) General Ledger Miscellaneous Transaction Journal (FPSDR018) GL File Balancing Report Detail - Differences Only (FPSDR276) GL File Balancing Report Summary - Differences Only (FPSDR277)
If this security option is set to None, the user will not have access to view General Ledger reports in GOLDView. |
04 |
Access to Teller Reports |
If set to Maintain or Inquire, users will have access to view all teller reports in the GOLDView system. For more information concerning teller reports, see these reports in the Deposit Reports manual on DocsOnWeb:
Teller Activity Report (FPSDR061) Teller File Cash Report (FPSDR033) Teller Override Listing Report (FPSDR035) Teller Posting Journal Report (FPSDR034) Terminal Transaction Report (FPSDR139) Bank POD Teller Journal (FPSDR196) Proof Cash In and Out Report (FPSDR032) Large Journal Transaction Report (FPSDR081) Currency Transaction Report (FPSDR163)
And teller reports in the Loan Reports manual:
Teller Posting Journal (FPSRP002 - Section 1) Teller Override Listing (FPSRP002 - Section 2) Transaction Journal by Tran Origination Code (FPSRP041) CP2 Transaction Report (FPSRP213) Selected Transaction Report (FPSRP231) Monthly Transaction Report (FPSRP266)
If this security option is set to None, the user will not have access to view teller reports in GOLDView. |
05 |
Access to Payroll Reports |
If set to Maintain or Inquire, users will have access to view all payroll reports in the GOLDView system. For more information concerning Payroll reports, see Chapter 7, Payroll Reports, in the Payroll manual on DocsOnWeb. |
06 |
Access to GOLDView Reports |
If set to Maintain or Inquire, users will have access to view all institution-specific GOLDView reports in the GOLDView system.
If this security option is set to None, the user will not have access to view deposit reports in GOLDView. |
These security options are only used for the the legacy Loan system in GOLDVision/WinTerm (Application 3). If you use the Loan system in CIM GOLD, security to use those screens is set up on the CIM GOLD tab. The legacy Loan system in GOLDVision is no longer supported.
|
CAUTION: If your institution still uses the legacy GOLDVision/WinTerm system, you must be cautious about who has access to these screens. If users change information in specific fields in GOLDVision/WinTerm, those changes will also update the Host record, which means those changes will reflected in CIM GOLD. For example, if a user with Maintain access changes the Original Balance on a loan (the LNOBAL field) on function 10 in the Loan system in GOLDVision, that information will also be reflected in the LNOBAL field in CIM GOLD (in the Original Balance field on the Loans > Account Information > Additional Loan Fields screen). Only supervisors and managers should be given security access to legacy loan fields. Or better yet, do not turn on these settings for anyone at your institution. Instead, use the CIM GOLD tab to establish who has access to screens in CIM GOLD.
Additionally, field-level security doesn't work in GOLDVision/WinTerm. So even if a user is restricted from making changes to a field (such as the Original Balance field) on the Field-level Security screen in CIM GOLD, if they have access to function 10 in GOLDVision/WinTerm, they would be able to change the field (e.g., Original Balance). |
|---|
Materials Management - Application 34
The Materials Management system is no longer supported. These security options are no longer used.
Old Report Warehouse is no longer supported. GOLDPoint These security options are no longer used.
Payroll Management - Application 11
The Payroll System allows you to select options and modules to meet your institution’s particular payroll processing needs. The following security options allow users to use the Payroll system in their designated rolls.
Bit # |
Function Name |
Description |
|---|---|---|
01 |
Report Formats |
•If this option is set to Maintain, users will be able to set up Payroll report formats for Payroll reports that have a variable format. This is done through the Report Request screen (function 59, then function 2) in the Payroll system in GOLDVision/WinTerm.
•If this option is set to Inquire or None, users do not have access to set up report formats (function 59, then function 2) for variable Payroll reports.
See section 7.1.1, Formatting Reports, in the Payroll manual for more information. |
02 |
Print Reports |
•If this option is set to Maintain or Inquire, users will be able to print Payroll reports through function 59, then function 1, in the Payroll system in GOLDVision/WinTerm.
•If this option is set to None, users do not have access to print reports through function 59, then function 1.
See Chapter 7, Payroll Reports, in the Payroll manual for more information. |
03 |
Emp. Payroll History |
•If this option is set to Maintain or Inquire, users will be able to view the Employee History List (function 17).
•If this option is set to None, users do not have access to view the Employee History List (function 17).
See section 3.3, Employee Payroll History, in the Payroll manual for more information. |
04 |
Emp. Earnings/Deductions |
•If this option is set to Maintain, users can access the Employee Earnings screen (function 22) and Employee Deductions screen (function 26) in maintenance mode, being allowed to make and save changes.
•If this option is set to Inquire, users have view-only access to the Employee Earnings screen (function 21) and Employee Deductions screen (function 25). They will not be able to make and save changes.
•If this option is set to None, users do not have access to the Employee Earnings screen (function 21/22) or the Employee Deductions screen (function 25/26).
See section 3.4, Employee Earnings, and section 3.5, Employee Deductions, in the Payroll manual for more information. |
05 |
Emp. Profile |
No longer used. |
06 |
Emp. Evaluation |
No longer used. |
07 |
Report Writer |
•If this option is set to Maintain or Inquire, users will have access to Payroll Report Writer (function 63 in Payroll). See the other Payroll security options below (bit 63 and 64) for other options affecting this function.
•If this option is set to None, users do not have access to the Report Writer function.
See Chapter 8, Report Writer, in the Payroll manual for more information. |
08 |
Emp. Benefits |
•If this option is set to Maintain, users have access to the Employee Benefits screen (function 34). They can set up, change, and save benefit codes for employees.
•If this option is set to Inquire, users have view-only access to the Employe Benefits screen through function 33, not function 34.
•If this option is set to None, users cannot access the Employee Benefits screen from function 33 or 34.
See section 3.7, Employee Benefits, in the Payroll manual for more information. |
09 |
Payroll Posting - F/M |
8, 15/16 |
10 |
Payroll Adjustments |
12 |
11 |
Co Emp Pay Change/F1 - Emp Mstr |
13<F1>/14<F1>, 38 |
12 |
Print Payroll Checks |
36 |
13 |
Check Reconciliation |
40 |
14 |
Void Checks |
44, 48 |
15 |
Employee Master |
13/14, 13<F1>/14<F1>, 13<F2>/14<F2>, 13<F7>/14<F7>, 13<F10>/14<F10> |
16 |
Dept Employee Changes |
58 |
17 |
Payroll Cycles |
1-1/2-1 |
18 |
Company Earnings |
1-2/2-2 |
19 |
Company Deductions |
1-3/2-3 |
20 |
Tax Tables |
1-4/2-4 |
21 |
Company Benefits |
1-5/2-5 |
22 |
Project Codes |
1-6/2-6 |
23 |
Job Cost Codes |
1-7/2-7 |
24 |
Position Control File |
1-8/2-8 |
25 |
Job Description File |
1-9/2-9 |
26 |
Pay Grade File |
1-10/2-10 |
27 |
Job Status File |
1-11/2-11 |
28 |
Company User Fields |
1-12/2-12 |
29 |
Employee Number Change |
1-13/2-13 |
30 |
Position Control Budget Info |
1-14/2-14, 2-8<F1> |
33 |
Daily F/M |
59.1.1 |
34 |
Employee Master and Labels |
59.1.2, 59.1.1 |
35 |
Employee Pay Information |
59.1.3, 59.1.5, 59.1.7, 59.1.9, 59.1.11, 59.1.14, 59.1.15, 59.1.18, 59.1.20, 59.1.21, 59.1.22 |
36 |
Emp. Not Posted and Balancing |
59.1.4, 59.1.13 |
37 |
Distribution |
59.1.6 |
38 |
Position Control and Budget |
59.1.8, 59.1.38 |
39 |
Time Cards |
59.1.16 |
40 |
Posting Errors |
59.1.12 |
41 |
Batch Reports |
|
42 |
FTE Report |
59.1.19 |
43 |
Alternate Posting |
1-15/2-15 |
44 |
Monthly Tax Liability |
|
49 |
Employee Pay Amounts |
13<F1>/14<F1> |
50 |
Employee User Field 1 |
41/42 |
51 |
Employee User Field 2 |
41/42 |
52 |
Employee User Field 3 |
41/42 |
53 |
Employee User Field 4 |
41/42 |
54 |
Employee User Field 5 |
41/42 |
55 |
Post Rate Changes |
20, 24 |
61 |
Change Client Number |
66 |
Report Writer Report Setup |
•If this option is set to Maintain, users can use the following functions to set up Payroll reports in Report Writer (function 63 in Payroll): oModify reports (function 2) oCreate new reports (function 3) oCopy reports (function 4)
•If this option is set to Inquire or None, users do not have access to the report setup functions in Report Writer (functions 2, 3, and 4).
See Chapter 8, Report Writer, in the Payroll manual for more information. |
|
64 |
Report Writer Run Report |
•If this option is set to Maintain or Inquire, users can use the following functions to print Payroll reports in Report Writer (function 63 in Payroll): oRun reports (function 1) oModify logic before running reports (function 7)
•If this option is set to None, users do not have access to print reports in the Report Writer function.
See Chapter 8, Report Writer, in the Payroll manual for more information. |
These security options control whether or not the user has access to view Payroll reports in the Payroll system (Application 17, function 59). See the following options.
See Chapter 7, Payroll Reports, in the Payroll manual on DocsOnWeb for a details description of each Payroll report.
Bit # |
Function Name |
Description |
|---|---|---|
01 |
Daily FM |
|
02 |
Employee Master and Labels |
|
03 |
Employee Pay Information |
|
04 |
Emp. not posted and balancing |
|
05 |
Distribution |
|
06 |
Position control and budget |
|
07 |
Time cards |
|
08 |
Posting errors |
|
09 |
Batch reports |
Security settings under PC Applications are important so users will be able to access GOLDPoint Systems applications. If a user should have access to any of these applications, you should set the option to Maintain. Setting an option to Inquire or None does not allow the user to have access to any of the functions within that application. See the following descriptions. Once the option is set to Maintain, the other security options for that system can be set up for the user.
For example, if you set the Access to PC Applications option to Maintain, the user will be able to log on to those applications, but then you can restrict other functions within that application, so only those function applicable to the user can be accessed.
Bit # |
Function Name |
Description |
|---|---|---|
01 |
Access to PC Applications |
Set this option to Maintain for users to have access to the following applications:
GOLDTeller (This would be legacy GOLDTeller. For GOLDTeller in CIM GOLD, see GOLDTeller above for more security options) Platform GOLDPrint GOLDView (see GOLDView above for more security options) G/L GOLD (see G/L GOLD above for more security options) GOLDWriter (see GOLDWriter above for more security options) GOLD ExceptionManager (see GOLD ExceptionManager above for more security options) GOLDAcquire CIM GOLD (see the CIM GOLD tab on the Security > Setup screen for more security options) WinTerm/GOLDVision IRS GOLD |
02 |
CRM GOLD Access to Employees and Officers |
If you want to restrict users from viewing employee accounts in the Customer Relationship Management system (also known as CIF), select the "None" radio button for this user or profile.
If you want the employee to have access to employee accounts, set this option to "Maintain."
See How do I restrict employee accounts? in the FAQ topic for more information. |
03 |
File Services Attach Files |
If this option is set to Maintain, users can attach files in File Services Plus.
If this option is set to Inquire or None, users cannot attach files in File Services Plus. The Attach Files option will be grayed out, as shown below:
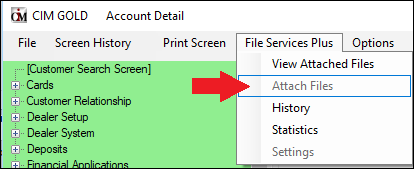 |
04 |
File Services Delete Files |
If this option is set to Maintain, users can delete files in File Services Plus.
If this option is set to Inquire or None, users will not be allowed to delete files in File Services Plus.
See #7 on the View Attached Files help page for more information about deleting files in File Services Plus. |
05 |
File Services Transfer Files |
If this option is set to Maintain, users can transfer files from one account to another account in File Services Plus.
If this option is set to Inquire or None, users will not be allowed to delete files in File Services Plus.
See the Transfer Files screen help for more information. |
06 |
File Services View Statistics |
If this option is set to Maintain or Inquire, users can view statistics for File Services Plus.
If this option is set to None, users will not be allowed to access the Statistics screen, and that option will be grayed out, as shown below:
 |
07 |
Files Services Access Settings |
If this option is set to Maintain, users can access and make changes to settings using the Settings screen in File Services Plus.
If this option is set to Inquire or None, users will not be allowed to access the Settings screen in File Services Plus, and that option will be grayed out in the File Services Plus menu as shown below:
 |
08 |
File Services Export Files |
If this option is set to Maintain, users can export files in File Services Plus.
If this option is set to Inquire or None, users will not be allowed to export files in File Services Plus.
See #7 on the View Attached Files help page for information about exporting files in File Services Plus. |
09 |
File Service Edit Metadata |
This option is no longer used. |
10 |
File Services F/M Cache Folder |
If this option is set to Maintain or Inquire, users can designate where File Services Plus stores the temporary cache folder.
If this option is set to None, the Temporary File Cache Folder option is grayed out on the User Settings screen. See help for that screen for more information. |
12 |
File Services Edit Original |
This option pertains to the File Security Plus Vaulting feature. See the linked page in the File Services Plus help manual for more information about this feature.
Use this option to restrict certain users from altering source documents while granting other users the ability to add watermarks to documents (indicating that the documents are not original). Giving authorized users Maintain security in this option allows them to watermark documents. For all other users, keep this option set to None. |
11 |
GOLDWriter Access |
•If this option is set to Maintain, users will have access to run GOLDWriter reports.
•If this option is set to Inquire or None, users can log into GOLDWriter but they won't be able to create or view any reports on the Host or in the queues. They will be able to open reports from their own locations, however, by selecting "Open" from the File menu.
See the GOLDWriter User's Guide for more information. |
18 |
CheckWriter List Checks |
This option is no longer used. Check Writer is now fully maintained within CIM GOLDTeller or GOLDTrak PC. |
19 |
CheckWriter Change/Add Checks |
This option is no longer used. Check Writer is now fully maintained within CIM GOLDTeller or GOLDTrak PC. |
20 |
CheckWriter Print Checks |
This option is no longer used. Check Writer is now fully maintained within CIM GOLDTeller or GOLDTrak PC. |
21 |
CheckWriter List Docs |
This option is no longer used. Check Writer is now fully maintained within CIM GOLDTeller or GOLDTrak PC. |
22 |
CheckWriter Change/Add Docs |
This option is no longer used. Check Writer is now fully maintained within CIM GOLDTeller or GOLDTrak PC. |
23 |
EIS/DSR Email Setup |
If this option is set to Maintain, the user will be setup as authorized to receive the Executive Information Summary Report for Deposits (FPSDR166) and Loans (FPSRP166). |
CIM Security Setup |
Note: This option must be used in conjunction with the options under Security on the CIM GOLD tab (see below). Additionally, if you want to allow access to the Security > Setup screen, the user must also be set up with Security Management options.
 Security > Setup Screen > CIM GOLD Tab and System Tab
Full Maintenance Access
To give a user the ability to set up and maintain security for other users, the following options must be set to Maintain:
•The CIM Security Option on the System tab of the Security > Setup screen •The Security > Setup option on the CIM GOLD tab of the Security > Setup screen •The Administrative Functions option under Security Management on the Security > Setup > System tab
Inquiry Access
If any of the following options are set to Inquire (or all of them), the user will only have view-only access to the Security > Setup screen in CIM GOLD:
•The CIM Security Option on the System tab of the Security > Setup screen •The Security > Setup option on the CIM GOLD tab of the Security > Setup screen •The Administrative Functions option under Security Management on the Security > Setup > System tab
No Access
If this option is set to None, but the Security > Setup option on the CIM GOLD tab is set to Inquire or Maintain, the user will be able to view the Security > Setup screen in CIM GOLD, but they will not be able to make changes to that screen. However, if the CIM Security Setup option, CIM GOLD Security option, and Security Management options are all set to None, the user will not be able to access the Security > Setup screen in CIM GOLD at all. The Security screens will be completely removed from the left tree navigation in CIM GOLD. |
|
25 |
CIM User-defined Help Setup |
•Set this option to Maintain if you want the user to be able to set up user-defined help for screens in CIM GOLD. User-defined help is accessed from the Help > User Defined Help menu at the top of CIM GOLD.
•Set this option to Inquire or None and the user can view user-defined help, but they will not be able to add user-defined help to screens in CIM GOLD.
See the User-defined Help topic in the CIM GOLD User's Guide for more information. |
26 |
CIM Subscription Setup |
This option is similar to 24, CIM Security Setup, in that for this to work, you must also have the Security > Subscribe To Mini-Applications option set to the same security level.
If this option and the option on the CIM GOLD tab are both set to Maintain, the user will be able to access the Security > Subscribe to Mini-Applications screen and make and save changes.
If this option and the option on the CIM GOLD tab are both set to Inquire, the user can view which screens your institution uses, but they will not be able subscribe to any screens.
If this option and the CIM GOLD tab option are set to None, the Security > Subscribe To Mini-Applications screen will not appear in the left tree navigation in CIM GOLD.
See Subscribe To Mini-Applications for more information. |
CIM Can View Employee Accounts |
This is an important option for employee accounts.
•If this option is set to Maintain or Inquire, users will be able to view and make changes to employee accounts. This is an all-or-nothing option. The Inquire option also allows for making changes and maintaining employee accounts.
•If this option is set to None, users will not be able to view or make changes to employee accounts. If a user tries to view an employee account, the following message will appear at the top of the screen:
"Current user does not have security to view employee accounts"
See How do I restrict employee accounts? in the FAQ topic for more information. |
|
29 |
EFT GOLD Access |
•If this option is set to Maintain, users will have access to the EFT GOLD stand-alone application.
•If this option is set to Inquire or None, users can log into EFT GOLD, but they won't be able to do anything within the application.
See the EFT GOLD User's Guide for more information. |
30 |
EFT GOLD Submit Wires |
•If this option is set to Maintain, users will be able to submit wires through the EFT GOLD stand-alone application.
•If this option is set to Inquire or None, users will not be able to submit wires through EFT GOLD.
See the Creating and Editing New Wires with the Wire Detail Screen in the EFT GOLD User's Guide for more information. |
31 |
EFT GOLD Approve Wires |
•If this option is set to Maintain, users will be able to approve submitted wires through the EFT GOLD stand-alone application.
•If this option is set to Inquire or None, users will not be able to approve wires through EFT GOLD.
See Approving a Wire in the EFT GOLD User's Guide for more information. |
32 |
EFT GOLD Change Options |
•If this option is set to Maintain, users will be able to change wire options in the EFT GOLD stand-alone application.
•If this option is set to Inquire or None, users will not be able to change wire options through EFT GOLD.
See Setting Wire Options in the EFT GOLD User's Guide for more information. |
33 |
CIM Can See Employee Loan Accounts |
If you want to restrict users from viewing employee accounts in the Loan system, select the "None" radio button for this user or profile.
If you want the employee to have access to employee accounts, set this option to "Maintain."
See How do I restrict employee accounts? in the FAQ topic for more information. |
34 |
GOLDAcquire Access |
•If this option is set to Maintain, users will have access to the GOLDAcquire Plus stand-alone application.
•If this option is set to Inquire or None, users can log into GOLDAcquire Plus, but they won't be able to do anything within the application.
See the GOLDAcquire Plus User's Guide for more information. |
35 |
GOLDAcquire Upload |
•If this option is set to Maintain, users will be able to check in new projects they create in GOLDAcquire Plus.
•If this option is set to Inquire or None, users cannot check in projects into GOLDAcquire Plus.
See the GOLDAcquire Plus User's Guide for more information. |
36 |
EFT GOLD View Inbound Wires |
•If this option is set to Maintain or Inquire, users will be able to view inbound wires in the EFT GOLD stand-alone application.
•If this option is set to None, users will not be able to view inbound wires through EFT GOLD.
See the Inbound Wire View topic in the EFT GOLD User's Guide for more information. |
37 |
EFT GOLD View Outbound Wires |
•If this option is set to Maintain or Inquire, users will be able to view outbound wires in the EFT GOLD stand-alone application.
•If this option is set to None, users will not be able to view outbound wires through EFT GOLD.
See the Outbound Wire View topic in the EFT GOLD User's Guide for more information. |
CIM Can See Employee Deposit History |
If you want to restrict users from viewing employee accounts in the Deposit system, select the "None" radio button for this user or profile.
If you want the employee to have access to employee accounts, set this option to "Maintain."
See How do I restrict employee accounts? in the FAQ topic for more information. |
|
39 |
CIM Can See Employee Loan History |
If you want to restrict users from viewing employee accounts in Loan History, select the "None" radio button for this user or profile.
If you want the employee to have access to employee accounts, set this option to "Maintain."
See How do I restrict employee accounts? in the FAQ topic for more information. |
40 |
Allow Gateway to Alter Terminal |
This option is for GOLDPoint Systems only. |
54 |
PCI Full Card Number |
This option is for GOLDPoint Systems only. |
55 |
PCI Card Vault |
This option is for GOLDPoint Systems only. |
PC Check Image Utilities is no longer supported or updated by GOLDPoint Systems.
Security Management - Application 19
In order for a user to have access to set up security for other employees, these options must be set. These options are for both the legacy Security system in GOLDVision/WinTerm (Application 19) and for CIM GOLD. In addition to these options, security administrators must also have the security options set to Maintain under the CIM GOLD tab, as shown below:
 Security > Setup Screen > CIM GOLD Tab |
 Security > Setup Screen > System Tab |
The CIM GOLD Security options and the legacy Security Management options work hand-in-hand. If you do not set up the legacy Security Management options but you do have the CIM GOLD Security options set, it may appear as though you can change security options in CIM GOLD, but the system will not allow you to save those options unless the Security Management options are also set to Maintain.
Bit # |
Function Name |
Description |
|---|---|---|
01 |
Administrative Functions |
This option must be set to Maintain for security supervisors responsible for setting up security for other employees at your institution.
Set this option to Inquire or None and the user will not be able to set up or change security settings for employees. See the Security settings under PC Applications for other options that affect security. |
02 |
Reset Security Violation (F9) |
Set this option to Maintain if the user should be able to reset security violations either through the Security > Reset Violations screen in CIM GOLD or the Security Management system, Security Violations screen (Application 19, then click <Security Violations> or press <F9>).
If this option is set to Inquire, the user will be able to view security violations but will not be able to reset security.
If this option is set to None, users will not have access to the Security Violation screen.
In order to reset security violations through CIM GOLD, the Reset Violations security option must also be set to Maintain on the CIM GOLD tab of the Security > Setup screen. |
03 |
Print Requests (2, 3, 4) |
If this option is set to Maintain, users can print reports showing employee access to all the systems by clicking <Print Routines> (or pressing <F1>) from the main Security Management screen (Application 19). This report can be printed using different formats, such as:
•A report listing all the system security options (report 1) •A report listing all the employees and what security options they have either Maintain or Inquire access to (not including No access) (report 2) •A report listing all the employees and what security options they have either Maintain, Inquire, or None (report 3) •A report listing all the employee numbers, their names, their user name, whether they are connected to a profile or employee security, and whether they are active or inactive (report 5).
See section 5.1, Print Routines, in the legacy Security Management manual on DocsOnWeb for more information.
Note: The CIM GOLD corresponding screen to this is found under Security > Reports. Security for this screen in CIM GOLD is completely dependent on the security setting on the CIM GOLD tab of the Security > Setup screen. |
04 |
Appl. Programmer Functions |
This option is for GOLDPoint Systems only. |
05 |
Reset Security Code |
Set this option to Maintain if the user should be able to reset security codes either through the Security > Reset Passwords screen in CIM GOLD or by pressing <F11> on the Security Management screen (Application 19, then press <F11>) in GOLDVision/WinTerm. Note: If using GOLDVision, you should be in WinTerm mode.
If this option is set to Inquire or None, users will not be able to reset passwords.
In order to reset passwords through CIM GOLD, the Reset Passwords security option must also be set to Maintain on the CIM GOLD tab of the Security > Setup screen. |
This is for GOLDPoint Systems only.
Utility programs are no longer supported. Do not set these options.
The Web Security options give users access to the secure part of the GOLDPoint Systems website, as shown below:

Secure Site of GOLDPoint Systems Web Site
Users must have a valid user name and password in order to access the secure part of the GPS website. Once logged in, these options determine which areas of the security site are available to the user.
Bit # |
Function Name |
Description |
|---|---|---|
01 |
Web Logon/training |
Set this option to Maintain or Inquire if the user should have access to log into GPS’s secure site. Once they do log in, they will have access to all training tutorials in GOLDPoint University, as well as access to the help library in DocsOnWeb.
If this option is set to None, the user will be unable to login to GPS’ secure website.
Users log in to the secure site from GOLDPoint System’s main website: https://www.goldpointsystems.com. The LOGIN link is near the top-right corner of the main website. |
02 |
Allow Software Downloads |
This option is no longer used. |
03 |
Knowledge Base Access |
This option is no longer used. |
04 |
Executive Information System |
Set this option to Maintain or Inquire if the user should have access to view EIS/OSR reports through GPS’ secure website.
If this option is set to None, users will not be able to view or see the EIS/OSR option in the left navigation of GPS’ secure site. |
05 |
E-work Orders |
Set this option to Maintain if you want the user to be able to create and view work orders submitted to GOLDPoint Systems through the E-Work Order system in the secure website.
If set to Inquire or None, the user will not be able to view or create e-work orders. |
06 |
EIS All |
Used to control view of "INSTITUTION" level EIS/OSR Reports. If your institution has access, security will enable those users to to Maintain to view this report. |
07 |
EIS Division A |
Used to control view of "DIVISION" or "DIVISION A" level EIS/OSR Reports. If your institution has access, security will enable those users to to Maintain to view this report. |
08 |
EIS Division B |
Used to control view of "DIVISION B" level EIS/OSR Reports. |
09 |
EIS Division C |
Used to control view of "DIVISION C" level EIS/OSR Reports. |
10 |
EIS Region |
Used to control view of "REGION" level EIS/OSR Reports. |
11 |
EIS State |
Used to control view of "STATE" level EIS/OSR Reports. |
12 |
EIS Branch |
Used to control view of "BRANCH" level EIS/OSR Reports. |
13 |
Allow Ticket Submission |
This option is not used. |
14 |
Allow Wo Prioritization |
This option is not used. |
15 |
Executive Files |
Allows/blocks access to Advisory Board documents. |
16 |
Allow Customer Blog |
This option is not used. |
17 |
OSR Restricted Institution |
This option is not used. |
18 |
OSR Restricted Company |
This option is not used. |
19 |
OSR Restricted Division |
This option is not used. |
20 |
OSR Restricted Region |
This option is not used. |
21 |
OSR Restricted State |
This option is not used. |
22 |
OSR Restricted Branch |
This option is not used. |
23 |
EIS Company |
This option is not used. |
24 |
OSR Restricted Institution 2 |
This option is not used. |
25 |
OSR Restricted Company 2 |
This option is not used. |
26 |
OSR Restricted Division 2 |
This option is not used. |
27 |
OSR Restricted Region 2 |
This option is not used. |
28 |
OSR Restricted State 2 |
This option is not used. |
29 |
OSR Restricted Branch 2 |
This option is not used. |