Field Level Security Screen |
  

|
Navigation: Security Screens > Setup Screen >
Field Level Security Screen |
|
The Field Level Security screen is used to set up field-specific security for employees. Just as there is security to use screens within CIM GOLD, many fields and buttons can also have security in order to make changes to the data in those fields.
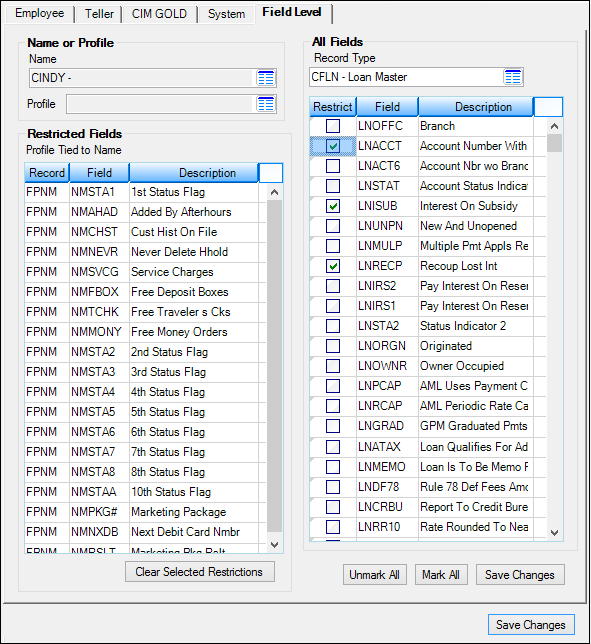
This screen is found under the Loans > System Setup Screens, in the CIM GOLD Miscellaneous system, and as a tab on the Security > Setup screen. See the following example of this screen:
Employees must first be set up with system security using the Security > Setup screen before any field-level security can be tied to them. If an employee is tied to a specific profile in Security Setup, then the same profile name is used to set up the specific field-level security for that profile name. If the field-level security feature is not going to be used for your institution, then no work is required in the field-level security screen. If the profile doesn’t fit for every field for particular employees, then you cannot tie them to that profile; however, you can accomplish this by creating a different profile.
This feature can be used for fields related to both deposit and loan accounts. It is not required but can be used for all or just a portion of the company employees. However, the loan field-level security fields will not be operational until the loan screens are completed.
All the fields are "open" to every employee until they are either tied to a profile (that has been customized) or have been restricted individually.
The Record Type dictates what fields are available for the specified type. For example, FPDM is for the Deposit Master Record. These records are similar to the records used in GOLDWriter. For a list of record types and their descriptions, see the Master Records section below.
The field-level security screen is organized into two sections.
1.The left side is used to indicate the employee or profile that you want to set up, change, or look at. Based on an employee's individual settings or the settings of the profile, it shows you all the fields that are restricted for them.
a.The Name drop-down list shows all the employees that have been set up through the Employee tab of the Setup screen.
b.The Profile drop-down list shows all the available profiles that been set up through the CIM GOLD Profile tab of the Setup screen. A portion of the screen will be disabled based on the item selected in this field. Employees tied to a profile cannot have any changes made to their restrictions; this has to be done using the profile.
2.The right side of the screen is used to restrict the specific fields in specific records that you do not want accessed for file maintenance. This can be for either a person or a profile based on job description, such as a teller or a branch manager. By using profiles, your institution can set up templates that can be tied to employees based on the job they do at the company. See the All Fields field group for more information.
Each list view on this screen contains right-click functionality. If you right-click a list view on any of the screens in this system, the following pop-up menu appears:
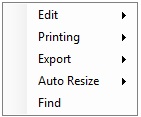
Select any of these options in the pop-up menu for additional functions. The following table explains each of these pop-up functions:
Pop-up Function |
Description |
|---|---|
Edit |
Selecting this option allows you to copy the highlighted information in the list view to your Windows® clipboard. To highlight more than one record in the list view, choose Edit, then Select All. After you have copied the highlighted information from the list view using the Edit pop-up function, you can then paste that information into Notepad or any other word processing program.
Note: The formatting will look better if you use the Export function instead. |
Printing |
Select this option to print the information in the list view to a designated printer. You can preview the information before printing it and make any needed adjustments to the printer settings or page setup. |
Export |
Select this option if you would like to export the information in the list view to either a tab-delimited format or to GOLDPoint System's Report Manager program. If you export to a tab-delimited format, you can open the information into a spreadsheet program such as Microsoft® Excel®. |
Auto Resize |
This function is used to resize the columns and rows in the grid to fit the data contained therein.
|
Find |
The Find function allows you to search for any word, phrase, or amount in the list view. This is a helpful tool to find the exact information you are looking for. When you select this option, the Find dialog appears. Enter the information in the top field, and click <Find>. All matching information will be displayed in the list view below the search field. Double-click any of the results, and you will be returned to the list view and the item you selected will be highlighted. |
See the Record Type field for a list of all possible records in CIM GOLD.
|
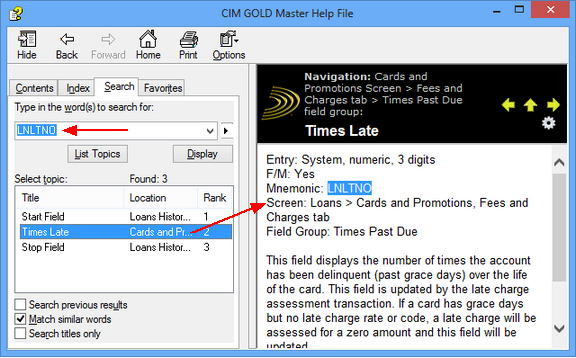
Tip: If you want to find where that field is found in CIM GOLD, you can search for the mnemonic of that field in Master Help. Not all fields are actually found within CIM GOLD. Some fields are behind-the-scenes fields. However, most fields are listed in help along with their mnemonic. For example, if you search for LNLTNO (the number of times the loan has been late) in the Master Help, the search results show that field can be found on the Loans > Cards and Promotions screen, as shown below:
|
|---|
In order to use this screen, your institution must:
•Subscribe to it on the Security > Subscribe To Mini-Applications screen.
•Set up employees and/or profiles with either Inquire (read-only) or Maintain (edit) security for it on the CIM GOLD tab of the Security > Setup screen. |