System Field Dictionary |
  

|
Navigation: Teller System > CIM GOLDTeller Overview > CIM GOLDTeller Screen Details > Functions > Administrator Options >
System Field Dictionary |
|
![]() Functions menu > Administrator Options > System Field Dictionary
Functions menu > Administrator Options > System Field Dictionary
The System Field Dictionary is used to create fields to be used for drop boxes or to add other fields that can be included on receipts. These fields are user entered and can be specific to your institution.
What are drop box fields? Drop box fields give tellers a list of possible options for fields, as shown below:
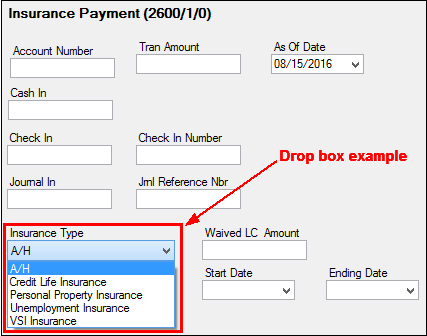
These are very helpful for end tellers when processing transactions. It helps remove user error, and it allows tellers to quickly select information for provided fields, rather than the teller needing to remember codes to be entered in a field. Sometimes these fields are referred to as drop-list boxes, drop-lists, or drop-down boxes. They all mean the same.
These are highly customizable to your institution. CIM GOLDTeller allows your institution to determine which fields should be drop boxes, and which information should be in the drop boxes.
You must first define what should go in the drop box, as well as how the system will read the information. That's what this screen is for. This screen is a little more advanced and may require contacting your GOLDPoint Systems account manager for some assistance the first time you attempt making a drop box. But really, it's not that hard of a process and the following steps should make it easier for you. Once you understand the process, you will be an expert at creating drop-list fields in CIM GOLDTeller.
This is only one part of a three-part process. Once completing this screen, you need to finish two more tasks:
1.Use the fields you created in steps 1-9 below and add them to a drop-list using the View/Modify Droplists function.
2.Once done with that function, you need to access the Transaction Design screen and add the drop-list to the field you want on the transaction. |
Security
Security for this screen should only be given to managers. Security for this screen is found on the Security > Setup screen > System tab, then GOLDTeller Security > System Fields Dictionary option. See the GOLDTeller Security Features topic for more information. |
Example: On the Insurance Payment transaction (tran code 2600-01) there is a field called "Descriptor." That field is for the Insurance Type. You can turn that field into a drop-list, but first you need to add all possible insurance types offered by your institution to the System Field Dictionary. Once set up on this screen, you can add them to a drop-list using the View/Modify Droplists function, and then assign that drop-list to the field using the Transaction Design screen.
The example above is used in the following steps to explain how to add fields to the System Field Dictionary.
| 1. | Open the Functions > Administrator Options > System Field Dictionary. |
| 2. | Click <New>. |
| 3. | In the Field Name field, enter the new field to be created. This field name must be unique, yet descriptive enough so that others understand what the field is for. In our example shown at the end of these steps, we've named the field "InsDes0100" for insurance descriptor 0100. |
Note: If more than one field will be grouped for a drop box, type the same first few characters for each field name. This way, they will be grouped together in the list box and easily accessed when selecting them for the drop-down list.
| 4. | Leave the ID or Length field blank. The system will automatically fill it in with the length of the field name. |
| 5. | Select the Source of the field. If entering items for a drop-list, this should be set to "Constant." |
| 6. | The Type field should be set to "Standard." |
| 7. | Enter the description in the Constant Data field. This description will display in the drop-down list. Based on the example above, you could enter "0100-Accident & Health." |
| 8. | In the Short Data field, enter the value to be sent to the system to populate a host field. Based on step 7, for example, you would enter "0100." When the Insurance Payment transaction is run with this descriptor, the system records "0100" as the source of the insurance type of where the insurance payment came from. This is displayed in Loan History (or Deposit History if running a deposit transaction). This is a very important step. The system only reads codes (it's not a human, obviously), so do not use anything the system can't read. For example, you wouldn't enter "Accident and Health" here, because the system can't determine that it's code "0100." |
| 9. | Click <Save> to save the field. |
You would then repeat these steps for each insurance type. Or you could copy the information from this field and use it for a new field. See the Copy steps below.
Note: To quickly sort the fields in alphabetical order or reverse alphabetical order, click the Field Name column header once (for alphabetical) or twice (for reverse alphabetical). Capitalized letters are sorted before uncapitalized letters. For example, AZField would come before AasField.
See the following example of one of the insurance type fields set up on the System Field Dictionary screen. The steps are numbered on the screen example.
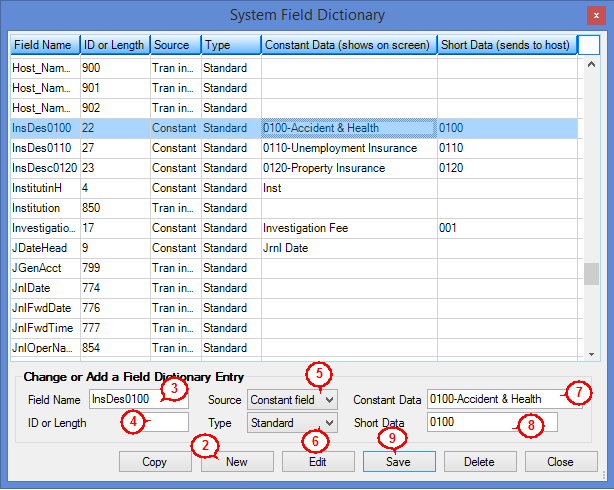
CIM GOLDTeller Functions Menu > Administrator Options > System Field Dictionary Screen
To copy a field to create a new field:
1.Highlight the field in the table that you want to copy in order to create a new field.
2.Click <Copy>.
3.Type a new field name in the Field Name field.
4.Change the Constant Data and Short Data fields with applicable information that will apply to the new field.
5.Click <Save>.
To edit an existing field:
1.Highlight the field in the table that you want to edit.
2.Click <Edit>.
3.Edit the information.
4.Click <Save>.
To delete an existing field:
1.Highlight the field in the table that you want to delete.
2.Click <Delete>.
Note: If you delete a field from the table, if that field has been applied to a drop-list on a transaction, it will automatically be deleted from that drop-list.