Navigation: Notification System > Manual Notification Handler Screen >
Use the Manual Notification Handler screen to manually re-queue messages. Messages with errors are sent to this screen from the Queue Error Manager screen and archived messages are sent to this screen from the Archive Manager screen.
Anything entered in the Override Subject or Override Message fields on this screen overrides anything previously entered in those fields.
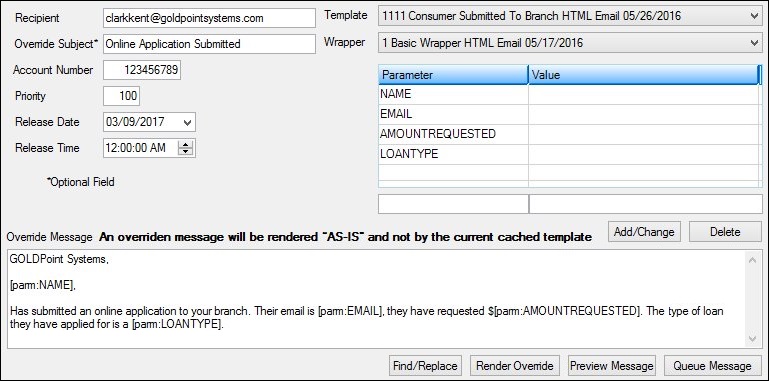
See the following example of this screen followed by field and button descriptions.

Manual Notification Handler Screen
Field |
Description |
|---|---|
Enter the email address or phone number that the message will be sent to in this field. If the template selected is an email template, the address entered must be the email address of the recipient. If the template selected is a text template, the address entered must be the phone number of the recipient. |
|
Enter the new subject line of the message in this field. This subject line will override any subject line previously entered. |
|
Enter the account number that the message will be tied to in this field. |
|
Enter the priority number in this field. The lower the value entered, the higher the priority of the message. If the server has many messages to transmit, the highest priority messages are transmitted first. The default priority for most messages is 100. |
|
Enter the date to release the message. Enter the date using MM/DD/YYYY format, or use the drop-down calendar to select the date. The message will not be sent until the date and time indicated in the Release Date and Release Time fields. |
|
Enter the time to release the message. Enter the time using HH/MM/SS format, or use the arrows to select the time. The message will not be sent until the date and time indicated in the Release Date and Release Time fields. |
|
Enter the code for the new body of the message in this field. This message will override any message body previously entered. |
|
Select the template from this drop-down field. This field displays the type and identification number of each template available. Selecting a template automatically enters that template's parameters into the Manual Notification list view. |
|
Select the wrapper from this drop-down field. This field displays the type and identification number of each wrapper available. Selecting a wrapper automatically enters that wrapper's parameters into the Manual Notification list view. |
|
This list view displays the parameters and values currently set up to use for substitution when rendering the message. You can select the parameters and values in this list view to update or delete them. You can also add new parameters and values to this list view using the <Add/Change> button to add the information in the the Parameter and Value fields.
The following buttons affect this list view: •<Add/Change>: Click this button to update the Manual Notification list view with the information in the Parameter and Value fields. •<Delete>: Click this button to delete the parameter selected in the Manual Notification list view. |
|
Enter or update parameters in this field and click <Add/Change> to modify the Manual Notification list view. |
|
Enter or update values in this field and click <Add/Change> to modify the Manual Notification list view. |
Button |
Description |
|---|---|
Click this button to update the Manual Notification list view with the information in the Parameter and Value fields. See the Add or Change Parameters section for more details. |
|
Click this button to delete the parameter selected in the Manual Notification list view. See the Delete Parameters section for more details. |
|
Click this button to perform a find and replace function in the body of the message in the Override Message field. See the Find and Replace Text section for more details. |
|
Click this button to render the message with the parameters and values set up in the Manual Notification list view. Note: Once you click <Render> the first time, you cannot change the parameters or values and click <Render> again.
The parameters and values in the Manual Notification list view are ignored when rendering the subject if anything is entered into the Override Subject field. They are also ignored when rendering the body of the message if anything is entered into the Override Message field.
See the Render Changes to Parameters section for more details. |
|
Click this button to display the message as it would render (display in an HTML renderer) if the processor uses the current effective template. See the View Messages section for more details. |
|
Click this button to queue the message. See the Queue or Re-queue a Message section for more details. Note: This button appears only for new messages. |
|
Click this button to re-queue the message. If the message being queued had an error, the error is automatically marked as handled. See the Queue or Re-queue a Message section for more details. Note: This button appears for previously-created messages that you want to send again. |
See also:
Manual Notification Handler Screen