Navigation: Notification System > Templates Screen > Notification Templates Screen Details >
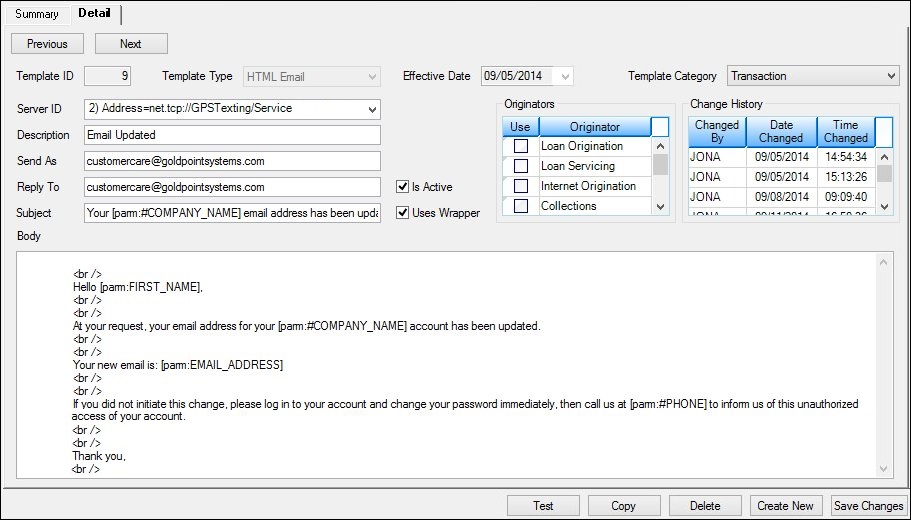
Use the Detail tab to create, modify, or delete notifications. You can also use this tab to render a test notification to ensure that the body, subject, etc. of a notification have been set up correctly.
See the following example of this screen followed by field and button descriptions.

Notification Templates Screen > Detail Tab
Field |
Description |
|---|---|
Enter the identification number for the notification template in this field. If you selected a template on the Summary tab, this field displays the identification number for the selected notification template. Note: When creating custom templates, the template ID must be within the range of 10000–11999.
You can load a specific notification template onto this screen by searching for that template on the Summary tab and double-clicking on the template in the Templates Summary list view. |
|
Select the format type of the notification to be sent (Email (HTML or text) or Text (SMS)) from this drop-down list. Note: If you want to be set up to be able to sent notifications via text (SMS), please contact your GOLDPoint Systems client solutions specialist. |
|
Enter the date when the notification should become effective (start being sent). Enter the date using MM/DD/YYYY format, or use the drop-down calendar to select the date. |
|
Select from this drop-down field whether the notification will be a transactional or marketing notification. If the notification is set up as a marketing notification, customers who have opted out to receive marketing texts or emails will not receive any texts or emails with marketing templates. For more information, see the help for the Borrower Opt Out table on the CIF tab of the Marketing and Collections screen. |
|
Enter the identification number of the server used for notifications in this field. |
|
Enter a description of the notification in this field. Try to be descriptive so that others can easily tell the purpose for this notification when it is listed in the Templates Summary list view on the Summary tab. |
|
Enter the email address (e.g., CustomerCare@GOLDPointsystems.com) to be used to send notifications in this field. This is the email address that users will see as the sender of the notification. |
|
Enter the email address (e.g., CustomerCare@GOLDPointsystems.com) that emails will be sent to when a user replies to the notification in this field. |
|
Enter the title of the notification that will appear in the subject line in this field. |
|
Enter the code and text to be used in the email or text notification in this field. In this field you can specify the font, style, wording, etc. of the notification.
The following special characters entered in the text of the body of the notification could interfere with how a message is displayed in an HTML browser: (&), (<), (>), ('), and ("). The program will substitute the specified parameter whenever <parm:####> is entered in the code where #### is the parameter name. |
|
Check this field to activate the notification. If this field is not checked, the notification will not be active and will not appear on the Summary tab if the Show Only Active and Future Templates field is checked. |
|
Check this field to include a wrapper on the notification. Wrappers are the institution branding that is applied to the notifications. Wrappers display your institution's logos, advertising, and selected verbiage in the header and footer of the notification. For more information on setting up wrappers, see the Wrappers screen. |
|
The Originators grid displays the originating systems that can be used for the notification template. Check the Use box next to the originating system that you want to use for the template.
This can enable you to tie specific templates to loan origination, loan servicing, etc. For example, your institution can use a different template with a different wrapper for origination and loan servicing. The template for origination might include a wrapper with advertising while the template for loan servicing does not. And the system can automatically use the correct template with the correct wrapper depending on the system that is sending the notification.
The following columns display information in the Originators grid: •Use: Use this checkbox to select the originating system for the notification. •Originator: Displays the originating systems that can be tied to the notifications. |
|
The Change History list view displays who has modified the notification and when they modified it. The following columns display information in the Change History list view and can be used to sort:
•Changed By: Displays the name of the user who last modified the notification. •Date Changed: Displays the date (in MMDDYYYY format) when the user in the Changed By column modified the notification. •Time Changed: Displays the time (in HHMMSS format in a 24-hour clock format) when the user in the Changed By column modified the notification. |
Button |
Description |
|---|---|
Click this button to render a test notification on the Detail tab to ensure that the body, subject, etc. of a notification have been set up correctly. |
|
Click this button to copy the format of the current template to create a new template. |
|
Click this button to delete the notification currently selected in the Templates Summary list view. |
|
Click this button to load a blank template on the Detail tab. |
|
Click this button to save any change made to the Notification Templates screen. |
See also: