GPS Only: Creating Receipts from Text Files |
  

|
Navigation: Teller System > CIM GOLDTeller Overview > CIM GOLDTeller Screen Details > Functions > Administrator Options > Print Form Design > Creating a New Form/Receipt >
GPS Only: Creating Receipts from Text Files |
|
If a client sends you a Word® file to be used for the text of a receipt, you can connect that file to CIM GOLDTeller to be used for receipts. These steps assume you know about WinTerm's FIDL language (used in step 8 below).
1.Using Word documents provided by clients, copy the desired verbiage to be used on the receipt and paste it into Notepad and save as a .txt file. The naming convention should be XXXX01.txt, XXXX02.txt, etc., for purposes explained later. The XXX can be anything that would make it easy for others to remember, such as RECEIPT01, HEADER01, MESSAGE01, FOOTER01, RECEIPT02, HEADER02, etc.
2.Save the .txt file in a folder on your C: drive. (Remember the path.)
3.Open RegEdit (by going to your Start menu and typing "RegEdit" and opening it (it's an .exe file)).
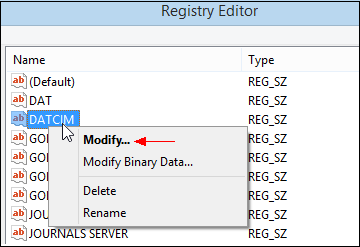
4.Navigate to this location: HKEY_LOCAL_MACHINE > SOFTWARE > Wow6432Node > CORe > GTLLR, then right-click the DATCIM value and select "Modify," as shown below.
Note: If you don't have DATCIM, you can add it to the register by completing the following steps:
a.Right-click "GTLLR" under CORe and select New > String Value (see below).
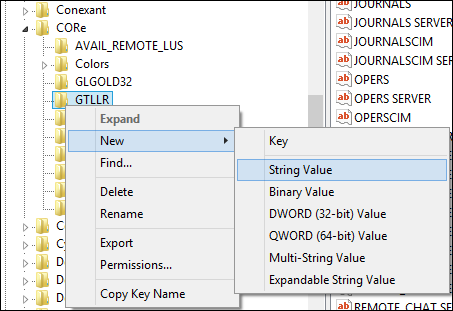
b.When the new value appears, type "DATCIM" and then complete step 4 above, then continue on to step 5.
2.Click <OK> and close the Registry Editor. You are now ready to tie a System Field to the .txt file.
3.Open CIM GOLD and navigate to GOLDTeller (under Teller System in the left tree menu).
4.From the Function menu, select Administrator Options > System Field Dictionary.
5.Click <New>.
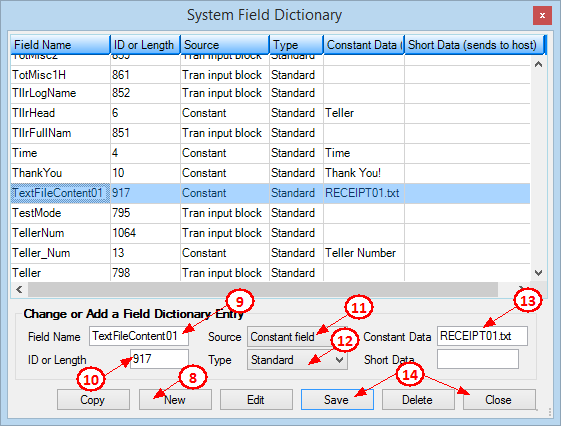
6.In the Field Name, type the name of the field beginning with the words "TextFileContentNN", where "NN" is the same digits used in the .txt file naming explained in step 1 above. For example, if the .txt file was named "RECEIPT01", you would name the field "TextFileContent01".
7.Enter "917" in the ID or Length field.
8.In the Source field, select "Constant field".
9.In the Type field, select "Standard".
10.In the Constant Data field, type the name of your text file. From our example in step 1 above, we used "RECEIPT01.txt".
11.Click <Save> and then <Close> to close the System Field Dictionary. See the following steps illustrated below, followed by steps to add the field to your header in receipts.
To add the field you added in the steps above to a header (so it will appear on the receipt):
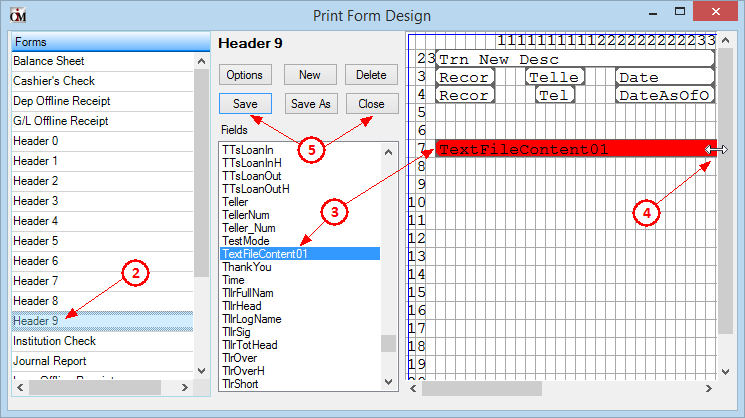
1.Open the Print Form Design screen from the Functions > Administrator Options menu.
2.Select the header being used to hold the new .txt information. This header is used in FIDL language in WinTerm when programmers set up the receipt.
3.Click and hold the TextFileContentNN field from the Fields box and drag and drop it in the location you want it to appear on the form.
4.Stretch the TextFileContentNN field as long as it can possibly go on the form design. This will ensure that the length of the .txt file is maximized. If after testing you find that some words are cut off, adjust your original Notepad .txt file to what you can visually see the margins should be.
| Note: If your .txt file is designed to print as an 8.5" x 11" size, click <Options> and adjust the sizing of the header. |
| 5. | Click <Save> and <Close>. See the following steps illustrated below. |
Now a programmer will tie the header in WinTerm using FIDL language in the following manner and in the correct location where the .txt file will appear on the receipt, generally after fields are programmed. Programmers use function 2 (Institution Options), then function 36 (Teller Output Format Message Setup) in Blue WinTerm, to insert the headers and FIDL language. Unless you are very familiar on how to do this, do not attempt! A programmer can help you with this step (see below).
")
Teller Output Format Message Setup Screen (function 2, then function 36 in Blue WinTerm)
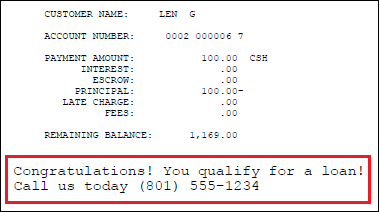
The following is an example of a receipt in CIM GOLDTeller, where some of the wording is pulled from a .txt file. The wording is highlighted with a red box.