Navigation: Loans > Loan Screens > System Setup Screens >
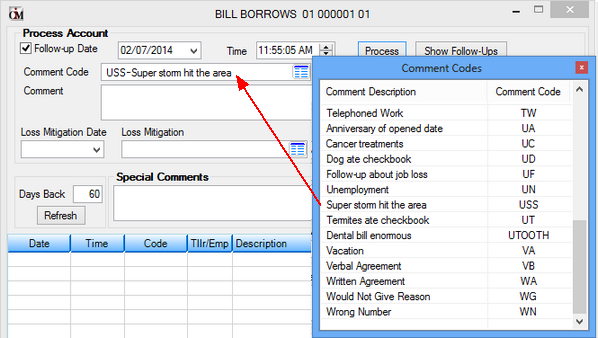
Use the Collection Comment Codes screen to set up user-defined codes that can be used by employees and collectors when they contact your customers. These comment codes will be displayed in the Comment Code field on the Contact tab of the Loans > Marketing and Collections screen or from the Options > Show Collections Comments screen on the top menu bar in CIM GOLD, as shown below:
IMPORTANT: Adding Comment Codes is a two-step process
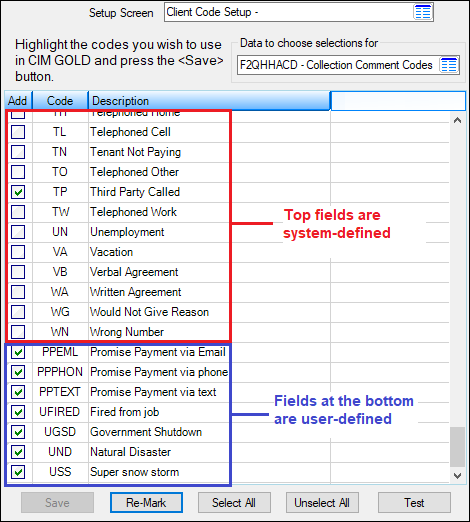
1.The first step is adding them on this screen. 2.The next step is to check the Add box on the Loans > System Setup Screens > Client Code Setup > Collection Comment Codes screen, as shown below. User-defined fields come after the system-defined codes, so you will need to scroll down to see your new codes. If the second step is not complete, the new Comment Codes will not show in the Comment Codes box for users.
 |
|---|
When setting up codes on the Collection Comment Codes screen, you may want to start each user-defined code with the same letter. That way when you sort on the column heading Comment Code, the user-defined fields will be grouped together. For example, in the screen above, the user-defined codes start with "U" and are grouped together.
Note: See Promise Tracking below for information about Comment Codes that start with "PP" and why they are useful.
The list view at the top of this screen displays all previously created comment codes at your institution. See the Institution Defined Codes field (at the bottom-right of this screen) for a list of all system-defined comment codes already available.
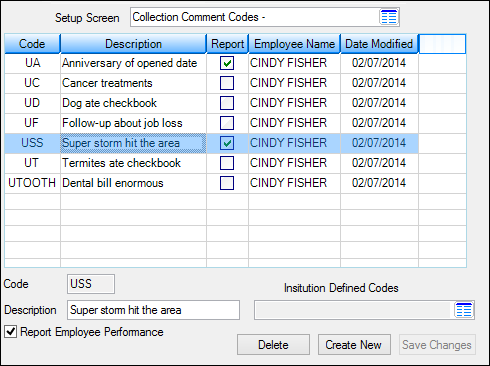
Loans > System Setup Screens > Collection Comment Codes Screen
The advantage of setting up comment codes on the Collection Comment Codes screen is that you can flag the comment to the Loans > Statistics and Summaries > Employee Performance screen. That way, any time the employee uses that comment code, it can be tracked through the Employee Performance screen.
Perhaps you want to contact all your customers and notify them of a new promotion your institution is advertising. You could enter a new collection comment code on the Collection Comment Codes screen and name it "UNP - New 90-day promotion." Make sure to check the Report Employee Performance box.
Then notify employees that they should offer the new promotion to every customer they speak with that day, and when they make contact, select the new "UNP - New 90-day promotion" from the Comment Code field on the Marketing and Collections screen.
Once employees start using the new codes, you can track how many account owners are being contacted using the user-defined code through the Employee Performance screen. The User Comment row displays the number of accounts where the user-defined collection comment code was used, as shown below.
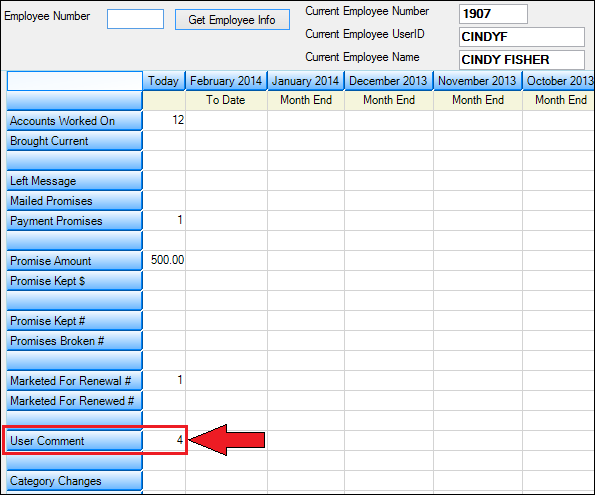 Loans > Statistics and Summaries > Employee Performance Screen
|
If you set up codes that start with "PP," they will be tracked on the Loans > Statistics and Summary > Promise Tracking screen. (Only for CIM GOLD version 7.9.4 and above.) If you want to enter more promised payment codes for tracking purposes, you will need to create them on the Collection Comment Codes screen.
The comment codes must start with PP in order to be logged on the Promise Tracking screen. If the codes only start with one P or a different letter or number, they will not be recorded.
For example, if you want to track how successful text solicitations are compared to phone, you might set up two comment codes called "PPTEXT" and "PPHONE." Then when employees log their efforts accordingly, you can quickly see which ones were more successful on the Promise Tracking screen. See the following example of more "PP" codes set up on the Collection Comment Codes screen. For more information, see the Promise Tracking screen help.
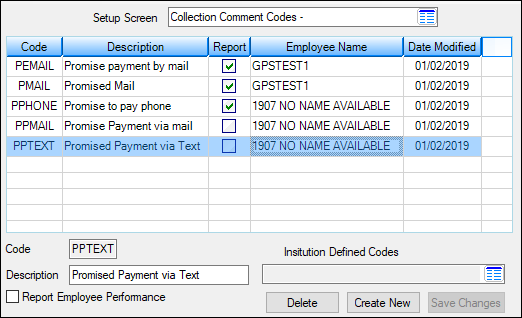 Loans > System Setup Screens > Collection Comment Codes
Loans > Statistics and Summaries > Promise Tracking Screen
|
1.Access the Loans > System Setup Screens, click the Setup Screen list icon
2.At the bottom of the screen, click
3.In the Code field (mnemonic UCCODE), enter the alphanumeric code you want to use to designate this user-defined code. If you try entering a system-defined code (as displayed in the Institution Defined Codes field) or a user-defined code that has already been set up (as displayed in the list view above), the system will display an error provider
4.In the Description field (mnemonic UCMX40), enter the description for this code. The description should help the user understand when to use this code on an account, such as "Advertised new promotion," "Super storm delayed payment," or "Follow-up about job loss." You can enter any description you want in this field.
5.Check the Report Employee Performance box (mnemonic UCREPT) if you want this code to be reported on the Loans > Statistics and Summaries > Employee Performance screen. See How is this useful? above for why this box may be helpful for tracking purposes.
6.Click
7.To edit information about previously created comment codes (except the Code number itself), select the code in the list view and edit the fields on this screen. To delete a previously created code, select the code in the list view and click <Delete>. |
|
Record Identification: The fields on this screen are stored in the CSUC record (User Defined Collection Comment Codes). You can run reports for this record through GOLDMiner or GOLDWriter. See CSUC in the Mnemonic Dictionary for a list of all available fields in this record. Also see field descriptions in this help manual for mnemonics to include in reports. |
|---|
In order to use this screen, your institution must:
•Subscribe to System Setup Screens on the Security > Subscribe To Mini-Applications screen.
•Set up employees and/or profiles with either Inquire (read-only) or Maintain (edit) security for System Setup Screens on the CIM GOLD tab of the Security > Setup screen. |