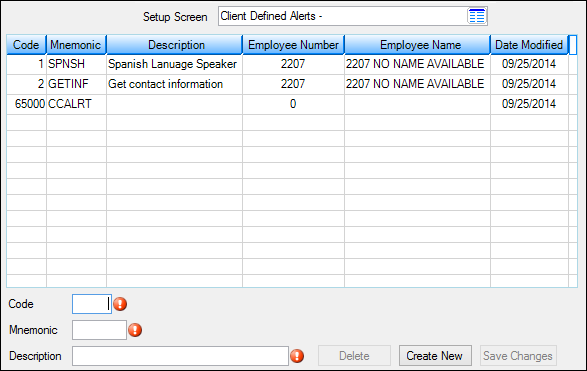
Client Defined Alerts Screen |
  

|
Navigation: Loans > Loan Screens > System Setup Screens >
Client Defined Alerts Screen |
|
The Loans > System Setup Screens > Client Defined Alerts screen lets you create alerts and apply those alerts to specific accounts, so that any time a user accesses that account, the alert is displayed.
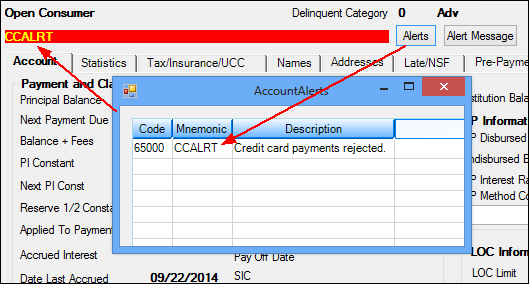
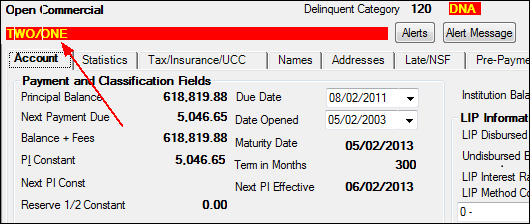
A client-defined alert is a message you create and assign to an account. Once assigned, the alert mnemonic displays in a red bar at the top of screens for that account. See the example below.
Client Defined Alert on the Loans > Account Detail Screen
If the Require Acknowledgment option is enabled from the Set Alerts dialog on the Loans > Account Information > Actions, Holds and Event Letters screen, the message itself appears as a dialog and must be acknowledged by clicking <OK>.
You can change the description of the message to one more suitable for your institution. You can also select options that control how the alert displays (such as how long the alert will display before it closes, or whether a user must click <OK> before the alert closes). To apply the alert to individual accounts and to set up options and messages for the alert, use the ![]() button on the Loans > Account Information > Actions, Holds and Event Letters screen.
button on the Loans > Account Information > Actions, Holds and Event Letters screen.
The list view at the top of this screen displays all previously created alerts at your institution. Select an alert in the list view to edit that alert's Mnemonic or Description in the fields below. To delete an alert, select it in the list and click <Delete>.
Loans > System Setup Screens > Client Defined Alerts Screen
To create and apply client defined alerts to an account, follow the steps below:
1.Contact your GOLDPoint Systems account specialist and have Institution Option SUDA set to "Y." This makes a <Set Alert> button display on the Actions, Holds and Event Letters screen.
2.Open this screen.
3.In the Code field, type a new code number for the client defined alert (up to five digits).
4.In the Mnemonic field (DAFLDS), type a brief label for the alert. This label appears in the red bar on the top of CIM GOLD screens when the account is selected.
5.In the Description field, type information that will help when deciding whether to assign this alert to an account.
6.Open the Actions, Holds and Event Letters screen and access the account that needs an alert applied.
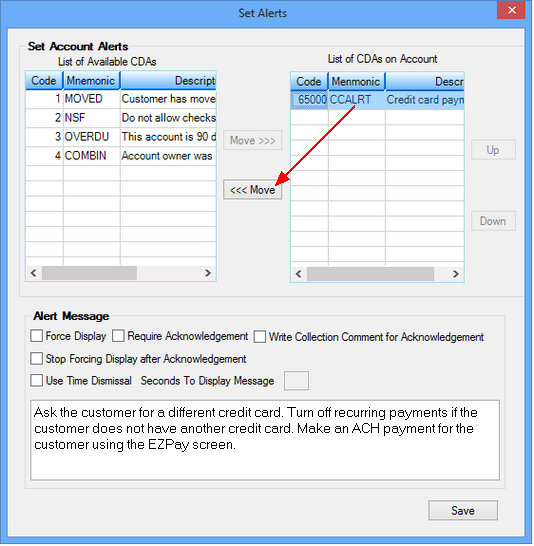
7.Click <Set Alert> to open the Set Alerts dialog, which lists the alerts you have defined.
8.Assign an alert for that account and select display options for the alert.
Alert 6500 is reserved for credit card payments that have been rejected by the system. The card could be rejected for many reasons, including the card has expired, the limit has been reached, etc. This alert appears automatically on accounts set up with recurring credit card payments when the system encounters a rejected credit card payment, as shown below:
You may also want to apply additional alert message options, such as a dialog box that is displayed notifying the user of the credit card rejection, as well as asking the user to acknowledge the message. Additional options are made by clicking <Set Alerts> on the Actions, Holds and Event Letters screen. See the help page on that screen for more information on the different alert options available. (Institution option SUDA must be set in order to view the <Set Alerts> button and dialog box on the Actions, Holds and Event Letters screen.)
An Institution Option CCAC is available that allows users to set up an ACH payment for customers in the event that their recurring credit card payment is rejected. You can set up the ACH payment using the Loans > Transactions > EZPay screen, then select the E-Check radio button instead of the Debit/Credit Card button. You may also want to click the Card Profiles link on that screen and restrict the rejected card from being used in the future.
You will need to manually remove the alert once a new recurring card is set up on the account, or once the recurring payment is removed from the account and the account owner elects instead to use ACH payments or another type of payment other than credit card.
To remove the alert from the account, click <Set Alerts> on the Actions, Holds and Event Letters screen, then select the credit card alert in the List of CDAs on Account, and then click
Loans > Actions, Holds, Event Letters Screen, then click <Set Alerts> |
|
Record Identification: The fields on this screen are stored in the CSDA record (Client Defined Alerts). You can run reports for this record through GOLDMiner or GOLDWriter. See CSDA in the Mnemonic Dictionary for a list of all available fields in this record. Also see field descriptions in this help manual for mnemonics to include in reports. |
|---|
In order to use this screen, your institution must:
•Subscribe to System Setup Screens on the Security > Subscribe To Mini-Applications screen.
•Set up employees and/or profiles with either Inquire (read-only) or Maintain (edit) security for System Setup Screens on the CIM GOLD tab of the Security > Setup screen. |