Navigation: Dealer System > Dealers Screen >
Using the Dealers screen you can approve dealers with a pending approval status by clicking either <Approval Steps> or <Temporary Approval> in the lower-right corner of the Dealers screen. You can also select and approve the branches that the dealer can use by clicking the <Approved Branches> button. Note: You must be set up with proper security in order to approve dealer status.
To approve a dealer with a pending approval status using the <Approval Steps> button:
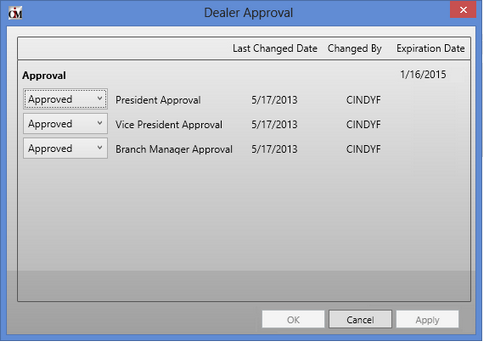
1.Click the <Approval Steps> button to open the Dealer Approval dialog.

Dealer Approval Dialog
2.The Dealer Approval dialog displays the approval steps necessary for the dealer's approval. The approval steps are determined by your institution. Note: The Approval Steps are set up on the Dealer System > Dealer Approval Setup screen. Security for users to be able to approve each step is also set up on this screen.
3.Obtain all of the necessary approvals for the dealer. For example, you could have an approval step for the branch manager, vice president, and president. Until each of the steps is approved, the dealer only has pending status.
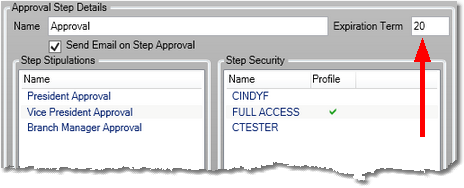
4.The approval can also be set up with a date limit. In other words, the approval is only good for a set number of months. Afterwards, the dealer becomes expired (unless someone approves their status again). This would be useful if you want to review dealers after a designated number of months. The number of months is set up when creating the steps on the Dealer Approval Setup screen. The number of months until the dealer is expired is entered in the Expiration Term field (as shown below). If an expiration term is entered, the Approval Expiration field on the Dealers screen displays the date of expiration once the dealer is approved.
5.Additionally, an option is available on the Dealer System > Options screen that requires each step in the approval process to be completed in order. For example, the branch manager would need to approve the dealer first, followed by the vice president, and then the president gives final approval.

Expiration Term Field on Dealer Approval Setup Screen
6.Once each step is approved, click <OK> or <Apply> and the dealer status is updated to Approved.
Click the <Temporary Approval> button to give temporary approval for the dealer. This button is grayed out if the dealer has already been approved. Temporary approval is a useful tool to give dealers approval for a set number of months before reviewing their activity and either approving them for a longer term or denying them.
Temporary approval does not require any additional approval steps. Once this button is clicked, the dealer is temporarily approved. The temporary approved limits are set up on the Dealer System > Options screen in the Temporary Approval Time field.
Once the term has expired, the dealer's status changes to expired. You can view the expired dealers in the Approval Queue or by checking Include Unapproved when doing a dealer search.
To select and approve the branches that the dealer can use:
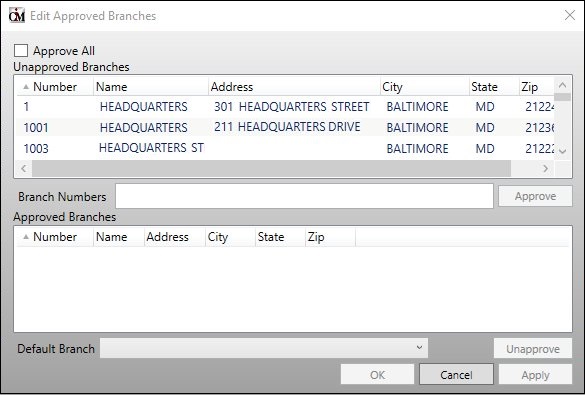
1.Click the <Approved Branches> button to open the Edit Approved Branches dialog.

Edit Approved Branches Dialog
2.Using the Edit Approved Branches dialog, select a branch from the Unapproved Branches list view and click <Approve>.
3.The selected branch is then placed in the Approved Branches list view.
4.Repeat steps 2 and 3 until all of the branches that you want approved for the dealer are listed in the Approved Branches list view. Note: If you want the dealer to be able to use all branches, check the Approve All field to automatically move all of the branches into the Approved Branches list view.
5.Once all of the branches that you want to approved for the dealer to use are in the Approved Branches list view, select a default branch for the dealer using the Default Branch field.
6.Once you have finished setting up the approved branches, click <OK> or <Apply> to apply your changes.
See also: