Print Options tab |
  

|
Navigation: Teller System > CIM GOLDTeller Overview > Setup Requirements > Operators.dat File >
Print Options tab |
|
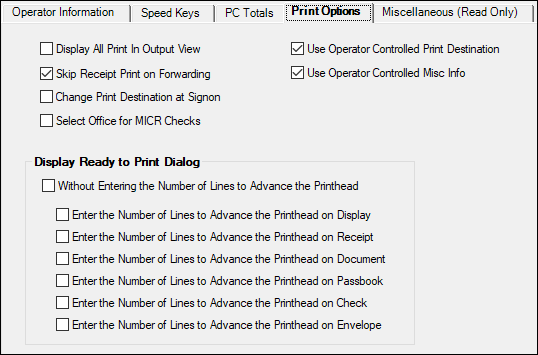
The Print Options tab on the Operator Information screen allows for different options when printing. See the following example of this tab, followed by field descriptions.
Functions > Operator Functions > Operator Information Screen > PC Totals Tab
Field |
Description |
|---|---|
Display All Print in Output View |
Check this box if you want any printing done from CIM GOLDTeller to also be displayed in the Output View. The Output View is found in the fourth quadrant of the CIM GOLDTeller screen.
If your printers are set to other destinations and this option is not selected, then nothing will be displayed in the fourth quadrant. Instead, the information is printed to the designated printer. We suggest this option be selected. |
Skip Receipt Print on Forwarding |
When users forward transactions from the Functions > Journal/Forwarding screen, a receipt is automatically printed to the printer designated on the System Configuration screen, Printer Defaults tab. If this option is selected, the receipt does not print on journal/forwarding. |
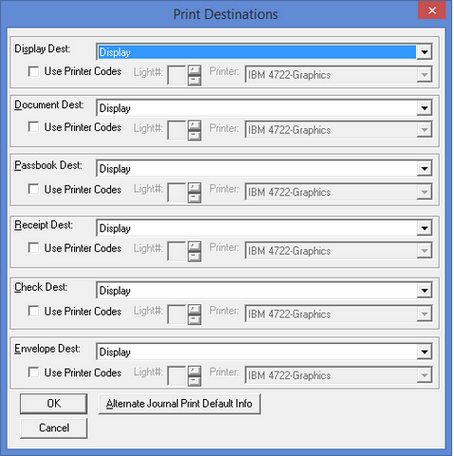
Change Print Destination at Signon |
If this option is selected, the Print Destinations dialog box is displayed every time after the operator logs onto CIM GOLDTeller. The user can then change any of the printer destinations, as shown below.
Usually this is done on the System Configuration screen > Printer Defaults tab and saved to the DB4 Server for all operators at the branch or office.
This option is helpful for those users who need to change their printers, but do not have security access to the Functions > Administrator Options > System Configuration screen. |
Field |
Description |
Select Office for MICR Checks |
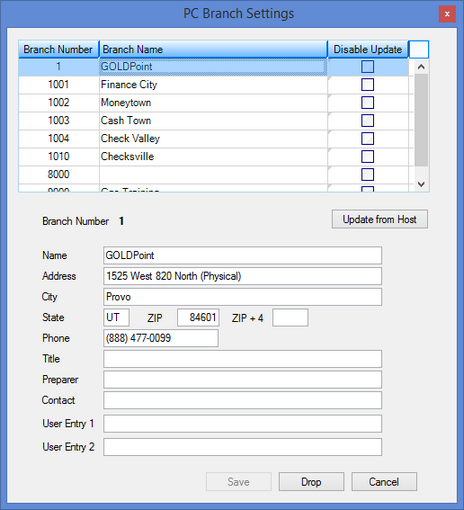
This option only works if your institution prints MICR-type checks (see MICR Check Printing). If this option is on, for transactions where you print a check to the customer (an amount in the Check Out field on the transaction), the PC Branch Settings screen appears near the end of the transaction. You can use the defaulted branch or select a different branch from the dialog box where the check is issued. See the following example of the PC Branch Settings screen that appears: |
Field |
Description |
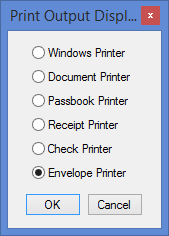
Use Operator Controlled Print Destination |
If this option is selected, any time the user prints from CIM GOLDTeller, the Print Output Display dialog box appears,as shown below.
The user can then select which printer to print to. These printers are set up on the Functions > Administrator Options > System Configuration screen > Printer Defaults tab.
This is a helpful option if users do not have security access to the Printer Defaults tab, but they would like to be able to choose where print results (such as checks and receipts) are printed. |
Use Operator Controlled Misc Info |
When this option is selected, important CIM GOLDTeller options are then saved to the Operators.dat file instead of changing settings in the PC Registry settings.
This option is specifically for those institutions that run CIM GOLDTeller on terminal servers. When this option is checked, the options on the Functions > Administrator Options > System Configuration screen > Miscellaneous tab are saved and maintained by the teller, and therefore, saved to the Operators.dat file. |
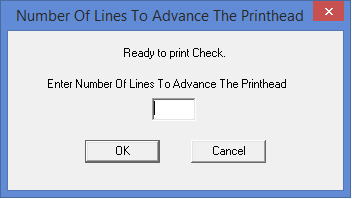
Display Ready to Print Dialog and Lines to Advance fields |
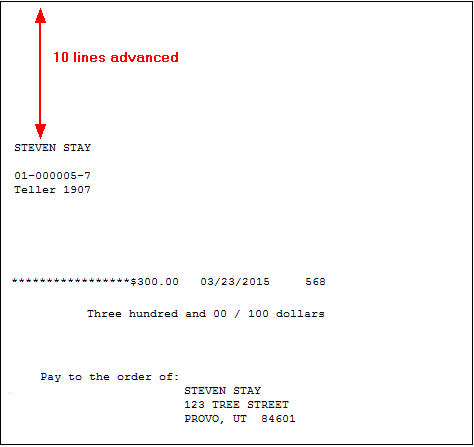
The options in the Display Ready to Print Dialog field group relate to space requirements you may want included before documents, checks, etc. are printed from CIM GOLDTeller. You must uncheck the first option, Without Entering Number of Lines to Advance the Printhead on Display, before you can use any of the other options.
When you print the designated item from GOLDTeller with this option included, a dialog box appears allowing you to designate how many lines of white space you want included before the item is printed, as shown below:
For example, if you enter "10" in this field when printing checks, the system would include 10 pixel lines of white space at the top. The system automatically allows for some white space, but your institution may want more. This option allows for that.
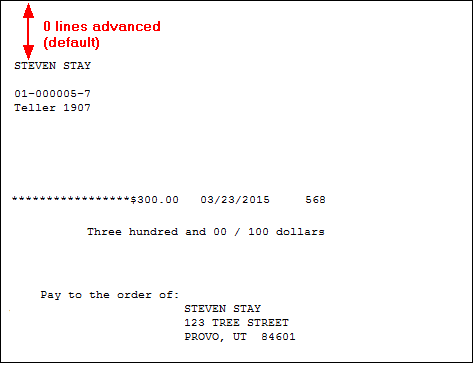
See the following examples of a check with 10 lines advanced compared to a check with no lines advanced. For more information on each of the print types available in CIM GOLDTeller, see the System Configuration screen > Printer Defaults tab. |
Check Example with 10 Lines Advanced:
Check Example with 0 Lines Advanced: