Navigation: Teller System > CIM GOLDTeller Overview > CIM GOLDTeller Screen Details > Functions > Administrator Options >
***UNDER CONSTRUCTION: This topic is being rewritten and possibly re-programmed for better functionality. We anticipate this section being redone by January 2021.***
Using the MICR Check Printing feature allows your institution to print your own checks, complete with MICR line, using check stock paper that is loaded into a printer. This guide will help you learn how to set up and print MICR checks onsite from CIM GOLDTeller.
 |
Note
Checks can also be printed with a MICR line and check stock from the Loans and Deposit systems. The steps to do this from those systems are slightly different, but similar. See these topics for more information:
•Printing Checks within Loans System •Printing Checks within Deposits System |
|---|
Printing MICR checks requires some setup, but once that is complete, it is very easy to print checks directly onto check stock including a printed MICR line.
Part 1: Set Up Office and Routing Number to use in the MICR line.
Part 2: Create the MICR Check Format using the MICR Check Form Designer screen.
Part 3: Designate the Next Check Number using the Next Available Check Number Screen.
Part 4: Printing Checks in CIM GOLDTeller.
IMPORTANT
Your institution must have the following before you can successfully print MICR checks:
•A laser printer with magnetic toner cartridge to print the checks.
•Secure MICR-approved blank check stock paper. Keep the box the paper comes in, so you can better set up the dimensions of your checks using the MICR Check Form Designer screen.
•The MICR Encoding font. If you downloaded CIM GOLD version 7.5.9 or above, the MICR font is included with the download. If you need help downloading the approved MICR font, contact your GOLDPoint Systems account manager. |
|---|
WARNING
If your institution's system is offline, and tellers attempt to print MICR checks, they will not be able to. The use of MICR checks in CIM GOLDTeller is only available in online mode. MICR check printing is disabled in offline mode and GOLDTeller will revert to offline check printing. |
|---|
Before you can print MICR checks from GOLDTeller, several setup steps are required, as outlined below:
1. |
Your GOLDPoint Systems account manager must set up the MICR check types on the GOLDPoint Systems > MICR Check Types screen for your institution. |
2. |
|
3. |
Create the MICR check formats using the Functions > Administrative Options > MICR Check Form Designer screen. |
4. |
You should designate the next check number to be used by the MICR checks by accessing the Functions > Administrator Options > Next Check Number screen in CIM GOLDTeller and entering the check number for each type of MICR check. This step can also be done on the GOLD Services > Next Available Check Number screen. |
5. |
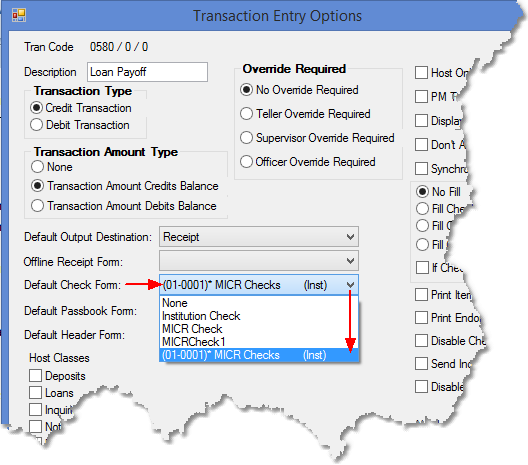
For each transaction where a check out is required (e.g., Payoff, Miscellaneous Distributions, etc.), you need to designate that the MICR checks format you created in step 3 above be the Default Check Form on the transaction. This is done through the Functions > Administrator Options > Transaction Design screen, then click |

The following topics explain how to set up the actual MICR check formats and print MICR checks:
•Create MICR checks using the MICR Check Form Designer.
•Designate the next check number for MICR checks for each branch.
•Turn on the PC Institution option indicating that MICR checks can be used.
•Running transactions with the MICR check printing function.