Get Next Check Number |
  

|
Navigation: Teller System > CIM GOLDTeller Overview > CIM GOLDTeller Screen Details > Functions > Administrator Options > MICR Check Printing >
Get Next Check Number |
|
CIM GOLDTeller Functions menu > Administrator Options > Next Check Number
In order to use CIM GOLDTeller MICR checks, you must set up the next check number to be used by the checks. This can be done in two places: GOLD Services > Next Available Check Number screen or in CIM GOLDTeller under Functions > Administrator Options > Next Check Number screen. Once the next check number is set up, the system uses that number, then increments it by one for each subsequent MICR check that is printed. This number is required.
When printing checks from Check Writer and using MICR checks, the Check Number field is disabled. You are not allowed to enter the Check Number from the Check Writer screen if printing MICR checks. Instead, the system keeps track of each MICR check that is printed and increments the check number on the Get Next Check Number screen by one. See the Check Writer help for more information.
See the following example of the Get Next Check Number screen:

CIM GOLDTeller Functions Menu > Administrator Options > Get Next Check Number Screen
You can override the check number from the various places where checks are printed (e.g., Loans > Check Printing > Reserve Checks screen; Deposits > Check Printing > Deposit Checks; etc.), unless you are printing MICR checks. All check records are sent to Check Reconciliation.
In addition to setting up this screen, you must enter the routing and account number for each office at your institution that uses MICR checks. You can enter this information on the GOLD Services > Office Routing Info screen.
UNAC Option
If your institution has the UNAC option set up, the Check Out Number on the transaction must be verified against the next check number on the Get Next Check Number screen. If the Check Out Number entered on the transaction does not match the Check Number on the Get Next Check Number screen, the transaction is canceled and will not process.
However, if you use MICR checks, you may not want to bother with checking whether or not the Check Out Number matches the next check number. Consequently, you should check the Don’t Validate Check Number box for MICR checks if you use the UNAC option. That way, the system will not require tellers to validate the check number, because with MICR checks, the check number is automatically entered for the teller. |
To set up the next check number:
1. |
Access the Get Next Check Number screen (CIM GOLDTeller Functions menu > Administrator Options > Get Next Check Number), as shown above. |
2. |
Click |
3. |
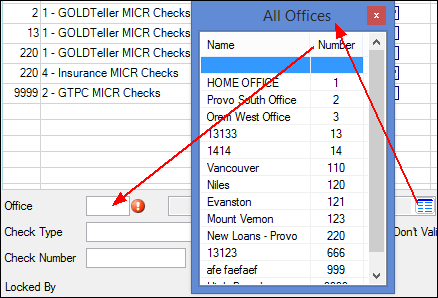
Enter the office number for the check type you want to enter in the Office field. Click the list icon
|
4. |
In the Check Type field, click the list icon |
5. |
Enter the initial check number the system will start with in the Check Number field. If this number is not included, you will receive an error message when attempting to print MICR checks from CIM GOLDTeller. |
6. |
If your institution uses the UNAC option and you do not want transactions validated against the next check number, check the Don't Validate Check Number box. Otherwise, leave this box unchecked. If institution option UNAC (use next available check number) is turned on, the Check Out Number on the transaction is verified against the Check Number on the Next Available Check Number screen (this screen). If the check number does not match, the transaction does not process. If using MICR checks, you will want to check the Don't Validate Check Number box, because the check number is automatically entered for tellers when printing MICR checks. |
7. |
Click |
See also:
Creating MICR Checks for Use in CIM GOLDTeller