|
Process Exceptions list view |
  

|
Navigation: GOLD Services Screens > GOLD ExceptionManager Screen Group > Process Exception Items Screen >
Process Exceptions list view
|
Process Exceptions list view |
|
The main list view at the top of the Process Exception Items screen displays all exception items that have been downloaded from a selected date. The columns that are displayed in this list view depend on the status of the Show all Columns checkbox. If this checkbox is marked, all possible columns are displayed in the list. If this checkbox is left blank, the columns displayed are dependent on User settings.
Selecting an exception item in this list causes the Details section of this screen to display information about that exception item (unless the Hide Data checkbox is marked). Double-clicking an exception item in this list causes the Change Exception Information dialog to appear. See the linked help for more information about this dialog.
Right-clicking in this list view brings up a menu that allows you to access the following features:
Function |
Description |
|---|---|
Posting |
This menu item allows you to quickly perform actions and corrections concerning selected exception items which correspond to the functions provided by the main buttons on this screen. |
Refresh Selected Exceptions |
If you select this menu item, the system will refresh any selected exception items. Refreshing causes the host computer to bring up any changes made to exception items by employees using GEM on their computers. Refreshing allows you to get the most up-to-date information. |
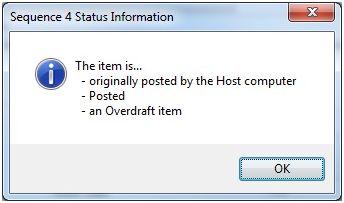
Show Status Information |
Selecting this menu item brings up a Status Information box. This box displays information concerning the exception item, such as whether or not any action has been taken on the item, whether the exception item has been posted or whether it is an overdraft item (see the following example). If more than one exception item is selected in the list view, only information for the top item selected will be displayed.
|
View Image |
This function is only enabled if your institution uses GOLDPoint Systems to store your images (institution option NIMG is enabled). |
Change Data |
When you select this function from the right-click menu (or double-click an exception item in the list), the Change Exception Information dialog is displayed. See the linked help for more information about this dialog. |
Notification of Change |
Selecting this function opens the Notification of Change screen with the selected item's information displayed. You can enter any corrected information for this exception item and send it to the Federal Reserve. |
Delete Return |
You can delete any return that hasn't been sent by right-clicking on it in the list view and selecting "Delete Return." |
Goto General Information |
Selecting this function will take you to the General Information screen for the account selected. |
Restore Default Splitter Position |
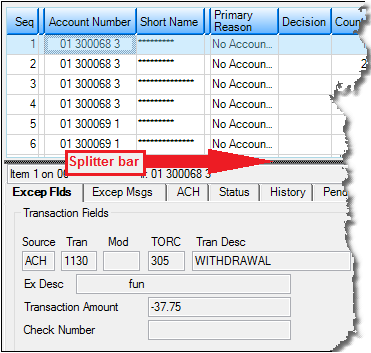
Select this option if you want to return the horizontal splitter bar to its original position in the middle of the screen. The splitter bar divides this screen between the main list view and the Details section, as shown below. You can click and drag this bar up or down.
 |
Printing (Current Size) |
This printing option is similar to the printing option below, except the list view is printed the way it currently looks on the screen. In other words, if you decrease or increase the size of the columns (by clicking and dragging), the print results are reflected similarly. If the other printing option is used (see below), the list view is printed with each column as wide as the data, which often causes the printed document to be viewed across multiple pages. |
Edit |
Selecting this option allows you to copy the highlighted information in the list view to your Windows® clipboard. To highlight more than one record in the list view, choose Edit, then Select All. After you have copied the highlighted information from the list view using the Edit pop-up function, you can then paste that information into Notepad or any other word processing program.
Note that the formatting will look better if you use the Export function instead. |
Printing |
Select this option to print the information in the list view to a designated printer. You can preview the information before printing it and make any needed adjustments to the printer settings or page setup. |
Export |
Select this option if you would like to export the information in the list view to either a tab-delimited format or to the Report Manager program. If you export to a tab-delimited format, you can open the information into a spreadsheet program such as Microsoft® Excel®. |
Auto Resize |
This function is used to resize the columns and rows in the grid to fit the data contained therein. |
Find |
The Find function allows you to search for any word, phrase, or amount in the list view. This is a helpful tool to find the exact information you are looking for.
When you select this option, the Find dialog appears. Enter the information in the top field and click <Find>. All matching information will be displayed in the list view below the search field. Double-click any of the results and you will be returned to the list view with the item you selected highlighted. |