Users Screen |
  

|
Navigation: GOLD Services Screens > GOLD ExceptionManager Screen Group > Administrative Screen Group > Setup Screen Group >
Users Screen |
|
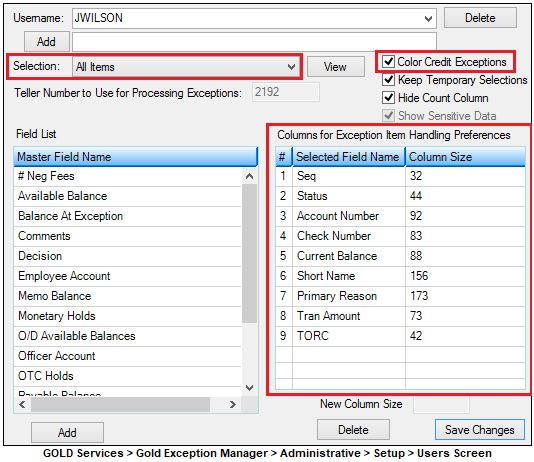
Use the GOLD Services > GOLD ExceptionManager > Administrative > Setup > Users screen to set up default settings for employees who process exception items through GOLD ExceptionManager (GEM). Once these settings have been set up for individual users, they will remain until an officer or supervisor with security clearance changes them again through this screen. If Keep Temporary Selections is checked when a user makes a change to their selections, all other functions will use them. See Security Setup for more information on how to allow individuals access to this screen.
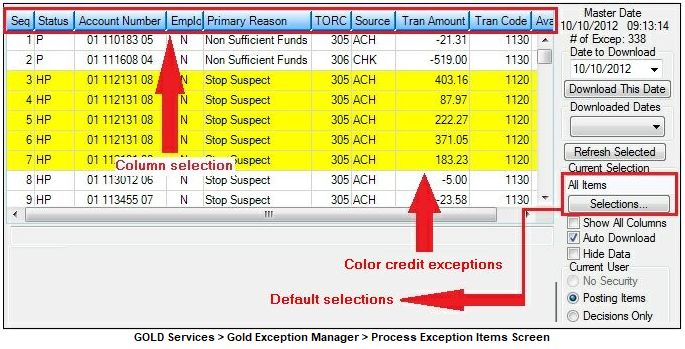
These settings mainly affect how information is displayed for users on the GOLD ExceptionManager > Process Exception Items screen. For example, using this screen, you can establish which columns will be displayed on the Process Exception Items screen, whether or not to color credit exceptions (deposits to accounts), and which selection items the employee should be using. Once those settings are established, the Process Exception Items screen will be affected accordingly.
In the following examples, this employee has been set up with an "All Items" selection, credit fields are colored, and the columns selected are displayed on the Process Exception Items screen:
To set up a new user from this screen:
1.Enter the username of the employee you are adding in the field below the Username field.
2.Click <Add>. If the username has already been established on the Tellers screen, the teller number of the user will automatically be displayed in the Teller Number to Use for Processing Exceptions field (UOETLR). If the user has not been set up on the Tellers screen, this field will default to 0. If the teller has already been set up, you can just select the teller's username from the Username drop-down list (UOUNAM).
3.Choose a selection from the drop-down Selection field (UOSLNM) you want this user to have access to. For more information on selections, see the Selections screen. Clicking <View> will take you directly to the Selections screen if you want to make adjustments to the selection.
4.Check the Color Credit Exceptions box (UOCDFS) if this employee wants all credit transactions to be highlighted with yellow on the Process Exception Items screen (as shown in the example above). Once the item has been handled (posted, returned, charged a fee, reversed, etc.), the highlight will be green.
5.Check the Keep Temporary Selections box (UOKTSL) to keep changes made to the selection for all other functions. Once you log off CIM GOLD, the default will be used.
6.Check the Hide Count Column box (UOGHCC) if you want to hide the Count column from the Process Exception Items screen list view.
7.The Show Sensitive Data box (UOSSDT) is file maintained from the Tellers screen. This field indicates that the user can view account-sensitive information while processing exception items, such as names, addresses, Social Security numbers, etc. Now you are ready to set up the columns that will be displayed on the Process Exception Items screen.
8.Under Field List in the Master Field Name list view, select the column(s) you want added. You can select multiple columns (by clicking <Ctrl> + left-click) or one at a time.
9.Click <Add>. The column(s) will now be displayed in the list view under Columns for Exception Item Handling Preferences (on the right).
10.Repeat steps 8 and 9 until all the columns you want are displayed in the list view on the right.
11.You can change the order of the columns in the right list view by left-clicking on a heading, holding down the left mouse button, dragging the heading up or down to the desired location, and releasing the left mouse button. However, Seq must be the top position.
12.Click <Save Change>.
|
Record Identification: The fields on this screen are stored in the XMUO record (User Option Record). You can run reports for this record through GOLDMiner or GOLDWriter. See XMUO in the Mnemonic Dictionary for a list of all available fields in this record. Also see field descriptions in this help manual for mnemonics to include in reports. |
|---|
In order to use this screen, your institution must subscribe to it on the Security > Subscribe To Mini-Applications screen. |