Employee tab |
  

|
Navigation: Security Screens > Setup Screen >
Employee tab |
|
Use the fields on the Employee tab of the Security > Setup screen to set up employee security. This tab is only available if the Employees or Tellers radio button has been marked on the screen.
|
Note: As a general security procedure, GOLDPoint Systems cannot reset passwords for your employees. The
For this button to appear on the Employee tab, your personal security or profile must have the Reset Security Code option on the System tab under Security Management set to "Maintain." See also Password Expiration below. |
|---|
To set up security for an employee, follow the steps listed below. For further information about the fields mentioned in these steps, see the table at the bottom of this help page.
Security > Setup Screen, Employee tab
1.On the Security > Setup screen, select the Employees radio button and click ![]() . The Create a New Employee dialog is displayed (as shown below).
. The Create a New Employee dialog is displayed (as shown below).
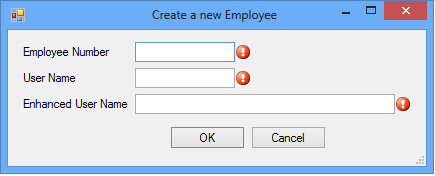
2.In the Create a New Employee dialog, type a new Employee Number, User Name, and Enhanced User Name, then click <OK>. Note: If you attempt to enter an employee number that has already been entered, the system will return an error message and not let you save until you change it to a number that is unique.
Employee number length is established on the Security > Company Options screen. The user name can be a maximum of eight alphanumeric characters. Once the number and name are established, they cannot be changed. If you want to make a change after clicking <OK>, you must change the employee Status to "Terminated" and delete the employee using the Security > Terminated Employee Deletion screen.
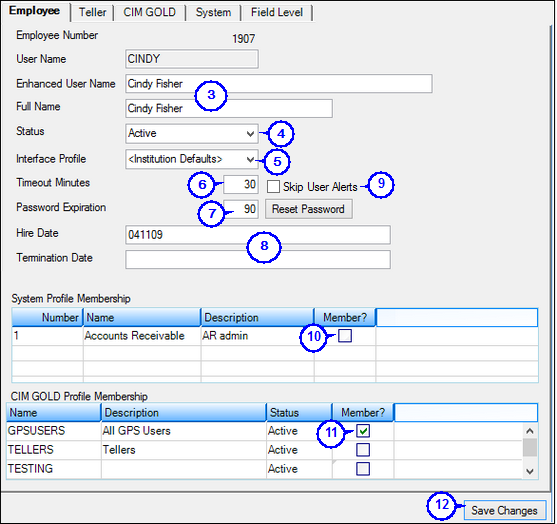
3.On the Employee tab, enter the Enhanced User Name and Full Name of the employee. The new profile will be added to the main Setup screen list view.
4.The Status drop-down list will show the default “Active” status. Select another status if necessary. If you select "Terminated," use the Terminated Employee Deletion screen to delete the employee record.
5.If you want to tie this employee to a profile, use the Interface Profile drop-down list.
|
Note: CIM GOLD profiles must be set up before you can use the profile name for an employee. |
|---|
6.Timeout Minutes are defaulted from the Company Options screen. If the length of time is not appropriate for the new employee, you can overwrite the company defaults. Starting in CIM GOLD version 7.9.4, if you enter "0" in this field, the system will not require the employee to re-enter their security code if they have been inactive in CIM GOLD for a designated period of time. For versions earlier than 7.9.4, a number between 5 and 60 is required.
7.Password Expiration is defaulted from the Company Options screen. If an employee needs more or fewer days between password (security code) changes, enter a number between 15 and 99 here to overwrite the company options. You can also enter 9999 for a password that never expires.
8.If your institution has any user-defined fields set up, enter the appropriate information in those fields. User-defined fields are set up on the Company Options screen.
9.If you mark the Skip User Alerts checkbox, the employee will not see any client-defined alerts (as a dialog or in the Alert Status field at the top of each screen in CIM GOLD). They will continue to see system-defined alerts (those alerts that occur automatically due to certain activity on the account, such as charge offs). For more information concerning client-defined alerts, see Loans > System Setup Screens > Client Defined Alerts.
10.If this employee is tied to a System profile, check the Member? box next to the System profile applicable for this employee in the System Profile Membership list view. All system profiles set up for your institution are displayed in this list view.
11.If this employee is tied to a CIM GOLD profile, check the Member? box next to the CIM GOLD profile applicable for this employee in the CIM GOLD Profile Membership list view. All CIM GOLD profiles set up for your institution are displayed in this list view.
12.Click ![]() . If the employee being set up is also a teller, continue to the Teller tab. If the employee is not a teller and is not using CIM GOLD or GOLDVision profiles, go to the CIM GOLD, System, and/or Field Level tabs to set the appropriate security.
. If the employee being set up is also a teller, continue to the Teller tab. If the employee is not a teller and is not using CIM GOLD or GOLDVision profiles, go to the CIM GOLD, System, and/or Field Level tabs to set the appropriate security.
The fields on this tab are as follows:
Description |
|||
The employee number is an institution-assigned number given to each employee. This number is used to identify the employee within the organization. When setting up security for an employee, the Employee Number must be entered.
This field has a minimum requirement of 4 and maximum of 10 digits. The length is defined on the Company Options screen, but you can overwrite that option by entering a number in this field. Do not enter leading zeros.
|
|||
This is the name the employee uses to sign on to the system and must be different from every other employee's user name. This field is mandatory and must be between 5 and 8 alphanumeric characters. |
|||
This field defaults to the same name as the User Name field. It can be changed, but the user must be informed. The enhanced user name must be entered in the Create a New Employee dialog box when you are creating a new employee. For more information on setting up an employee, see the Employee tab help. |
|||
This is the full name of the individual employee. This field may be up to 30 alphanumeric characters. |
|||
In this field, select the appropriate status for each employee.
|
|||
If this employee is tied to a CIM GOLD profile, select the profile from this drop-down list. See the CIM GOLD Profile tab for more information. |
|||
This field allows you to override the default time you have set on the Company Options screen. If an employee needs more time until GOLDPoint Systems programs are locked, enter the number of minutes here.
The value entered in the Minutes Without Activity to Close Terminal field on the Company Options screen supersedes the value entered in this field. In other words, company options trump employee options. |
|||
If you mark this checkbox, the employee will not see any client-defined alerts (as a dialog or in the Alert Status field at the top of each screen in CIM GOLD). They will continue to see system-defined alerts (those alerts that occur automatically due to certain activity on the account, such as charge offs). For more information concerning client-defined alerts, see the Loans > System Setup Screens > Client Defined Alerts. |
|||
This field allows you to override the default interval you have set on the Company Options screen. If an employee needs more or fewer days between password (security code) changes, enter a number between 15 and 99 here. You can also enter 9999 for a password that never expires.
|
|||
These user-defined fields are set up on the Company Options screen and allow your institution to provide more information about individual employees, such as title, birthday, or date of hire. Once a category is set, it cannot be changed. |
|||
This list view at the bottom of the Employee tab (see the screenshot above) displays all System profiles set up for your institution. If this employee should be assigned one of the system profiles, check the Member? box on the line to which the employee needs access. For more information concerning system profiles, see the System Profile tab. |
|||
This list view at the bottom of the Employee tab (see the screenshot above) displays all CIM GOLD profiles set up for your institution. If this employee should be assigned one of the CIM GOLD profiles, check the Member? box on the line to which the employee needs access. For more information concerning system profiles, see the CIM GOLD Profile tab. |