Set Alerts dialog |
  

|
Navigation: Loans > Loan Screens > Account Information Screen Group > Actions, Holds and Event Letters Screen >
Set Alerts dialog |
|
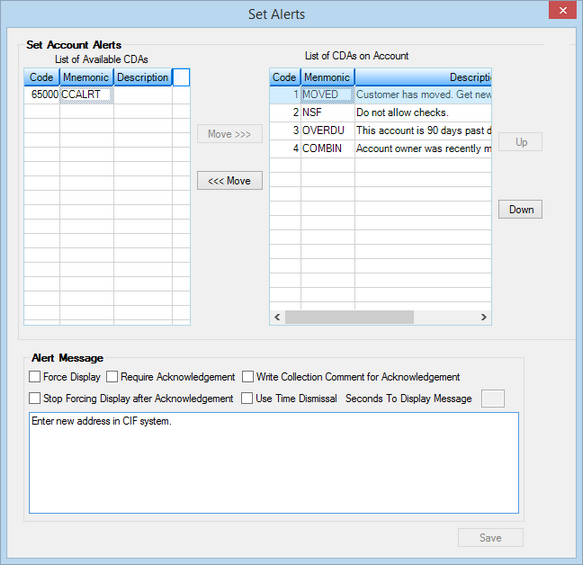
The Set Alerts dialog accessed by pressing <Set Alerts> on the Actions, Holds and Event Letters screen displays the institution-defined alerts that can be assigned to an account. These alerts are first defined on the Loans > System Setup Screens > Client Defined Alerts, and then applied to individual accounts using this screen.
|
Note: If no alerts have previously been set up on the Client Defined Alerts screen, the checkbox fields at the bottom of this dialog will be disabled. These fields will also remain unavailable until at least one client defined alert has been assigned to the account by adding it to the List of CDAs on Account (see below). |
|---|
|
Note: Alert 6500 is reserved for rejected credit card payments. See the Alert 6500 topic on the Client Defined Alerts screen for more information. |
|---|
|
Note: The |
|---|
Use this screen to set up customer alerts that will display on the account's Account Status banner on every screen in the Loan system. These alerts are found in the FPCM record, if you want to build GOLDMiner or GOLDWriter reports with them.
Apply client defined alerts to the account by selecting them in the List of Available CDAs and clicking the <Move> button to add them to the List of CDAs on Account. You can move alerts up and down in the list to choose the ones you want to display. Only the top three will display in the red banner line at the top of the account screens. You can add as many alerts to an account as you want, but only the top three will show and an ellipsis indicates more exist. The user would then need to click ![]() to view any other alerts on the account, as shown below:
to view any other alerts on the account, as shown below:

You can customize alerts to display according to your needs. For example, if this is an alert that you want other users to acknowledge before returning to their CIM GOLD activity, you would select the Require Acknowledgement checkbox (see below). Then the alert would display as a pop-up box, where the user would need to click <OK> to get rid of the dialog box. See the field descriptions in the table below for more information. Note: Each of these fields can be restricted for certain users using the Field-Level Security function. Field-level security allows you to control who in your institution can file maintain specific fields on a screen. To set up field-level security for alerts, see the following steps:
| 1. | Access the Loans > System Setup Screens > Field Level Security screen. |
| 2. | Select the Name or Profile of the person you want to set up security for in the Name or Profile field group. |
| 3. | In the All Fields field group, select the Record Type “FPCM – Account Alert Record.” |
| 4. | Check all boxes of the fields on the Set Alerts dialog that you want to restrict. |
| 5. | Click <Save Changes>. |
The fields on this dialog are as follows:
Field |
Description |
|
|
Mnemonic: CMFRMC |
If you check this box, the alert message dialog opens automatically as soon as you open an account screen that has an alert on it. If this box is not checked, you must click <Alert Message> to view the actual alert. |
|
|
Mnemonic: CMRACK |
If you check this box, the alert message dialog will display a checkbox labeled I Acknowledge That I Have Read The Message. The user must check this acknowledgement field and click <OK> to close the alert message dialog. |
|
Write Collection Comment for Acknowledgement
Mnemonic: CMWRAC |
If you check this box, when the user acknowledges the message, a collection comment will be added when acknowledgement is required. See below for an example.
|
|
Stop Forcing Display after Acknowledgement
Mnemonic: CMSTPM |
If you check this box, after the user acknowledges the alert message once, the alert reverts to normal display mode (the user must click <Alert Message> to view the actual alert) until the user logs off CIM GOLD. When the user logs back onto CIM GOLD, the alert messages are automatically displayed again until the user acknowledges the alert by clicking a button on the alert. If you do not check this box, the alert message dialog automatically opens as soon as you open an account screen that has an alert on it. |
|
|
Mnemonic: CMAUTD |
If you check this box, you can set a time limit for the alert message to display. |
|
|
Mnemonic: CMDMTM |
If you have checked Use Time Dismissal (see above), use this field to enter the number of seconds to display the alert message. |
