Navigation: Loans > Loan Screens > Account Information Screen Group >
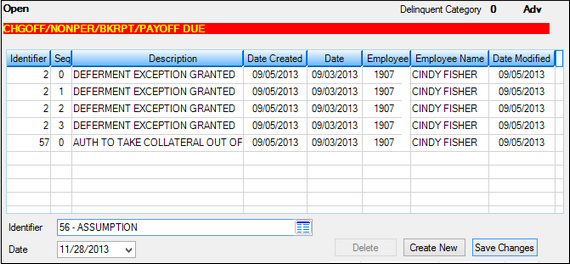
The Account Identifiers screen allows you to attach account identifier codes to an account. This screen is located under Loans > Account Information and Loans System Setup Screens in the CIM GOLD tree view. See the following example of this screen.
The list view at the top of this screen displays any account identifiers that have already been set up for the account.

Loans > Account Information > Account Identifiers Screen
Account identifier codes are used to identify an account that could be grouped or categorized in some way, as well as to alert someone viewing the account of a condition on an account.
These codes are not action codes, meaning that system-defined functions do not update, add, or remove these codes unless it is something that is specifically programmed for and updated for your institution. You could use these codes to create reports or for loan tracking purposes in GOLDWriter.
If using these codes to create a report in GOLDWriter, the following mnemonics can be used in the report pulled from the FPA3 system (Account Identifier Code):
Loan Account Number (A34NBR)
Date Created (A3DATC)
Date (A3DATZ)
Date Last Modified (A3DTLM)
Employee Number (A3EMPX)
Identifier Code (A3ICOD)
These codes will not be available to be updated by transactions, general afterhours functions, or actions taken within CIM GOLD except when a user sets up, removes, or updates an account identifier code through the Account Identifiers screen. However, loans can be boarded from GOLDTrak with an account identifier already in place. For example, you can attach loans originating from the Signature Portal with the account identifier of "Signature Portal Originated." Your GOLDTrak PC account specialist will need to set up your loan programs accordingly. Contact us if you would like this capability.
For example, your institution might want to identify accounts that have the following conditions. You would then create codes with these descriptions:
•Collateral Impounded
•Gap Ins Claim on collateral
•Due Date Change - customer request
•Due Date change - company policy
You could then easily create a report in GOLDWriter that includes all accounts with that account identifier.
|
Tip: In addition to adding an account identifier to specific accounts, you can also add a customized alert to the Account Status banner, so users can instantly see that this account needs special attention. See Set Alerts for more information. |
|---|
An account can have more than one account identifier code assigned to it. Account identifiers are defined by your institution using the Loans > System Setup Screens > Account Identifier Codes screen.
Account identifiers also appear as a tab on the Loans > Marketing and Collections screen.
|
Note: Institution Option HLAI is available that, when set, will hide the Account Identifiers tab on the Loans > Marketing and Collections screen. |
|---|
To assign an account identifier to an account, complete the following steps:
1.Access the account for which you want to assign the account identifier code, and then access this screen.
2.Click <Create New>. The Identifier and Date fields now allow information to be entered.
3.Click the list icon ![]() in the Identifier field and select the identifier you want assigned with this account.
in the Identifier field and select the identifier you want assigned with this account.
4.Click the Date drop-down arrow and select the date when this identifier will be assigned to this account.
5.Click <Save Changes>. The list view will display the account identifier now assigned to this account. This information will stay on the account until you delete it.
Buttons on this screen:
| <Delete> | Select an account identifier in the list view and click this button to delete it from the list of available codes. |
| <Create New> | To set up a new account identifier for this account, click this button. The new account identifier will not be applied to the account until the date selected in the Date field. |
| <Save Changes> | Click this button when you have finished making changes. |
In order to use this screen, your institution must:
•Subscribe to it on the Security > Subscribe To Mini-Applications screen.
•Set up employees and/or profiles with either Inquire (read-only) or Maintain (edit) security for it on the CIM GOLD tab of the Security > Setup screen. |
See also: