Navigation: Queues > Queue Screens > Collection Screen Group > Collection Queues Screen >
The Summary tab on the Collection Queues screen displays all accounts in the queue selected in the Collection Queues list.
Double-click an account in this list view and access the Detail tab to view the CIM GOLD screen designated from the Queue Definition Builder dialog on the Queues > Collection > Queue Administration screen for the selected account. This screen is typically set as Loans > Marketing and Collections but can be set to whatever screen is needed to enter information for the account.
The following is an example of this tab:
If the Restrict Collector field on the Loans > System Setup Screens > Collection Institution Options screen is marked, collectors will not be allowed to “cherry pick” the accounts they work on from this screen. They must instead work accounts in their listed order (the Order column lists them 1 to 99999).
Queue information must first be set up and assigned to your institution's employees on the Queue Administration screen before it can be accessed on this screen.
Right-click Functions
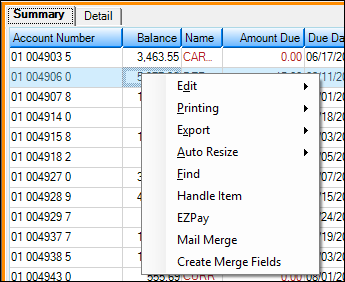
Right-clicking an account listed on the Summary tab brings up the following pop-up menu:

This menu allows you to quickly make decisions on an account, as described in the table below.
Menu Item |
Description |
|---|---|
Edit |
Select this menu item and you can do two things:
1.Select all the data in the table, so it can be copied. 2.Copy all the data in the table, or just the amount of data that is selected.
Once information is copied, you can paste it into a spreadsheet or document. If you paste the copied data into a spreadsheet by clicking <Ctrl> + V, it retains the information in a table format. |
Printing |
Use this menu item to print the information in the table to a printer of your choosing. You can also preview the print before it is actually printed to a printer or PDF. |
Export |
This menu items allows you to export the data in the Summary tab to either Report Manager or a tab-delimited file. If you export to a tab-delimited file, you can open this information in a spreadsheet such as Microsoft® Excel. |
Auto Resize |
To quickly resize columns on the Summary tab, choose this menu item. |
Find |
If you are looking for a specific account or piece of data in the queue, use this feature to search the entire table. |
Handle Item |
Selecting "Handle Item" from the right-click pop-up menu will change the disposition of the account to "Completed." A completed account no longer needs to be worked. See the Do Not Skip Completed option for more information. |
EZPay |
You can quickly access the EZPay screen from the right-click pop-up menu. From that screen, you can make a payment on the selected account. See the EZPay screen help for more information. |
Mail Merge |
The Mail Merge feature allows you to print a letter for the selected account that you can send to the account owner regarding their account. The letter must be set up previous to this step, and you need to save the merge fields file (see below). For more information about this important feature, see Creating Mail Merge Letters.
After you print a mail merge letter for an account, the Disposition column for the account changes to "Mail Merge."
IMPORTANT: This option does not appear in the right-click menu if institution option CQMM (Use Collection Queue Mail Merge System) is not set up for your institution. |
Create Merge Fields |
This right-click item allows you to save the merge fields needed to create a Mail Merge letter to a place on your computer or network. See Creating Mail Merge Letters for more information.
IMPORTANT: This option does not appear in the right-click menu if institution option CQMM (Use Collection Queue Mail Merge System) is not set up for your institution. |
Sorting
On the Summary tab, you can sort the list view as you normally would by clicking on the heading you want to sort by. For example, click on Balance to sort by the principal balance; click on the same heading again to reverse the order (high-to-low balance or low-to-high balance). When you leave the screen, the sort stays in that order. However, if you close CIM GOLD, the sort returns to the original sort. Your institution can establish how accounts are sorted by default on the Summary tab using the Sort Options on the Loans > System Setup Screens > Collection Institution Options. The Order on the Summary tab column quickly allows you to re-sort the data back to the original sort (see below):

|
WARNING: If you have the Restrict Collector option set (see Restrict Collector field on the Loans > System Setup Screens > Collection Institution Options screen is marked) and you re-sort the Summary tab, the system will re-sort the table, but it will expect the user to continue processing the accounts in order. In other words, the accounts will still need to be worked based on the Order column. So you will need to click the Order column heading again to return the accounts to their original sort (with 1 being the first one to work in the queue). If users try working accounts when they're not in order (and the Restrict Collection option is on), the following message will appear:
|
|---|