Navigation: Queues > Queue Screens > Collection Screen Group >
Collection Queues Overview
Collection queues are individual lists of delinquent loans sorted by your institution's specific criteria during afterhours processing, to be made available the following day for collectors to begin their collection activity.
Setting up Collection Queues should be done in the following order:
1.Set up the queues and the logic that will qualify which loans appear in which queues by using the Definitions tab of the Queues > Collection > Queue Administration screen.
2.Use the Assignments tab on the Queue Administration screen to assign employees to specific queues.
3.Establish your institution's contact person, as well as other options, on the Loans > System Setup Screens > Collection Institution Options screen.
4.Employees can now access the Collection Queues screen (described below) to actually record collection efforts regarding accounts.
Collection Queues Screen
The Collection Queues screen is the backbone of the Collection system. This is the screen your collectors will use to access accounts assigned to them in their queues, work accounts by calling borrowers and recording their contact efforts, as well as create collection letters to borrowers.
|
Note: Before using this screen, collection queues must first be created using the Queue Administration screen. Employees are also assigned to those queues using that screen. If you need to move accounts from one collector to a different collector, use the Collection > Accounts screen. |
|---|
The Collection Queues screen works as an automated collection check-off list. The list may include loans that were considered delinquent only the day before, or it might include follow-up items for the collector to do on delinquent loans where contacts and commitments have previously been made. This screen is composed of four sectors, as shown below:
1. |
This sector shows all the queues assigned to the selected employee. If you have proper security, you can click <Chg Employee> in the second sector to select a different employee number to view collection queues. This is referred to as the Collection Queues list. |
2. |
The second sector allows you to change accounts from specific branches and view totals for each queue. See Branch and Institution fields for more information. |
3. |
The Summary tab provides the ability for the collector to see all accounts within the selected queue; queue processing allows the collector to rapidly move from one loan to the next without having to enter loan numbers. Right-clicking this tab brings up many options, as explained in the Summary tab topic. |
4. |
Double-clicking on a loan in the Summary list will access the Detail tab. You can quickly toggle back and forth from the queue (Summary tab) to the Detail tab as collection activity progresses. |
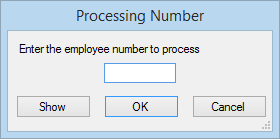
When you first open the Collection Queues screen, a dialog box appears asking you to enter the employee number, as shown below. You can type in your number, or you can click <Show> to display a list of all employees who have been set up as collectors, then double-click on your name to display your assignments.

|
Note: An institution option is available that affects whether or not the Processing Number dialog box appears (shown above). If Institution Option MECN is enabled, the Processing Number dialog box appears for every employee. If this option is disabled, the Processing Number dialog box doesn't appear and the system automatically pulls the employee number for that collector.
In order to use this option, Institution Option COLL must also be enabled. Contact GOLDPoint Systems to set up these options for your institution. |
|---|
Displaying Collection Queues
The Collection Queues screen displays the collection queues assigned to each employee and allows for the review and processing of the accounts.
To display a collection queue, complete the following steps.
1.Select Queues > Collection > Collection Queues.
The first time you use Collection Queues, the Processing Number dialog will appear asking you to "Enter the employee number to process." This number will become the default, and the queues assigned to that employee will automatically be displayed. (This box may not appear depending on if your institution uses institution option MECN explained above.)
2.Enter your employee number in the provided field, then click <OK>. If you are a supervisor and want to view the queues for a different employee, click <Show> to open a list of employee numbers, and then then click <OK>.
The collection queues assigned to that employee will be displayed under the employee's name.
3.Click on a queue. The accounts that qualify to be in that queue will be displayed under the Summary tab.
4.Double-click on an account, and that account will be displayed on the Detail tab.
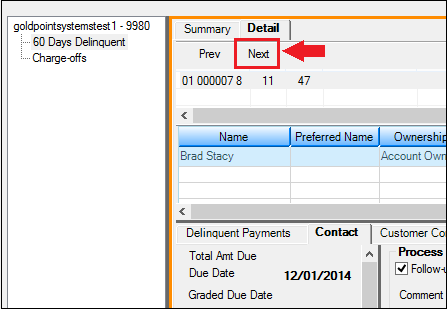
5.Once the account has been processed by the employee, the employee will click <Next> at the top of the Detail tab to bring up the next queue from the Summary tab, as shown below:

|
Note: A collection option, Restrict Collector, is available that requires employees to process the next account in the list before moving on to the next account. Without this option set, employees can randomly select any account from the Summary tab to work. See the Restrict Collector field on the Loans > System Setup Screen > Collection Institution Options screen for more information.
If you set this option, it will take affect the next time users log into CIM GOLD. If users currently have CIM GOLD open when it is set, they will need to close CIM GOLD and reopen it for it take affect. |
|---|
Sorting
On the Summary tab, you can sort the list view as you normally would by clicking on the heading you want to sort by. For example, click on Balance to sort by the principal balance; click on the same heading again to reverse the order (high-to-low balance or low-to-high balance). When you leave the screen, the sort stays in that order. However, if you close CIM GOLD, the sort returns to the original sort. The Order column displays the order accounts are sorted in.
Your institution can establish how accounts are sorted by default on the Summary tab using the Sort Options on the Loans > System Setup Screens > Collection Institution Options. The Order on the Summary tab column quickly allows you to re-sort the data back to the original sort (see below).
|
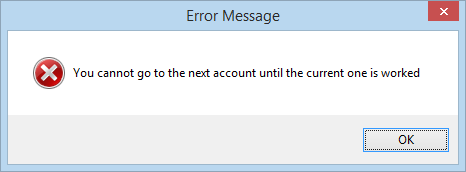
WARNING: If you have the Restrict Collector option set (see Note above) and you resort the Summary tab, the system will resort the table, but it will expect the user to continue processing the accounts in order. In other words, the accounts will still need to be worked based on the Order column. So you will need to click the Order column heading again to return the accounts to their original sort. If users try working accounts when they're not in order, the following message will appear:
 |
|---|
See these other help topics:
In order to use this screen, your institution must:
•Subscribe to it on the Security > Subscribe To Mini-Applications screen.
•Set up employees and/or profiles with either Inquire (read-only) or Maintain (edit) security for it on the CIM GOLD tab of the Security > Setup screen. |