Journal/Forwarding |
  

|
Navigation: Teller System > CIM GOLDTeller Overview > CIM GOLDTeller Screen Details > Functions >
Journal/Forwarding |
|
![]() Functions menu > Journal / Forwarding
Functions menu > Journal / Forwarding
The Journal/Forwarding function is one of the most useful functions for managers and tellers in CIM GOLDTeller. It allows you to quickly view what transaction activity has taken place today for a teller or all tellers on the server. Additionally, you can reverse any transaction from the Journal/Forwarding screen.
See the following topics:
Correcting Transactions from a Previous Day
Each transaction that has been processed through the CIM GOLDTeller system is tracked and recorded through PC files called Journal Files. Journal files are located either on the DB4 Server or on the individual PC where those transactions were performed. System Configuration controls where the journal files will be placed through the following marked path:
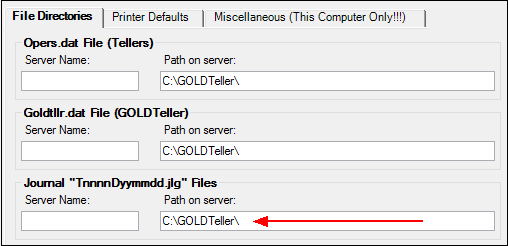
Journal files can be available for any number of days your institution can store, but we suggest not storing them for longer than five days. Each institution can choose to extend these days by changing the setting in PC Institution Settings (see Number of Days to Keep Journals field on the Settings Page One tab). The journal files are named using an individual teller’s number and the date transactions were performed, as shown below:
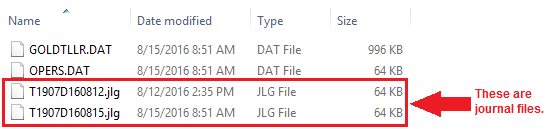
Once the Number of Days to Keep Journals option is past, any older journal files than that date are automatically deleted from the file on the server.
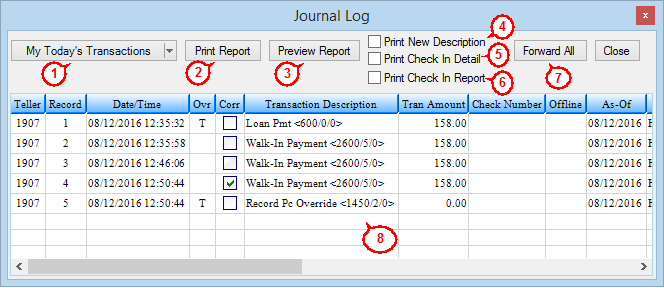
To access GOLDTeller Journal Files, select "Journal / Forwarding" from the Functions menu. Or press <Ctrl> + J to bring up the Journal Log, as shown below.
|
Field/Button |
Description |
|---|---|---|
1 |
My Today's Transactions |
The Journal Log will allow the current user to view a summary of his or her transactions for the day by selecting <My Today’s Transactions>. This selection is a standard predefined selection. You can set up a variety of selections based on what your tellers need for balancing throughout the day. See Edit Selections below. |
2 |
Print Report |
Facilitates the printing of any selection of Journal Report to a specified printer. |
3 |
Print Preview |
Generates an online preview of the selected journal report. |
4 |
Print Check In Detail |
Check this box to print the F11 item list checks on the report selected. |
5 |
Print Check In Report |
|
6 |
Print New Description |
Check this box to print the transaction description entered by the teller at the time of the transaction. |
7 |
Forward All |
Forwards all transactions, performed in an offline status, to the host. |
8 |
Transactions Log |
The main table (list view) on the Journal Log lists all transactions for the selected day and teller. This is where you can right-click transactions and correct them, forward them (if created offline), or view the item list. See Journal Log below for more information. |
Selecting "Edit Selections" (as shown below) opens the Journal Scan Information dialog box.
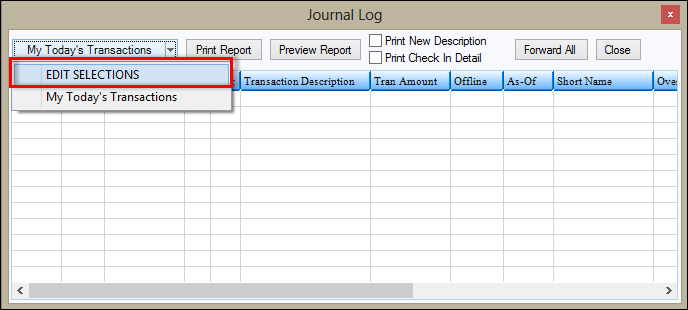
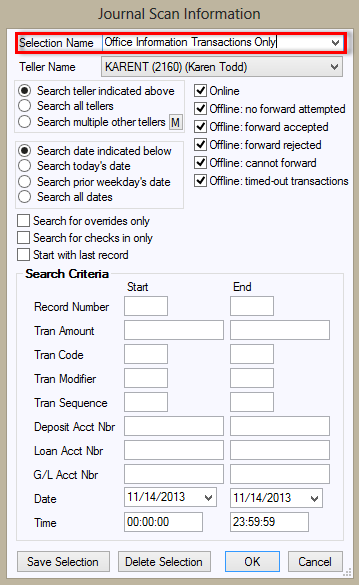
Use this dialog box to set up variations of different journal logs you want to see. For example, you can set up one selection to view only transactions from one teller. You could set up another selection to view transactions from all tellers. You could set up a third selection to view teller transactions that were processed two days ago, or you could set up a fourth selection to only viewed transactions that were created in offline mode.
The default settings, which "My Today’s Transactions" uses, include all online and offline transactions done during the current day for the selected teller.
If you want to set up additional Journal Selections, type a new name in the Selection Name field, update the needed selection parameters, and click <OK>. This will save this new selection as a future choice option. See Correcting Transactions from a Previous Day below for more information for an affective way to use this dialog box.
The Journal Log dialog box lists all transactions that fall within the parameters established in Edit Selections (see topic above).

In most cases, you will select "My Today’s Transactions" and all transaction processed today will be displayed in this list view. To view the transaction detail, you can also right-click on the transaction to open a pop-up menu, as shown below.
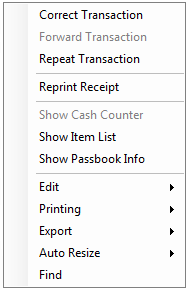
This pop-up menu allows the user to do the following tasks:
•Correct Transaction: Populates original transaction detail with the offsetting Correction box automatically marked or unmarked, depending on whether the original transaction was a correction itself. See Reversing Transactions for more information.
•Forward Transaction: If the highlighted transaction was done in an offline setting, this option will forward only this transaction to the host. Other offline transactions will not be forwarded. Clicking the ![]() button at the top of the Journal Log will forward all offline transactions.
button at the top of the Journal Log will forward all offline transactions.
•Repeat Transaction: Selecting this option for a transaction will bring up the original transaction (in Quadrant 3 of the CIM GOLDTeller screen) with the fields already populated. If you click ![]() , another transaction is run for that account.
, another transaction is run for that account.
•Show Cash Counter: This option doesn't work from Journal/Forwarding. Instead, use the Teller Total Functions under the Functions menu after closing the Journal Log.
•Show Item List: If an item list was used for the highlighted transaction, this option will display those entries as they were originally entered. See the Item List topic for more information.
Correcting Transactions from a Previous Day
Usually, if a transaction needs corrected, the teller can use the default Journal Log setting (My Today's Transactions), find the transaction, right-click it, and correct it, as explained in the Journal Log topic above.
However, sometimes a manager needs to correct a transaction from yesterday or even a couple of days ago. They can do that using the Journal Log screen by creating a new selection that includes transactions from previous days, as described in the following steps.
| 1. | Access the Journal Log by pressing <Ctrl> + J on the keyboard. |
| 2. | Under My Today's Transactions, select "Edit Selections." The Journal Scan Information dialog box is displayed. |
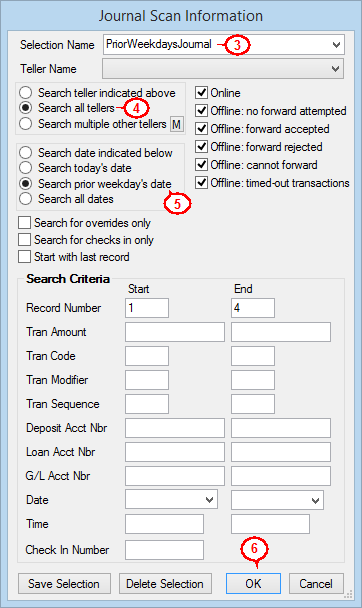
| 3. | Enter a new name for the selection in the Selection Name field. In our illustration below, we named it "PriorWeekdaysJournal." |
| 4. | If you want to search through all the teller journals for the transaction, select the Search all tellers radio button. Or if you want to search for just that teller's transactions, select the Search teller indicated above radio button and select the teller's name in the Teller Name drop-down field. |
| 5. | Select the Search prior weekday's date radio button to be able to search for transactions in the journal logs from all last week. If your institution does not keep teller logs for longer than one day, you will need to correct the transaction manually, as described in the Reversing Transactions topic. Note: If you also want to include today's transactions, don't use this radio button. Instead, select Search all dates or Search date indicated below and select the appropriate dates (include today's date) in the Date fields. |
| 6. | Click |
See the following example of these first steps:
Continue with the following steps:
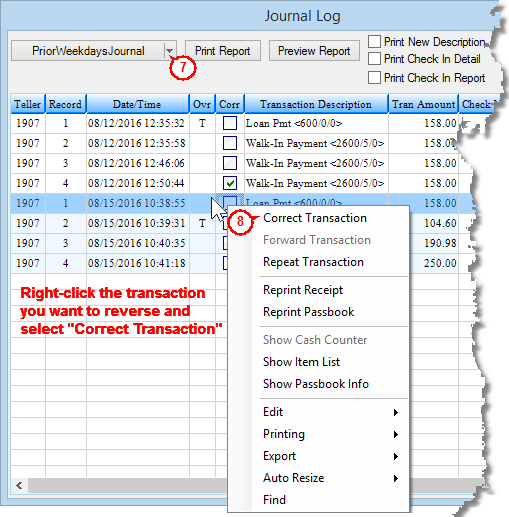
| 7. | Click the top-left drop-down arrow (labeled My Today's Transactions) and select the new selection you created in the steps above. In our illustration below, it's called "PriorWeekdaysJournal." The system will load all transaction log information from those dates/tellers. |
| 8. | Find the transaction you want to correct, right-click it, and select "Correct Transaction." |
| 9. | The transaction will then be displayed in CIM GOLDTeller with the Correction box already checked. Click |
See these steps illustrated below:
See the Reversing Transactions topic for more information.