|
MICR Check Field Descriptions |
  

|
Navigation: Teller System > CIM GOLDTeller Overview > CIM GOLDTeller Screen Details > Functions > Administrator Options > MICR Check Printing > Creating MICR Checks for Use in CIM GOLDTeller >
MICR Check Field Descriptions
|
MICR Check Field Descriptions |
|
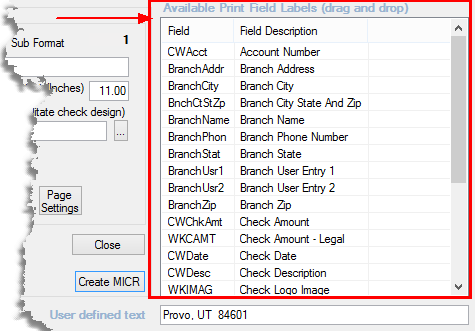
When creating MICR checks, several merge fields are available. This topic describes each of the merge fields and where the information is pulled. For more information about setting up MICR checks, see Creating MICR Checks for Use in CIM GOLDTeller. The following is an example of where the merge fields are found on the MICR Check Form Design screen:
Field |
Description |
|---|---|
CWAcct |
This is the account number for which you are running the transaction or Check Writer. Check Writer automatically appears after a transaction that requires money to go back to the customer, such as on a payoff or insurance cancellation. |
BranchAddr |
This is the branch address for the account for which you are running the transaction. This information is pulled once the transaction is run or the office or account number is entered in Check Writer. When the account involves the office number at the front (a two or four-digit number), the system pulls that branch's address information from the Functions > Administrator Options > PC Branch Settings screen.
For example, if the account number is 0002-0001230-07, "0002" is branch 2, and therefore, the address entered for branch 2 on the PC Branch Settings screen is pulled.
This is the street address. You would still need to add the BranchName and BnchCtStZp merge fields. |
BranchCity |
This is the city of the branch for the account for which you are running the transaction. This information is pulled once the transaction is run or the office or account number is entered in Check Writer. When the account involves the office number at the front (a two or four-digit number), the system pulls that branch's city information from the Functions > Administrator Options > PC Branch Settings screen.
For example, if the account number is 0002-0001230-07, "0002" is branch 2, and therefore, the city entered for branch 2 on the PC Branch Settings screen is pulled.
This is just the city name. You would still need to add the BranchName, BranchAddr, BranchSt, and BranchZip merge fields. Or rather than using this field, use the BranchCtStZp field, as described below. |
BranchCtStZp |
This is the branch's city, state, and Zip code. This is printed on one line, such as: Provo, UT 84601.
The system pulls that branch's city, state, and Zip code information from the Functions > Administrator Options > PC Branch Settings screen.
For example, if the account number being run is 0002-0001230-07, "0002" is branch 2, and therefore, the city, state, and Zip code entered for branch 2 on the PC Branch Settings screen is pulled. |
BranchName |
This is the branch's name. The system pulls that branch's name information from the Functions > Administrator Options > PC Branch Settings screen.
For example, if the account number being run on a transaction is 0002-0001230-07, "0002" is branch 2, and therefore, the name entered for branch 2 on the PC Branch Settings screen is pulled. |
BranchPhon |
This is the branch's phone number. The system pulls that branch's phone number information from the Functions > Administrator Options > PC Branch Settings screen.
For example, if the account number being run on a transaction is 0002-0001230-07, "0002" is branch 2, and therefore, the phone number entered for branch 2 on the PC Branch Settings screen is pulled. |
BranchStat |
This is the state of the branch for the account for which you are running the transaction. This information is pulled once the transaction is run or the office or account number is entered in Check Writer. When the account involves the office number at the front (a two or four-digit number), the system pulls that branch's state information from the Functions > Administrator Options > PC Branch Settings screen.
For example, if the account number is 0002-0001230-07, "0002" is branch 2, and therefore, the state entered for branch 2 on the PC Branch Settings screen is pulled.
This is just the state name. You would still need to add the BranchName, BranchAddr, BranchCity, and BranchZip merge fields. Or rather than using this field, use the BranchCtStZp field, as described above. |
BranchUsr1 |
This is a user-defined field determined by your institution. It could be a branch's slogan, or it could be the branch president's name. The system pulls this information from the Functions > Administrator Options > PC Branch Settings screen when the transaction is run. |
BranchUsr2 |
This is a user-defined field determined by your institution. It could be a branch's slogan, or it could be the branch president's name. The system pulls this information from the Functions > Administrator Options > PC Branch Settings screen when the transaction is run. |
BranchZip |
This is the Zip code of the branch for the account for which you are running the transaction. This information is pulled once the transaction is run or the office or account number is entered in Check Writer. When the account involves the office number at the front (a two or four-digit number), the system pulls that branch's Zip code information from the Functions > Administrator Options > PC Branch Settings screen.
For example, if the account number is 0002-0001230-07, "0002" is branch 2, and therefore, the Zip code entered for branch 2 on the PC Branch Settings screen is pulled.
This is just the Zip code of the branch. You would still need to add the BranchName, BranchAddr, BranchCity, and BranchSt merge fields. Or rather than using this field, use the BranchCtStZp field, as described above. |
CWChkAmt |
This is the amount of the check being paid to the customer via the Check Writer screen. |
WKCAMT |
This is the legal amount required on checks. It is the long-hand, written amount, such as "One hundred twenty-three dollars and 00/100." The system automatically pulls this amount from the amount on the Check Writer screen. |
CWDate |
This is the date the check was written to the customer. This amount is pulled when the Check Writer screen is processed for a customer. |
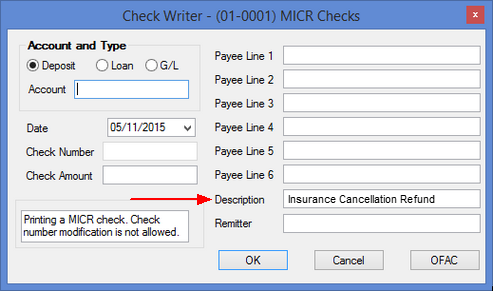
CWDesc |
This is the description of the check, as pulled after the Check Writer screen is processed from an account, as shown below:
|
WKIMAG |
Use this merge field to insert an image on your check. You can use your institution's logo, for example. For more information on inserting a logo on your checks, see the steps in the Creating MICR Checks for Use in CIM GOLDTeller. |
CWChkNum |
This is the check number for the check. If using MICR checks, this number is automatically assigned. See the Get Next Check Number topic for more information. |
CWPayee1 |
This is the customer for whom you are creating the check. This information is pulled from the Check Writer screen. You can add up to six payees on a check. |
CWPayee2 |
If this check format should include more than one payee, include this merge field as well as the CWPayee1 merge field. These are the customers for whom you are creating the check. This information is pulled from the Check Writer screen. You can add up to six payees on a check. |
CWPayee3 |
If this check format should include more than one payee, include this merge field as well as the CWPayee1 and CWPayee2 merge fields. These are the customers for whom you are creating the check. This information is pulled from the Check Writer screen. You can add up to six payees on a check. |
CWPayee4 |
If this check format should include more than one payee, include this merge field as well as the CWPayee1, CWPayee2, and CWPayee3 merge fields. These are the customers for whom you are creating the check. This information is pulled from the Check Writer screen. You can add up to six payees on a check. |
CWPayee5 |
If this check format should include more than one payee, include this merge field as well as the CWPayee1, CWPayee2, CWPayee3, and CWPayee4 merge fields. These are the customers for whom you are creating the check. This information is pulled from the Check Writer screen. You can add up to six payees on a check. |
CWPayee6 |
If this check format should include more than one payee, include this merge field as well as the CWPayee1, CWPayee2, CWPayee3, CWPayee4, and CWPayee5 merge fields. These are the customers for whom you are creating the check. This information is pulled from the Check Writer screen. You can add up to six payees on a check. |
CWRemitter |
This field would be used for cashier's checks. The remitter is the person who wrote and signed the check, or your institution. Not all checks require a remitter line. Use your institution's standards to determine whether or not to include this merge field on checks. This information is pulled from the Check Writer screen. |
See also: