|
Create MICR Line |
  

|
Navigation: Teller System > CIM GOLDTeller Overview > CIM GOLDTeller Screen Details > Functions > Administrator Options > MICR Check Printing > Creating MICR Checks for Use in CIM GOLDTeller >
Create MICR Line
|
Create MICR Line |
|
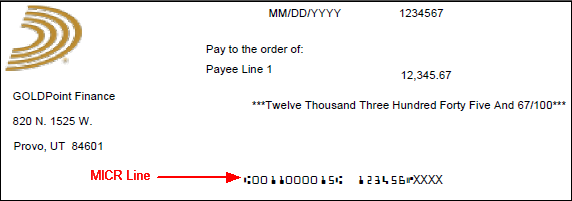
Every check needs a MICR line, which is the line used to uniquely identify the bank and account number where the check comes from. MICR checks require special fonts to be downloaded to your PC, as well as special printers. If you are using CIM GOLD version 7.5.9 or above, the MICR font is included with your download. Government regulations require that MICR fonts meet ANSI and ABA (X9.27-1995) banking standards. If you do not currently have this font loaded on your PC, you will not be able to print MICR checks.
The following is an example of where MICR lines are found on checks:
To include the MICR line on a check format:
1.Click ![]() on the MICR Check Form Design screen. Note: You may need to click
on the MICR Check Form Design screen. Note: You may need to click ![]() first before the
first before the ![]() button becomes file maintainable. The Routing Selection dialog box is displayed, as shown below.
button becomes file maintainable. The Routing Selection dialog box is displayed, as shown below.
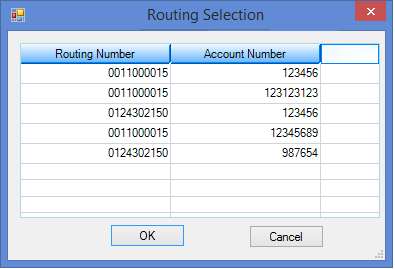
2.Select which routing and account number you want to use with these checks. The routing and account number are pulled from the GOLD Services > Office Routing Info screen.
3.Click <OK>. The Create MICR Line dialog box is displayed, as shown below:
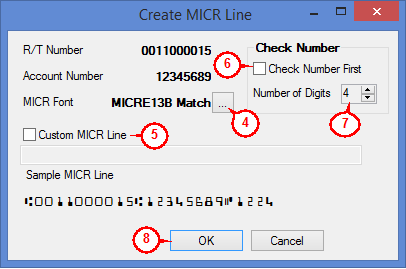
4.Click the browse icon ![]() and select the MICR font you use to print checks. If a MICR font is not listed as one of the font choices, you need to add it by downloading it to your Windows font folder. Contact your GOLDPoint Systems account manager if you need help finding a good font to use. If you are using CIM GOLD version 7.5.9 or above, the MICR font is included with your download. Note: You can modify the font size as well, if needed.
and select the MICR font you use to print checks. If a MICR font is not listed as one of the font choices, you need to add it by downloading it to your Windows font folder. Contact your GOLDPoint Systems account manager if you need help finding a good font to use. If you are using CIM GOLD version 7.5.9 or above, the MICR font is included with your download. Note: You can modify the font size as well, if needed.
5.If you want to create a custom MICR line, click the Custom MICR Line box and then enter the routing and account number you want to use for the MICR line in the field below the Custom MICR Line checkbox.
6.If you want the next available check number to come before the routing and account numbers, check the Check Number First box.
7.If the checks you are using have a different number of digits for the Check Number besides 4, enter that number in the Number of Digits field.
8.Click <OK>. The MICR line will be displayed on the check grid of the MICR Check Form Design screen.
9.Drag and drop the MICR line to where you want it to be on your checks.