Import Checks |
  

|
Navigation: GOLD Services Screens > Check Reconciliation Screen Group > Check Detail Screen > Search fields > Buttons/Dialogs >
Import Checks |
|
If your institution has external check records that you would like to upload into CIM GOLD's Check Reconciliation system, you can do so using the Check Detail screen. In order for the system to upload information to Check Reconciliation, however, your file first needs to be formatted appropriately.
Any data-processing program that creates tab-delimited files, such as Microsoft® Excel®, will work for saving your check information that can later be uploaded into CIM GOLD. Each column in your file should contain specific check information that matches up with CIM GOLD's Check Reconciliation system. Your file must be laid out with the following columns in the following order.
|
Note: If you do not set up your file with this specific layout, your information will not be uploaded correctly. |
|---|
Column |
Description |
Column 1 |
Check Number |
Column 2 |
Status (see note below) |
Column 3 |
Source |
Column 4 |
Issued Amount |
Column 5 |
Issue Date |
Column 6 |
Description |
Column 7 |
Payee |
Column 8 |
Cleared Account |
Column 9 |
Cleared Date |
Column 10 |
Voided Date |
Column 11 |
Originating Office/Branch |
Column 12 |
Type |
Column 13 |
Office Number |
Column 14 |
Account Number |
Column 15 |
Check Digit |
Column 16 |
Date of Transaction |
Column 17 |
Time of Transaction |
Column 18 |
Recon Trace Number |
Column 19 |
Cross Reference Check Number |
Column 20 |
Office Number of the Cleared Check |
Column 21 |
Account Number of the Cleared Check |
Column 22 |
Check Digit Number of the Cleared Check |
You can enter the headers for the columns, such as Check Number, Source, etc., for reference, but when you are ready to save the file and upload it to CIM GOLD, you should delete the header row.
|
Note: Only checks with the following status codes can be imported into Check Recon: Outstanding (O), Cleared (C), Voided (V), Cross Referenced (X), and Stopped Payment (S). Additionally, specific information for each of the statuses must be included or the system will return an error when uploading into CIM GOLD. The following table explains which information must be included with each status.
Additionally, you can update check records already saved in Check Recon by importing new check information data; however, the current status of those checks must be Outstanding (O) or Stop Payment (S), and they can only be updated with the status of either Cleared (C), Void (V), or Cross Reference (X). Checks with a Cleared, Void, or Cross Reference status cannot be updated by using the <Import Checks> function.
The Issued Date and Issued Amount fields on checks currently in Check Recon cannot be file maintained by importing information. Fields not listed above as required can be left blank in the import file without any adverse effects. If non-required fields are populated in the import file, and the corresponding fields in Check Recon are also populated, the information in the import file will overwrite the fields in Check Recon. If the same check information is imported more than once, the system will create an additional sequence of the check rather than updating or overwriting the existing check. |
|---|
The following steps explains how to set up and save check information in Excel 2010, and then upload that information into Check Recon.
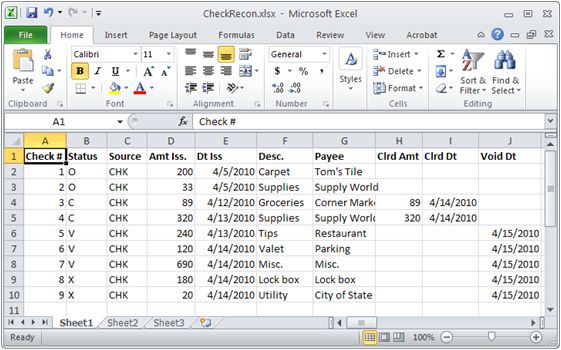
1.Type or copy and paste the check information in the appropriate cells in Excel. See the following example.
2.If you included a header row, as shown in row 1 in the example above, right-click on the row, select "Delete," and then select the Entire Row radio button and click <OK>. The header row will be deleted.
3.Click the File tab and then select "Save As." The Save As dialog appears.
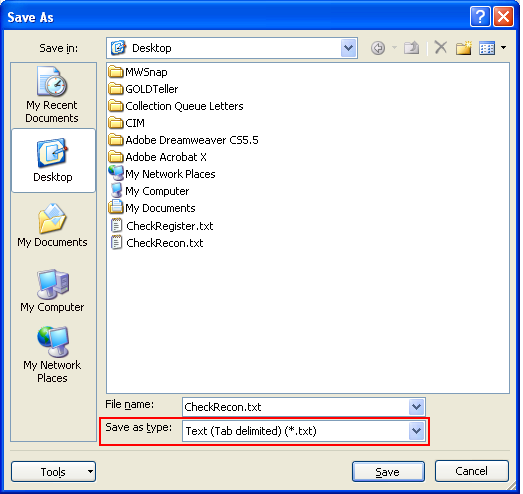
4.Type a name for your file in the File name field, and in the Save as type field, select "Text (Tab delimited)(*.txt)" as shown in the following example.
5.Click <Save> and close out of Excel.
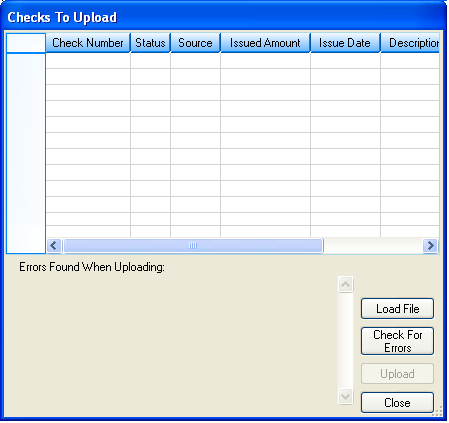
6.On the GOLD Services > Check Reconciliation > Check Detail screen in CIM GOLD, click <Import Checks>. The following dialog appears:
7.Click <Load File>. The Open dialog appears.
8.Find and select where you saved your Excel text file, then click <Open>. The system will return you to the Checks To Upload dialog and the check information will be uploaded into the table on that dialog.
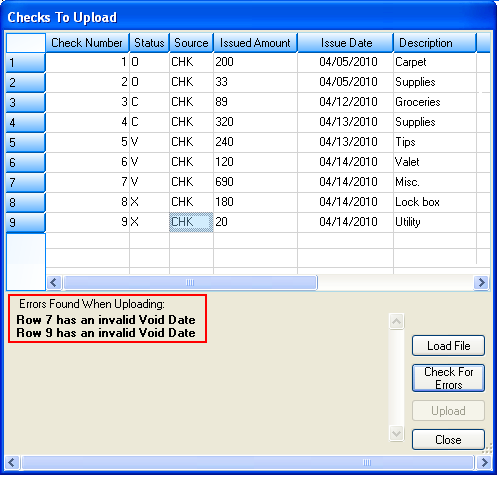
9.If any errors exist, they will appear under the Errors Found When Uploading section, as shown below. You can manually fix those errors on the Checks To Upload dialog, or you can go back into Excel, fix the errors from there, then repeat steps 3-8 above.
10.Click <Check For Errors> to see if all the errors have been fixed. If nothing appears under the Errors Found When Uploading section, the file is error-free, and you can now upload the file.
11.Click <Upload>. A message will appear indicating the upload has been completed. The check information is now saved in Check Recon.