The Report Wizard Step 3: Create Work Field Columns |
  

|
Navigation: How to > The Report Wizard >
The Report Wizard Step 3: Create Work Field Columns |
|
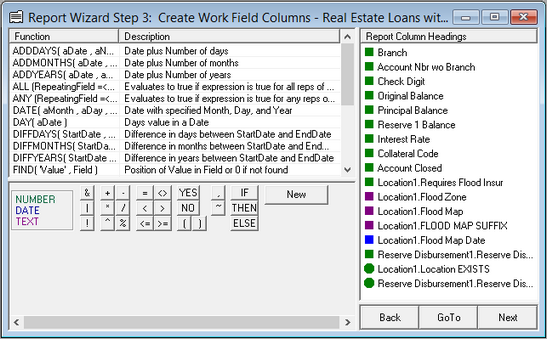
Step 3 of the Report Wizard allows you to create and edit additional work field or calculation columns on a report. Twenty pre-defined functions are available to use in your calculations or work fields. There are also 21 operators to perform arithmetic and comparisons, and three choices of what type of data the result will be. Work fields are needed when you want to use two or more mnemonics in creating a new calculation or when you want to edit the results of a single mnemonic. Note: If you don't need special calculations on the report, you can skip this step and proceed to the next step. (Click the <Next> button or <GoTo> button at the bottom of the screen.)
See the following example of this screen:
The following steps explain how to complete Report Wizard Step 3.
| 1. | To create a new column, click <New> in the bottom-middle pane. |
| An incomplete sentence will appear in the gray area below the functions. (See the following example.) |
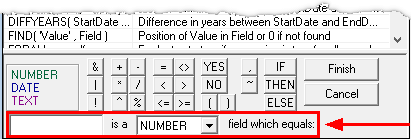
| 2. | Complete the sentence by typing a name in the blank box, and then choosing a field type from the drop-down list. The name you choose will be the column heading on the report and the name of your calculated work field. |
•The name must begin with a letter.
•Spaces are allowed, but no punctuation is allowed.
•The name can be no longer than 20 characters.
•It cannot be the same name as one of the functions names (displayed in the Function column), nor the same as one of the field names already displayed in the Report Column Headings pane.
| Examples of valid field names could be My Calculation, Avg Weighted Rate, Days Negative, etc. |
| Examples of invalid field names might be P/I Payment (no special characters (such as /, -, +, etc.) allowed), 1Field (must begin with a letter), ThisIsMyReallyLongField (longer than 20 characters), or Date (same name as one of the functions). |
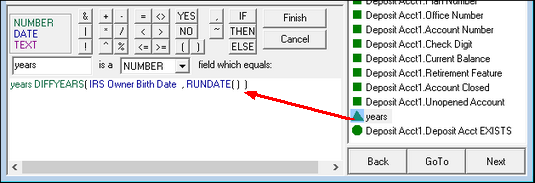
| 3. | Enter the equation, (that will be used to create a workfield), in the open space at the bottom of the pane. You can create the equation using fields from the Report Column Headings box, the operator buttons, and the functions listed in the Function box. |
•To enter a field name, click on the field with the mouse. (You can also type the formula using the keyboard.)
•To enter operators (e.g., =, +, -) click on the appropriate button. Also see the Definition of all Operators section for definitions of all operators.
•To enter a function, double-click on the function name.
| Most functions contain parameters enclosed within parentheses. These parameters should be replaced with appropriate values or field names. The easiest way to do this is to double-click on the parameter to be replaced, and then click on any field in the Report Column Headings box to replace it. Functions without parameters must still be followed by parentheses. To see a definition of all functions, see the Definition of all Functions section. |
| 4. | After the equation is complete, click <Finish>. |
| The newly created work field column will appear in the list of fields in the Report Column Headings box. The new column will have a triangle icon |
If you are viewing a report that has already been set up and want to see how a work field is calculated, double-click the work field under the Report Column Headings, and the calculation will be displayed in the box to the left, as shown below.
 |
When you have created and edited the work field columns you want to see on your report, click <Next> in the bottom right corner of the screen. Step 4 of Report Wizard will appear.
See also:
Appendix A - Special Calculations
Appendix B - Special Loan Field Mnemonics