Navigation: How to > The Report Wizard >
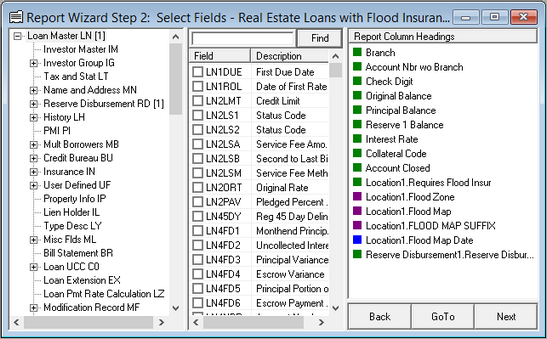
Step 2 of the Report Wizard allows you to select the records and fields you want to see when you run the report. When a record or a field has a possibility of multiple occurrences, you can choose how many times a record or a field will repeat in each report line. The following steps explain how to complete Report Wizard Step 2, as shown below.

1.In the left pane, the master record you have chosen in Report Wizard Step 1 will appear, with a tree structure of the other available records that can be combined below it. To see sub-records, click on the <+> sign to the left of the main records. Right-click on any of the records to select the number of occurrences of that record you would like to see in the report.
| As you highlight any item in the tree structure, new database fields will appear in the center pane based on the record selected. You need to proceed through all three steps in the left pane if you want to use any fields in the Report Column Headings pane on the right. |
| 2. | To see a list of fields available for a record, click on the record. The center pane will fill with the fields available from this record. |
 |
Tip: Most fields within CIM GOLD are tied to a mnemonic. If you don't know a mnemonic for a field, you can quickly find it by going to the CIM GOLD screen the field is on and use the <F1> field help. The field name and mnemonic are displayed at the top of the field help. You can also set your user preferences option to display the field mnemonic when you hover your cursor over a field. This is set in Options > User Preferences, Enable Tool Tip Pop-up Help. See the following example of the pop-up mnemonic next to a field:
|
|---|
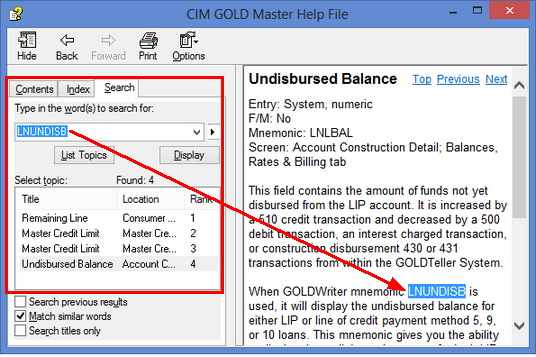
| You can also search for the mnemonic dictionary in the CIM GOLD Master Help. To search for a mnemonic, select "Master Help Search" from the Help menu, then click the Search tab, and enter the mnemonic you want to search for in the provided field, as shown below. Click <Display> to see a list of places in CIM GOLD where that mnemonic is referenced. |

| 3. | Place a check in the box to the left of each field name you want to appear on the report, or highlight it and press the space bar. If you cannot find a field, use the Find field at the top of the center pane. Enter any part of the field mnemonic or the description and the field will be highlighted. If it is the desired field, press the spacebar and the field will be added. The field name will now appear in the Report Column Headings box, with a colored square icon to the left of the field name. Number icons are green, date icons are blue, and text icons are purple. |
| When you click on any column heading in the Report Column Headings box, the source record and field will appear highlighted in the left and center panes. |
| When you are finished selecting all the fields you want to use on your report, click <Next> in the bottom-right corner of the screen. Step 3 of Report Wizard will appear. |
 |
Note: If you intend to use some fields in your calculations but do not want to see these fields displayed on the report, they must still be selected in this step. What is shown on the report will be defined in a later step in the Report Wizard. |
|---|
See also:
Appendix A - Special Calculations