Tying Data Source Files |
  

|
Navigation: GOLD EventLetters Setup Procedures >
Tying Data Source Files |
|
The following instructions describe how to use the Mail Merge function in Microsoft® Word 2010 to tie the data source files generated by GOLD EventLetters into letters you create in Word to be sent to your customers.
The data source file is where the loan fields are stored. The data source file is generated by GOLD EventLetters when you log on to that program and download the day's events. You must first download events in GOLD EventLetters before you can proceed with the steps outlined in this section.
There is one data file for each event. Each file (event) has specific fields available that can be used in the event letter. For example, loan event 1 is an ARM event. The data file has fields used specifically for ARM adjustments such as the next P/I, the amortized principal balance, date of next rate change, etc. Many fields are calculated in the "afterhours" process. Appendix A lists all common fields available for each loan event, as well as each field available for each of the loan events. The Deposit Event Descriptions section lists all fields for deposit events.
You can modify existing letters already on your PC or create new letters. As you create the letter and save it, or if you modify an existing letter already on your PC, save the letter to the "Merge Letters" folder in the following location: C:\Program Files (x86)\FPSGOLD\GOLDEventLetters\EventLetterFolders\MergeLetters. Then you can print the letters using GOLD EventLetters.
The following steps will explain how to tie a new or existing letter to its merge fields.
1.Open Microsoft Word from the Start menu or your desktop. Microsoft Word will open with a blank document.
2.Click the Mailings tab, then click Select Recipients, and then select "Use Existing List."
The Open Data Source screen will appear.
3.In the Look in field at the top of the Open Data Source screen, navigate to the following location (for Windows 7 or higher):
C:\Program Files (x86)\FPSGOLD\GOLDEventLetters\EventLetterFolders\DataSourceFiles
4.Click the down arrow in the Files of Type field at the bottom of the Open Data Source screen, and select "All Files." All the events generated by GOLD EventLetters will now appear (see following example).
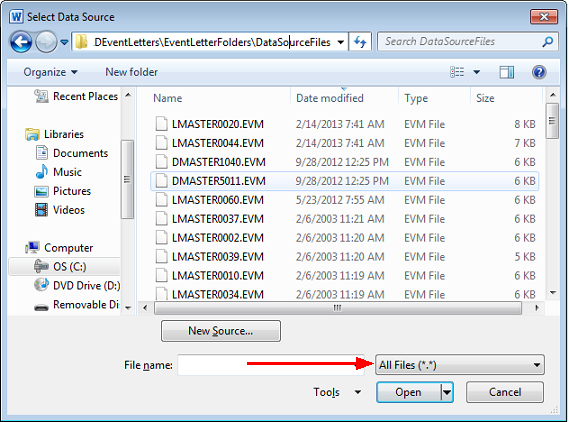
LMASTERXXXX.EVM or DMASTERXXXX.EVM
•"D" or "L" represents the event system from where you are working. "D" is for deposits, and "L" is for loans.
•Following the word "MASTER" in the file name, the next four characters represent the event number.
•The file extension, ".EVM", represents an event letter master source file.
 |
Tip: If you want to use a data source file of your own making (from an Excel file, Report Writer, GOLDWriter data files, etc.), see Copying Events. |
|---|
5.Double-click on the data source file (the event) you want to use. You will be returned to the blank Word document, and the Insert Merge Fields drop-down list will be file maintainable on the Mailings tab, as shown in the following example.
6.If you are beginning a new letter, you would begin the letter at this point. Once you are ready to insert a merge field, proceed to the next step.
If you are using an existing letter, place the cursor at the desired insertion point, and then proceed to the next step.
7.Click the Insert Merge Field drop-down list located on the Mailings tab. A list of fields available for that event will appear, as shown in the previous example.
8.At the desired insertion point in the letter, select the first field you want from the Insert Merge Field drop-down list. When you select the field, the system will automatically place the field in the letter for you. Continue inserting fields in your letter, wherever needed, until you are finished. For an example of a finished letter, see Finished Letter.
Remember: Merge fields displayed in this list view are tied to specific events. If a field you want to use is not listed, you will need to talk to your GOLDPoint Systems account manager and ask about programming more fields for particular events.
9.Save the finished letter that includes the merge fields in the Merge Letters folder by choosing "Save As" from the File menu.
For Windows 7 and above users, the Merge Letters folder is located at:
C:\Program Files (x86)\FPSGOLD\GOLDEventLetters\EventLetterFolders\MergeLetters
You may want to include the event record number in the drop-down File name field. For example, if you were finishing an event letter that welcomed new loan customers (event 21), you would enter “E21 L00 Welcome Letter” for the name of the letter.
10.Close Microsoft® Word by clicking the X in the upper-corner of the application.
Now you are ready to assign the merge letter to a specific event.
See also: Past Due Notices