Setting Up the GOLD EventLetters System |
  

|
Navigation: GOLD EventLetters Setup Procedures >
Setting Up the GOLD EventLetters System |
|
Setting up the GOLD EventLetters process takes a few steps, and once you have completed the setup, there are only a few occasions when you may have to repeat some of the steps. Those occasions are:
•If you need to create a new merge letter file.
•If you need to change or add a letter-to-data file assignment.
Please see Tying Data Source Files to Event Letters for information on how to create or change your letters or their assignments.
Before using GOLD EventLetters for the first time, some options need to be set up on your PC. Once these options are set up on a PC, you do not need to set them up again on that PC.
NOTE
Your institution must have the Event Letter Report (FPSRP175) set up for the data file to be created for the Loan system, and the Deposit GOLD EventLetter Report (FPSDR500) for the Deposit system. If you do not have these reports set up, please submit a work order. For more information concerning specific needs of the Loan and Deposit systems with regards to GOLD EventLetters, see:
For deposit event letters, Job Control Language (JCL) also needs to be added to the afterhours. A work order must be sent to GOLDPoint Systems to have the report and JCL set up for your institution.
GOLD EventLetters will automatically delete event records more than seven days old and event records created the same day when a re-run occurs, and write an account file maintenance record for each event. |
To set up these options on your computer, follow the steps below:
1.Select “Event Letter Options” from the Options menu. The options dialog will appear as shown below.
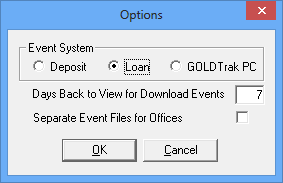
2.Verify which system you want to pull event letters from by selecting either the "Deposit," "Loan," or "GOLDTrak PC" radio buttons. Depending on which system you select, only event letters from that system will be available to download in GOLD EventLetters.
3.The Days Back to View for Download Events field on the Options dialog allows you to select how far back in history you want to download events. You can select a number from “1” to “7.” This option resides on your computer, so it will be different for each user.
4.If you want to separate event files into their respective offices, click the Separate Event Files for Offices checkbox on the Options dialog.
5.Select <OK> to update GOLD Event Letters.
Now you are ready to set up where you want event letters to be downloaded. The following steps explain how to do this.
6.Select “Folders” from the Options menu and the Folders dialog will appear as shown below (see description of each of the folders following the screen example).
7.Names and paths for five folders will be displayed. These folders and paths were created during the installation process. These paths are the folders where your data source files will be sent, and where you will save your letters and log files. You may change the path, including changing the path name, to a folder found on your network. However, if you share event letter files amongst many computers at your institution, some additional setup is required. See Sharing the Assign Event Letters List for more information.
8.Verify that the paths for each folder are correct and click <OK>.
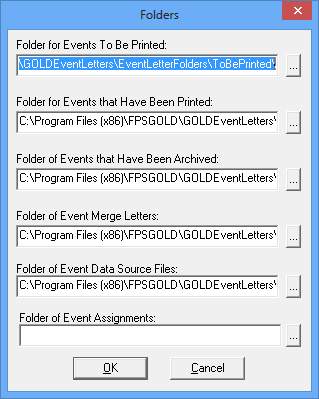
See the following descriptions of the five folders:
Folder |
Description |
|---|---|
Folder for Events to Be Printed: |
This is where you will save the Microsoft® Word letter that you created and merged with data source files downloaded from GOLD EventLetters. See Printing and Saving Event Letters for more information. |
Folder for Events that Have Been Printed: |
Once letters have been printed for events, this folder displays a log of all the events that were printed on a given day. |
Folder of Events that Have Been Archived: |
If you move events from the Events that Have Been Printed list to the Archived Events list on the Print Event Letters screen, this folder displays the log that was previously in the HaveBeenPrinted folder. |
Folder of Event Merge Letters: |
This is the folder to where you will save event letters when you initially create them in Microsoft® Word. You need to create merge fields where the finished data will go, such as customers' names, account balances, etc. The merge fields are pulled from the data source files (see below). These letters will later be assigned to specific events in GOLD EventLetters. See Tying Data Source Files and Assigning Merge Letters to Events for more information. Any letter you create must be saved in this folder. Otherwise, the event letter process will not work. |
Folder of Event Data Source Files: |
This is the source directory of event letter data files that will be the default "data source" for your word processor merge letter files. This is where the data (fields) to be merged into the letters are stored. You must first download events from GOLD EventLetters before they will be displayed in this folder. See Downloading Event Records for more information. |