Navigation: Working with GOLD EventLetters >
Once you have created your letter in Microsoft Word (as explained in the Tying Data Source Files to Event Letters help), you can tie a specific letter to the event number and event letter number you want using GOLD EventLetters. The following steps explain how to do this.
Note: If sharing one directory for letters amongst many computers at your institution, see Sharing the Assign Event Letters List for setup procedures to ensure all computers see the same event letters.
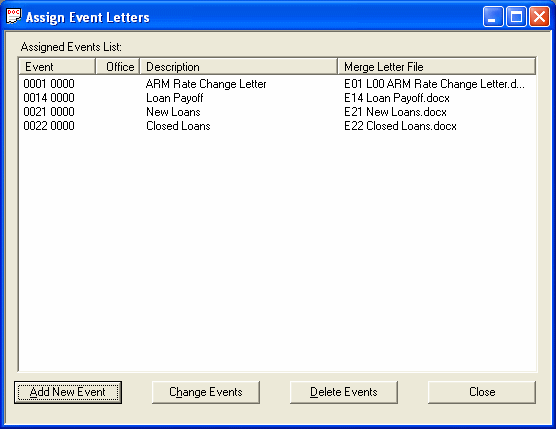
1.From the Functions menu in the GOLD EventLetters system, select “Assign Event.” You can also click the Assign Events icon found on the toolbar ![]() . The Assign Event Letters screen will appear displaying the event and letter numbers that have already been assigned or “tied to” a specific merge letter. (If none have been assigned, the Merge Letter File column will be blank.)
. The Assign Event Letters screen will appear displaying the event and letter numbers that have already been assigned or “tied to” a specific merge letter. (If none have been assigned, the Merge Letter File column will be blank.)

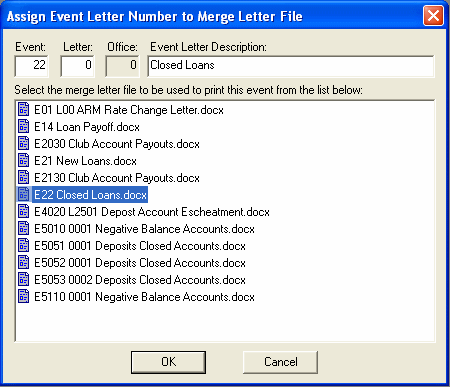
2.Click <Add New Event> or <Change Events>. The Assign Event Letter Number to Merge Letter File screen will appear (as shown below).

3.Type the needed data in the Event, Letter, Office, Event Letter Description fields at the top of the screen.
Note: The Office field will only be file maintainable if you have the Office option set on the Options dialog (select "Event Letter Options" from the Options menu). See the Setting Up the GOLD EventLetters System help section for more information on the Options dialog.
4.From the Select the merge letter file to be used to print this event from the list below field, highlight a merge letter file by left-clicking on one from the list.
Note: You should have already created a letter before these steps, using Microsoft Word®, as explained in the Tying Data Source Files to Event Letters help.
5.Click <OK>. This returns you to the Assign Event Letters screen.
You can continue to add new events or change event assignments from the Assign Event Letters screen by clicking <Add New Event> or <Change Events>.
6.The next step is to print the available letters found on the Print Event Letters screen. This process is explained in the Printing Event and Saving Event Letters help.
See the examples of a letter with the merged fields and a letter with data filled in.
See also instructions and examples of a 3-Up letter.