Step 2 - Select Fields |
  

|
Navigation: Miscellaneous Screens > Advertising Messages Screen Group > Advertising Message Screen > Using the Advertising Message Screen > Create the GOLDWriter Report for Your Advertising Message >
Step 2 - Select Fields |
|
1.Select the fields that will be used to identify which accounts should receive this advertising message. For example, in Step 1 we searched within the “Loan Master LN” record, as is shown on the left-hand side of the diagram below.
2.To select a field for the report, check the box in front of the mnemonic and description of the field you want included on the report. The field will then be displayed in the Report Column Headings window. In the example below, we chose the Account Number with Branch, Branch, Advertising Code, Principal Balance, and Date Opened.
|
Note: You must include the Advertising Code field in order for the advertising message to be displayed on the report. |
|---|
3.Click ![]() .
.
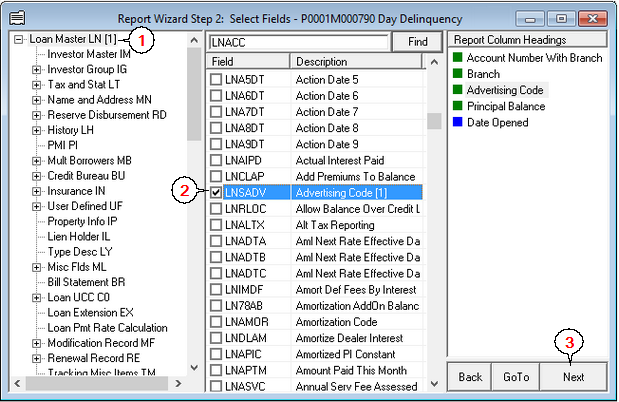
In the above example, Account Number with Branch and Branch have been selected, because we want only accounts at a certain branch to receive this advertising message. This Branch field will be used in Step 4 of this report when we enter the logic to tell the system how to determine which accounts should receive this message. The Advertising Code is also extremely important for this report as it will be used in the logic portion of this report to tell the system to only generate an advertisement for borrowers that you would like to receive advertisements.
The remaining fields shown, Principal Balance and Date Opened, are optional fields that can be selected depending on what you would like to show on the report.
After you have selected all the fields that you would like, click <Next> to move to Step 3 – Create Work Field Columns.