File Access Security Setup screen |
  

|
Navigation: File Services Plus > Settings > Image Options field group >
File Access Security Setup screen |
|
Use this screen to control which users can view certain kinds of documents through File Services Plus. If your institution requires file access security, it can be established here. This screen is accessed by clicking <Manage File Type Security> in the Image Options field group on the Settings screen.
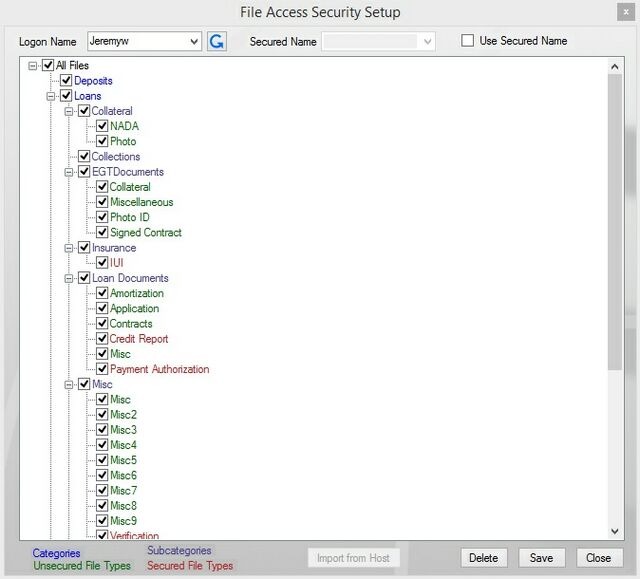
Using the fields on the top of this screen in conjunction with the color-coded list, security access can be assigned to either a CIM GOLD user name or a common security created specifically for this screen.
To assign security to a name:
1.Leave the Use Secured Name field blank.
2.Select the desired logon name from the drop-down list or enter the logon name into the Logon Name field.
3.Mark boxes in the list to determine which Categories (blue), Subcategories (purple), and File Types (green for unsecured, red for secured) the selected logon name is allowed access. If you mark or unmark a Category, all Subcategories and File Types within that Category will follow suit. If you mark or unmark a Subcategory, all File Types within that Subcategory will follow suit. unsecured File Types (in green) will always be accessible, regardless of their status on this screen. For example, a small institution chooses to assign each individual user his or her own security. This institution would always leave Use Secured Name blank and, for each employee that needs access, assign security to each Logon Name by marking appropriate boxes in the list.
4.Click <Save>.
To use a common security:
1.Mark the Use Secured Name field. When this field is marked, the list will show the checkboxes associated with the secured name, but the checkboxes will not be alterable. You can only alter checkboxes when the Use Secured Name field is not marked.
2.Select the desired logon name from the drop-down list or enter the logon name into the Logon Name field. For example, a large institution would like to create security profiles and assign security by roles (such as Teller, Loan Officer, etc). This institution would create security for new Logon Names (such as "All Tellers," "Loan Officers," etc) by marking the appropriate boxes in the list and saving them. Once these profile logon names are created, the institution would then mark the Use Secured Name field. The logon name would then be entered for each user, and the appropriate profile name would be selected from the Secured Name list.
3.Select the common name you want to use from the Secured Name drop-down list and click <Save>.
Logon names can be deleted by selecting the desired name from the Logon Name field and clicking <Delete>.
Categories, Subcategories, and File Types can all be designated as secured or standard. If the properties desired are not available, new properties can be created on the Manage Categories, Sub-Categories, and File Types screens.