Navigation: Loans > Loan Screens >
The purpose of the Contract Collection screen is to allow your institution to collect contracts for individuals. Monies received from the loan payments can be disbursed to the contract holder or to other individuals or institutions at the contract holder’s request. The monies can be disbursed by check, loan payment, or savings deposit both within the institution and through ACH. Service fees can also be collected out of loan payments for servicing the loan. Reports of disbursements are provided as needed.
The list view at the top of this screen displays information about all contract collections that have previously been set up by your institution. The fields and tabs on this screen are only available for file maintenance if a contract is selected in this list view or is being created. See below for more information about setting up contracts on this screen.
Use this screen to set up seller and recipient records for loan contracts. A seller record should be set up for each individual who owns a portion of the loan. Likewise, a recipient record must be set up for each recipient.
•To learn more about the vocabulary used in help for this screen, see the Contract Collection Terms help page.
•To learn how to set up contract collections, see the Contract Collections Setup help page.
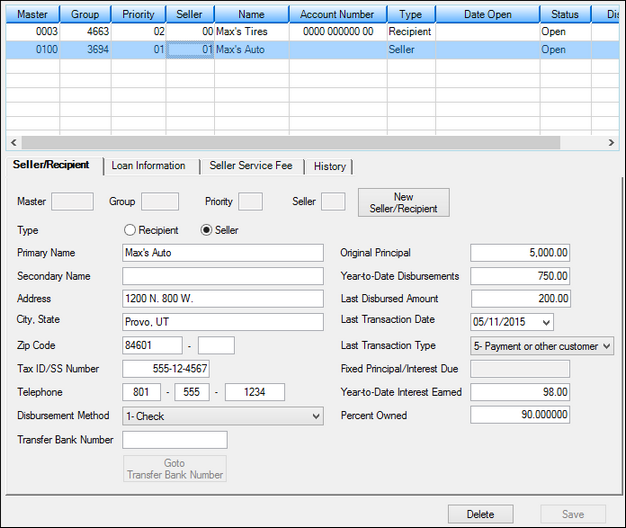
After clicking ![]() , you need to select either the Recipient or Seller radio button, depending on which record you are setting up. See the following example of this screen with a Seller record set up:
, you need to select either the Recipient or Seller radio button, depending on which record you are setting up. See the following example of this screen with a Seller record set up:

Loans > Contract Collections Screen
This screen works in conjunction with the Loans > Investor screens. The first step in setting up a seller or recipient is to create a unique seller/recipient number. First click ![]() , and then enter information in the following fields:
, and then enter information in the following fields:
Master: This is the master record number of the master set up to represent all Contract Collection loans (90 is suggested). You must first set up the master number on the Loans > Investor Reporting > Investor Master screen.
Group: This is the group number of the group used to set up the group record to represent all sellers and recipients for this Contract Collection loan. GOLDPoint Systems suggests using the last four digits of the loan number. You must first create this group using the Loans > Investor Reporting > Investor Group screen.
Priority: This is the priority designation this seller or recipient has when funds from the loan payment are disbursed to sellers and recipients.
Seller: This is the number given to a seller or recipient to designate the sequence of disbursements within the same priority level.
GOLDPoint Systems recommends using priority and seller/recipient numbers by tens rather than by ones. This will facilitate entering new sellers and recipients at a later date. Example: Seller 90_1234_20_15 can be added between seller 90_1234_20_10 and seller 90_1234_20_20.
All seller records must have a lower priority than all the recipient records for the same contract collection loan. If a recipient record has a lower priority than any seller, that recipient will not receive any disbursements. The following is an example of a priority level setup.
|
Priority Level |
|---|---|
Recipient 1 |
90_1234_10_10 |
Recipient 2 |
90_1234_20_10 |
Recipient 3 |
90_1234_20_20 |
Seller 1 |
90_1234_50_10 |
Seller 2 |
90_1234_60_10 |
Seller 3 |
90_1234_60_20 |
Changing From Seller To Recipient
To change the screen from a seller screen to a recipient screen, select the record in the top list view, then select the Recipient radio button and click <Save>.
|
WARNING: If this is done while on a completed seller screen, the information on that screen will be changed from seller information to recipient information. This should only be done on a blank screen (by clicking <New Seller/Recipient>) when entering new data. |
|---|
The tabs on this screen are as follows:
|
Record Identification: The fields on this screen are stored in the CFCN record (Contract Collections Seller). You can run reports for this record through GOLDMiner or GOLDWriter. See CFCN in the Mnemonic Dictionary for a list of all available fields in this record. Also see field descriptions in this help manual for mnemonics to include in reports. |
|---|
In order to use this screen, your institution must:
•Subscribe to it on the Security > Subscribe To Mini-Applications screen.
•Set up employees and/or profiles with either Inquire (read-only) or Maintain (edit) security for it on the CIM GOLD tab of the Security > Setup screen.
•Set up the desired field level security in the CFCN records on the Field Level Security screen/tab. |