Navigation: Queue Screens > Contact Queues Screen Group > Definition Screen >
Use the Contact Queues Definition screen to assign employees to specific queues. Only supervisors will be able to access this screen; employees will use the Contact Queues screen to record their contact activity with customers.
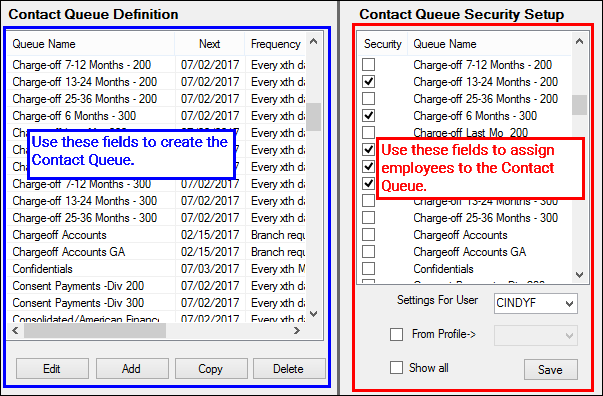
After you have created contact queues using the Contact Queue Definition fields on the left part of the screen, use the right part of the screen, as shown below, to set up which employees will have access to specific contact queues.

To assign employee to contact queues:
1.Manually type the user name of the employee in the Settings For User field. The user name must match the User Name field on the Security > Setup screen for that employee. If you are editing (not creating) an employee's queue access, select the user name from the Settings For User field. Once a name has been manually entered and saved, the name will always exist in this drop-down list.
|
Tip: You can create a profile name and then tie all employees to that profile. For example, you could create a setting named "Welcome" in the Settings For User field, then select all the queues for that profile from the Queue Name list above these fields. Queues that might fit in with the "Welcome" profile could be "New Loans" or "New Customers."
Once you have the setting for the profile created, you can then create users (employees) and assign those employees to the "Welcome" profile, as explained in step 3 below. |
|---|
2.Check the Security box next to the queue names you want the employee to have access to in the list above. If you are setting up the employee with a profile, skip this step and move to step 3.
3.If you are setting up an employee to have the same settings as another user or a profile, check the From Profile box, then select the profile or employee name from the field to the right. You will notice that the Queue Name list above is grayed out, and you cannot make any selections. That's because the system will use the selections already set for the profile (see TIP above).
4.Click <Save>. The next time the employee logs onto CIM GOLD, they can navigate to the Contact Queues screen, and the queues they've been assigned to will be displayed.