Navigation: Notification System > Triggers Screen > Triggers Screen Details >
Use the Manage tab to build and manage notification triggers.
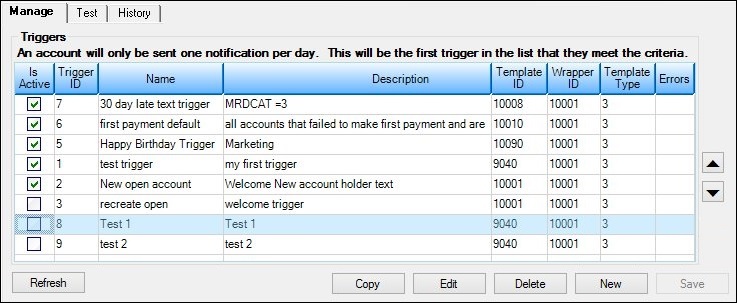
See the following examples of this tab followed by field and button descriptions.

Manage Tab
Field |
Description |
|---|---|
The Manager Triggers list view displays all of the notification triggers set up for your institution. Double-click on a trigger in this list view to open the Trigger Definition Builder dialog and view all of the details for the selected trigger.
To activate a trigger, check the Active field in the Is Active column of the Manage Triggers list view. To inactive a trigger, remove the check from the Active field.
The following columns display information in the Manage Triggers list view and can be used to sort: •Active: Check this field to activate the trigger. Remove the check from this field to make the trigger inactive. •ID: Displays the identification (ID) number of the trigger. •Name: Displays the name of the trigger. •Description: Displays a description of the trigger. •Template ID: Displays the identification (ID) number of the template used by the trigger. •Wrapper ID: Displays the identification (ID) number of the wrapper used by the trigger. •Template Type: Displays the type of template used by the trigger. •Errors: Displays the errors with the trigger (if applicable). |
Button |
Description |
|---|---|
Click this button to refresh the Manage Triggers list view. |
|
Select a trigger in the Manage Triggers list view and click this button to copy that trigger's information to create a new trigger. |
|
Select a trigger in the Manage Triggers list view and click this button to modify the selected trigger. |
|
Select a trigger in the Manage Triggers list view and click this button to delete the selected trigger. |
|
Click this button to create a new trigger. |
|
Click this button to save any changes you've made to the Manage tab. Note: This button must be clicked to save changes, even if you have clicked the <Save> button on the Trigger Definition Builder dialog. |
See also: